One of the best ways of learning something is building a lab for it. Especially when it comes to complex topics like network authentication. When I started learning about network authentication and Cisco Identity Services Engine (ISE), I found that there wasn’t a lot of clear information on how you build a lab. Not in Cisco documentation and also not on blogs, etc. In this post I’ll explain how I built my lab using CML and ESX.
Having a lab with ISE only is not going to get you very far. At a minimum, I think the following devices are needed in a network authentication lab:
- Cisco ISE.
- Active Directory Domain Services.
- Public Key Infrastructure (PKI) such as Active Directory Certificate Services (ADCS).
- Network Authentication Device (NAD) such as Catalyst 9000.
For my lab, I’m using only virtual devices. The focus is on learning network authentication and ISE which is why I’ve setup a very simple PKI, ignoring best practices such as offline root, intermediate CA, and so on. I might lab that at a later stage, but that’s not the current focus.
The topology of my lab is shown below:
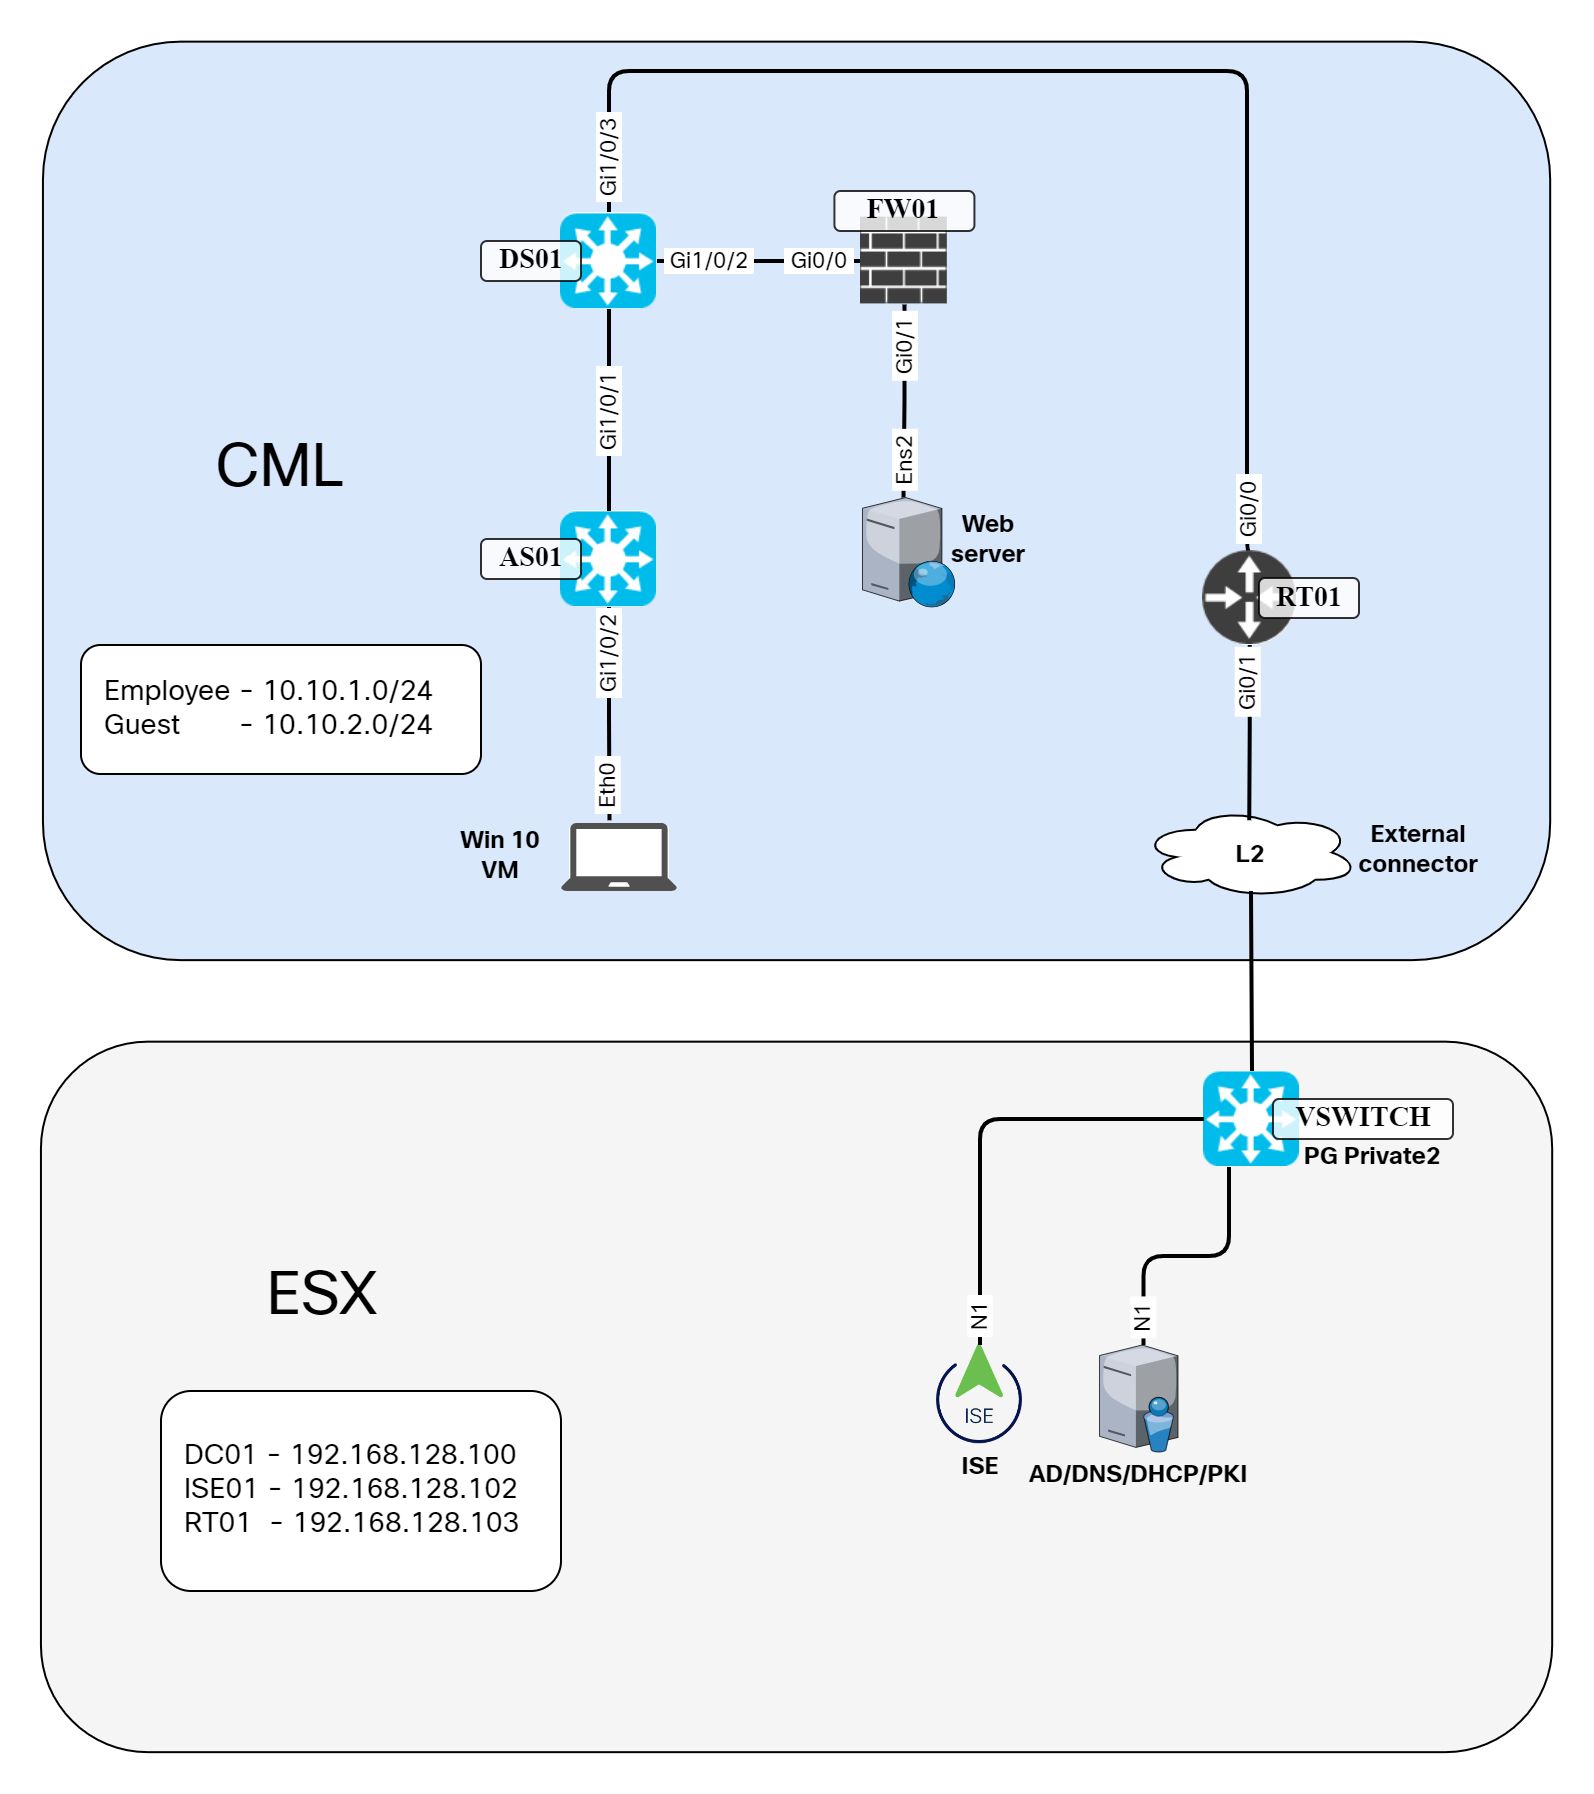
Note that some VMs such as the virtual Catalyst 9000 switches and the Windows 10 VM are hosted in CML while others such as AD server and ISE are hosted outside on ESX. This is because they are resource intensive and I prefer to run them straight on ESX.
The goal here is to have a realistic lab without going overboard with the number of devices. I’ll briefly describe each device and their role below.
Win 10 VM – This is the device that will run the 802.1X supplicant and have the certificates that enables it to do network authentication. It’s a domain joined PC.
AS01 – This is an access layer switch which will be configured to be the authenticator using RADIUS. It will also use TACACS+ for device administration.
DS01 – This is a distribution layer switch. It will have the L3 configuration for the VLANs in the lab.
FW01 – The firewall is in the lab to be able to setup rules that give access to the webserver based on IP network or SGT.
RT01 – This router is used to route between the CML lab and my ESX networks that host ISE and the Windows server.
External connector – The external connector bridges between the CML lab and the port group that the CML node is placed in ESX.
ISE – The device that will authenticate and authorize users and device admins. I opted to host ISE on ESX due to the requirements of the VM.
Windows server – I have all the roles such as ADDS, ADCS, DNS, and DHCP. This is obviously not best practice, but works well for a lab.
Now I’ll highlight some of the details and config of each node. Starting with AS01.The config is currently very straight forward, it has a trunk to DS01 and a management interface in VLAN 10. It also has a default route towards DS01:
AS01#sh run int gi1/0/1
Building configuration...

Current configuration : 61 bytes
!
interface GigabitEthernet1/0/1
 switchport mode trunk
end

AS01#sh run int vlan10
Building configuration...

Current configuration : 60 bytes
!
interface Vlan10
 ip address 10.10.0.2 255.255.255.0
end

AS01#show run | i ip route
ip route 0.0.0.0 0.0.0.0 10.10.0.1
DS01 has a trunk towards AS01. It has linknets towards the firewall and router. It has static routes. It also hosts the SVIs for the VLANs in the lab:
DS01#sh run int gi1/0/1
Building configuration...

Current configuration : 61 bytes
!
interface GigabitEthernet1/0/1
 switchport mode trunk
end

DS01#sh run int gi1/0/2
Building configuration...

Current configuration : 91 bytes
!
interface GigabitEthernet1/0/2
 no switchport
 ip address 10.10.3.9 255.255.255.248
end

DS01#sh run int gi1/0/3
Building configuration...

Current configuration : 91 bytes
!
interface GigabitEthernet1/0/3
 no switchport
 ip address 10.10.3.2 255.255.255.252
end

DS01#sh run int vlan10
Building configuration...

Current configuration : 60 bytes
!
interface Vlan10
 ip address 10.10.0.1 255.255.255.0
end

DS01#sh run int vlan20
Building configuration...

Current configuration : 95 bytes
!
interface Vlan20
 ip address 10.10.1.1 255.255.255.0
 ip helper-address 192.168.128.100
end

DS01#sh run int vlan30
Building configuration...

Current configuration : 95 bytes
!
interface Vlan30
 ip address 10.10.2.1 255.255.255.0
 ip helper-address 192.168.128.100
end

DS01#sh run | i ip route
ip route 0.0.0.0 0.0.0.0 10.10.3.1
ip route 10.10.4.0 255.255.255.0 10.10.3.10
The network 10.10.4.0 is going to be used for the web server. The default route points towards the router.
The FW hasn’t been configured yet so I’m skipping it.
The router has an interface towards DS01 and and interface towards ESX via the external connector. The interface towards external has a static IP in the same subnet as ISE and the Windows server. It also has some static routes:
RT01#sh run int gi0/0
Building configuration...

Current configuration : 157 bytes
!
interface GigabitEthernet0/0
 ip address 10.10.3.1 255.255.255.252

RT01#sh run int gi0/1
Building configuration...

Current configuration : 162 bytes
!
interface GigabitEthernet0/1
 ip address 192.168.128.103 255.255.255.0

RT01#sh run | i ip route
ip route 0.0.0.0 0.0.0.0 192.168.128.1
ip route 10.10.0.0 255.255.255.0 10.10.3.2
ip route 10.10.1.0 255.255.255.0 10.10.3.2
ip route 10.10.2.0 255.255.255.0 10.10.3.2
The Windows server has routes to the CML lab via RT01:
C:\Users\Administrator>route print

IPv4 Route Table
===========================================================================
Active Routes:
Network Destination        Netmask          Gateway       Interface  Metric
          0.0.0.0          0.0.0.0    192.168.128.1  192.168.128.100    281
        10.10.0.0    255.255.255.0  192.168.128.103  192.168.128.100     26
        10.10.1.0    255.255.255.0  192.168.128.103  192.168.128.100     26
        10.10.2.0    255.255.255.0  192.168.128.103  192.168.128.100     26
ISE has a route for the management network via RT01:
ise01/admin#show ip route

Destination          Gateway              Iface
-----------          -------              -----
10.10.0.0/24         192.168.128.103      eth0
That’s what my lab currently looks like. In the coming blog posts we’ll take a look at installing the different services. Stay tuned!
That is a great lab, very interesting, thank you! Can you please tell me what brand and model of computer hardware platform you are running this on? Also, how much memory and how many CPUs do you have please?
That is a great lab, very interesting, thank you! Can you please tell me what brand and model of computer hardware platform you are running this on? Also, how much memory and how many CPUs do you have please?
Hi Ian,
I don’t recall the exact model, but it’s a HP server with 48 cores and 384 GB of RAM.
Thank you very much, great blogs, I am enjoying it.