A colleague needed to connect to several Cisco devices, run some show commands, and save the output. I decided it would be good to practice my Python skills so I coded something together.
Why didn’t do you do this in Ansible, Nornir, or other tool of choice? Because the goal was to learn Python, not minimize amount of work to solve the task.
This work was highly inspired by others such as Debi, John, and wouldn’t be possible without the work from Kirk. Also thanks to Patrick, and Nick for giving me pointers on the code.
From a high level, the script will perform the following tasks:
- Read commands from a text file “commands.txt”
- Read devices from a text file “devices.txt”
- Ask the user for credentials
- Log in to the devices
- Perform show commands
- Save the output to a text file per device
In order to perform the tasks, the script relies on several modules:
Colorama – Used to color code terminal output
Netmiko – Used to setup SSH connection to device and parse the output
Datetime – Used to create a timestamp
Getpass – To get password from user without displaying it to the terminal
The script starts by importing these modules:
# Colorama used for coloring of terminal
from colorama import Fore, Back, init
# Netmiko used to connect to devices
from netmiko import ConnectHandler
from netmiko.ssh_exception import NetMikoTimeoutException, NetMikoAuthenticationException
# Datetime used to timestamp files
import datetime
# Getpass for asking for password from user
import getpass
The first thing we do is to get a timestamp. The timestamp is in ISO format. We don’t want microseconds so timespec="seconds" is used.
# Get current time in ISO format
time_now = datetime.datetime.now().isoformat(timespec="seconds")
Running this from the REPL produces an output like this:
>>> time_now = datetime.datetime.now().isoformat(timespec="seconds")
>>> time_now
'2020-07-01T10:24:23'
>>>
The next thing we do is to initialize Colorama. We set autoreset=True to not have to reset the style after each time we have formatted strings.
# Initialize colorama and reset style by default
init(autoreset=True)
Following that, there is a function that opens a file, with the name filename, does a read() to read the entire file but splitlines() to get each row as en entry stored in the list lines.
def read_from_filename(filename):
    """Returns all lines from filename as a list

    Parameters:
    filename - name of the file to read

    Returns:
    list: lines
    """
    with open(filename) as f:
        lines = f.read().splitlines()
        return lines
The next part is a function that gets the credentials. It asks the user for a username and a password, using getpass() to get the password without displaying it to the terminal. The username and password are returned from the function.
def get_credentials():
    """Get username and password from user

    Parameters:

    Returns:
    str: username
    str: password

    """
    username = input("Enter username: ")
    password = getpass.getpass()
    return username, password
Finally, we have the function that actually does all of the work connecting, entering commands, and saving the output. This is where most of the code is so I’ll break the code down into smaller parts. The function takes 4 arguments:
devices_lines– The devices to connect to in the form of a list. We get this list when runningread_from_filename()config_lines– The commands to use on the devices. This is also provided after runningread_from_filename()username– The username. This is provided after runningget_credentials()password– The password. This is provided after runningget_credentials()
def connect_and_send(devices_lines, config_lines, username, password):
    """Connect, run show commands, and save the output

    Parameters:
    devices_lines - devices to connect to, gathered from read_devices()
    config_lines - commands to run, gathered from read_commands()
    username - username for logging in to device, gathered from get_credentials()
    password - password for logging in to device, gathered from get_credentials()

    Returns:

    """
We want to iterate over the list devices_lines, to connect to all of the devices. We use a For loop for this. We create a dictionary to provide to Netmiko so that we can connect using ConnectHandler. The dictionary consists of:
device_type– Set tocisco_iosbecause only Cisco devices in this demoip– The IP of the device to connect to. We get this from iterating over the IP addresses indevices_linesusername– The username used to connectpassword– The password used to connect
for ip in devices_lines:
        device = {
            "device_type": "cisco_ios",
            "ip": ip,
            "username": username,
            "password": password
        }
Then follows a try statement with try/except logic for error handling. Colorama is used as indicated by print(Fore.MAGENTA) etc to color code the terminal.
try:
            print(Fore.MAGENTA + "=" * 70)
            print(Fore.CYAN + "" * 15 + " Connecting to Device: " + ip)
            print(Fore.MAGENTA + "=" * 70)
The next step is to setup the actual connection using Netmiko. We provide the dictionary device to Netmiko and unpack it using **. It would also be possible to use the ConnectHandler and provide each argument with ConnectHandler(device_type = "cisco_ios", host = ip, username = username, password = password)
net_connect = ConnectHandler(**device)
Then there’s a bunch of printing to the terminal, indicating what device we are connected to with ip, and where the data will be saved to by concatenating ip, _ and time_now.
print(Fore.MAGENTA + "~" * 70)
print(Fore.CYAN + "" * 15 + " Now connected to Device: " + ip)
print(Fore.CYAN + "" * 15 + " Sending commands ")
print(Fore.CYAN + "" * 15 + " Saving output to: " + ip +"_" + time_now)
print(Fore.MAGENTA + "~" * 70)
We need a file to save output to. We open the file, run all the commands in config_lines and save the output to this file. I’m doing some fancy formatting but there’s not much more to it. We write to the file with f.write(). Keep in mind that when writing to the file, it’s all being written to the same line unless you insert \n.
# Open file to write to
            filename = ip + "_" + time_now + ".txt"
            with open(filename, "w") as f:
                for command in config_lines:
                    f.write("=" * 20)
                    f.write(command)
                    f.write("=" * (80 - len(command)))
                    f.write("\n" * 2)
                    cmd_output = net_connect.send_command(command)
                    f.write(cmd_output + "\n" *2)
We also have a few Netmiko exceptions that we are looking for, NetMikoTimeoutException, and NetMikoAuthenticationException. If a connection times out, or if authentication fails, an error message is printed and the code continues.
except (NetMikoTimeoutException, NetMikoAuthenticationException) as e:
            print(Fore.RED + "~" * 15 + str(e) + "~" * 15)
Finally, here is the code that executes the functions. We run read_from_filename to get the devices and the commands, get_credentials() to get username and password, and then feed this into connect_and_send().
if __name__ == "__main__":
    # Get all commands
    config_lines = read_from_filename("commands.txt")
    # Get all devices
    devices_lines = read_from_filename("devices.txt")
    # Get credentials
    username, password = get_credentials()
    # Connect and save
    connect_and_send(devices_lines, config_lines, username, password)
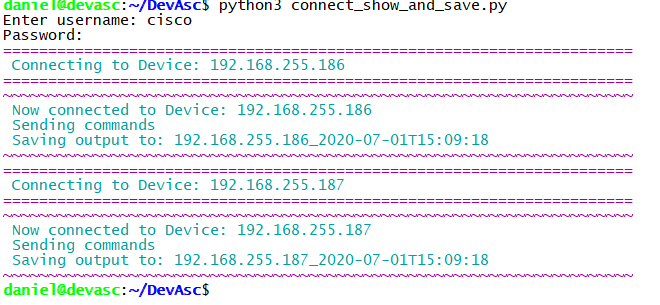
Running the code, it looks like this:
The result looks like this:
daniel@devasc:~/DevAsc$ cat 192.168.255.186_2020-07-01T15\:19\:43.txt
====================show ip arp=====================================================================

Protocol  Address          Age (min)  Hardware Addr   Type   Interface
Internet  192.168.255.1           0   000c.2957.2663  ARPA   GigabitEthernet1
Internet  192.168.255.11        140   0050.56b7.217a  ARPA   GigabitEthernet1
Internet  192.168.255.185         3   0050.56b7.5e33  ARPA   GigabitEthernet1
Internet  192.168.255.186         -   0050.56b7.69ff  ARPA   GigabitEthernet1

====================show mac address-table | exclude STATIC=========================================

^
% Invalid input detected at '^' marker.


====================show cdp neighbors detail=======================================================

Total cdp entries displayed : 0

====================show ip route===================================================================

Codes: L - local, C - connected, S - static, R - RIP, M - mobile, B - BGP
       D - EIGRP, EX - EIGRP external, O - OSPF, IA - OSPF inter area
       N1 - OSPF NSSA external type 1, N2 - OSPF NSSA external type 2
       E1 - OSPF external type 1, E2 - OSPF external type 2
       i - IS-IS, su - IS-IS summary, L1 - IS-IS level-1, L2 - IS-IS level-2
       ia - IS-IS inter area, * - candidate default, U - per-user static route
       o - ODR, P - periodic downloaded static route, H - NHRP, l - LISP
       a - application route
       + - replicated route, % - next hop override, p - overrides from PfR

Gateway of last resort is 192.168.255.1 to network 0.0.0.0

S*    0.0.0.0/0 [254/0] via 192.168.255.1
      192.168.255.0/24 is variably subnetted, 2 subnets, 2 masks
C        192.168.255.0/24 is directly connected, GigabitEthernet1
L        192.168.255.186/32 is directly connected, GigabitEthernet1

daniel@devasc:~/DevAsc$
Code is available at Github.
I hope this example was useful for learning Python. Use the code as you wish but I take no responsibility for your network 😉
Hi Daniel,
Thanks for the guide ! I am working on getting it to try with telnet if SSH does not work. Its a great Python script! keep it up 😉
Thanks, Dan!
Hi Daniel,
i got this error.
Traceback (most recent call last):
File “python_show.py”, line 89, in
config_lines = read_from_filename(“commands.txt”)
File “python_show.py”, line 26, in read_from_filename
with open(filename) as f:
FileNotFoundError: [Errno 2] No such file or directory: ‘commands.txt’
Dear Daniel,
please ignore my above message.
it works now.
great script.
Ivanyeung
Thanks for the article explaining each part of the script. I am getting an error on this section (or at least I think so):
# Open file to write to
filename = ip + “_” + time_now + “.txt”
with open(filename, “w”) as f:
for command in config_lines:
f.write(“=” * 20)
f.write(command)
f.write(“=” * (80 – len(command)))
f.write(“\n” * 2)
cmd_output = net_connect.send_command(command)
f.write(cmd_output + “\n” *2)
The error I get is :
Traceback (most recent call last):
File “C:/Users/Ixxxx/PycharmProjects/xxx/venv/Collect Show Commands Output.py”, line 70, in connect_and_send
with open(filename, “w”) as f:
OSError: [Errno 22] Invalid argument: ‘10.166.66.1_2021-07-19T23:37:56.txt’
The file was created, but empty. Line 70 is the first line of the script posted above. Thank you in advance.
Were you able to get it solved, Rob? What Python version are you running?
If this was run on a Windows machine, the colons in the filename are illegal.
The following should replace the colons with dashes:
time_now = datetime.datetime.now().strftime(“%Y-%m-%dT%H-%M-%S”)
@ittybittypacket
Thank you so much. I loved how you did your code and it didnt take too long to get my head around how to make it work in my environment. I also managed to finish off my script which adds another layer of commands but mine didnt use functions so I am going to get my head around how yours works so I can add to it.
The one thing you really helped me with was the return after the commands executed for the writing to a file, I missed this so my file only showed the last command ran.
Hello Sir,
thanks for this… in my case i am trying to write the configs i made on the switch to a csv file.
Hello Daniel ,
How did you fix the issue? i am getting same error