In this post we’ll add a Network Authentication Device (NAD) to ISE to perform TACACS+ authentication and authorization. We’ll also do a deep dive on AAA commands on the NAD. First let’s start with the overall goal of the lab and an overview of how TACACS+ works.
The goal of the lab is to have two users, Bob and Alice, where Bob works in the NOC and Alice is a network admin. Based on the AD group they belong to, they should get different permissions when administrating devices. Alice will be able to use all commands, while Bob will only be able to use basic commands. This is shown below:
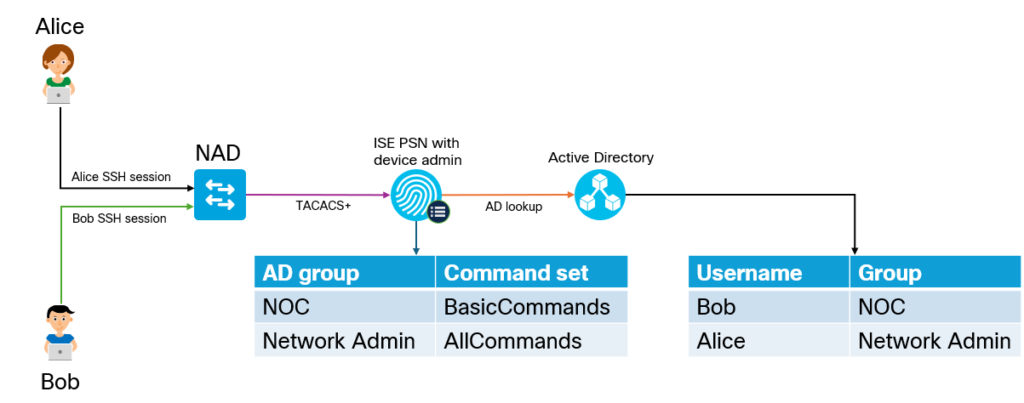
Why would we use TACACS+ over RADIUS? The main reason is that it gives us per command authorization and accounting. The overall flow of TACACS+ is shown below:
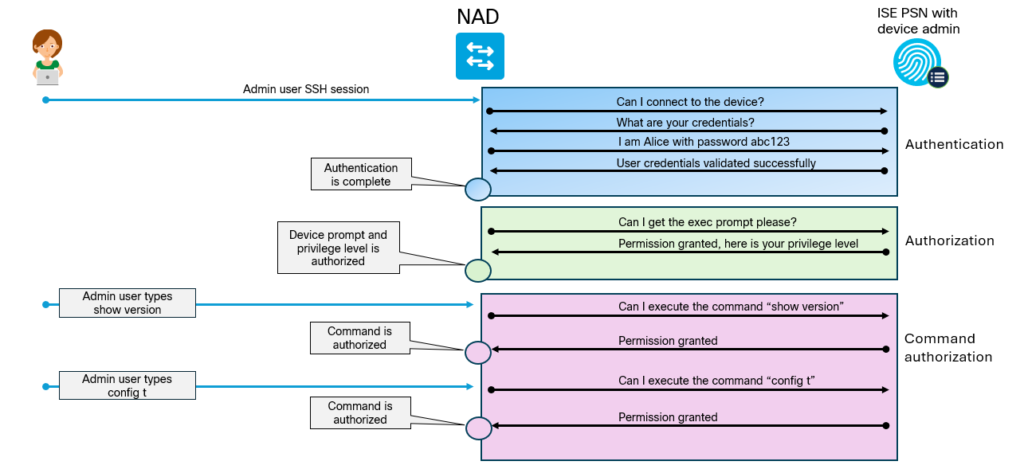
Enabling TACACS+
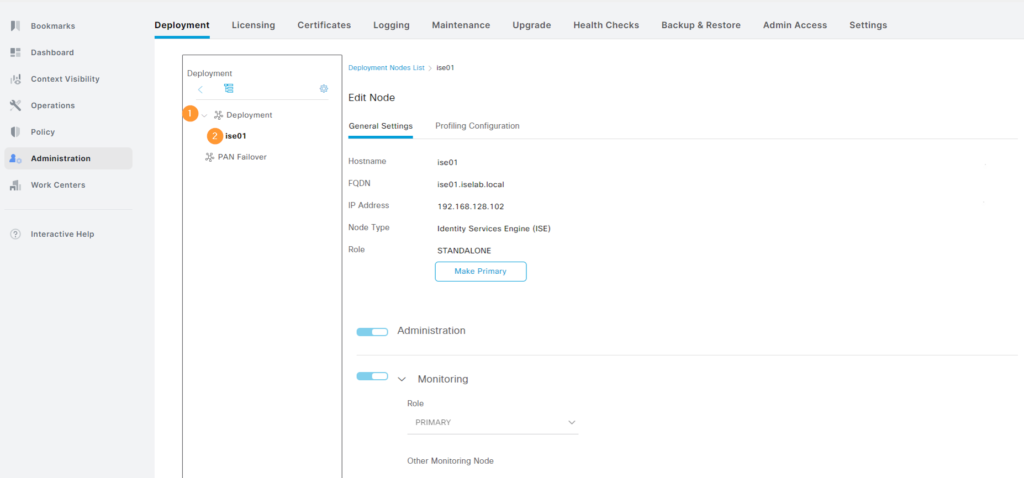
To get things started, we must first enable TACACS+ on the PSN. Go to Administration -> Deployment located under System:

Click the > symbol next to Deployment and select your PSN that you want to enable TACACS+ on:
Scroll down to the Policy Service part. Notice that Device Admin is currently not enabled:
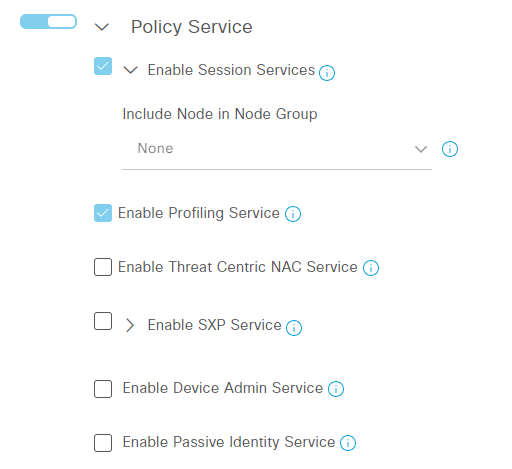
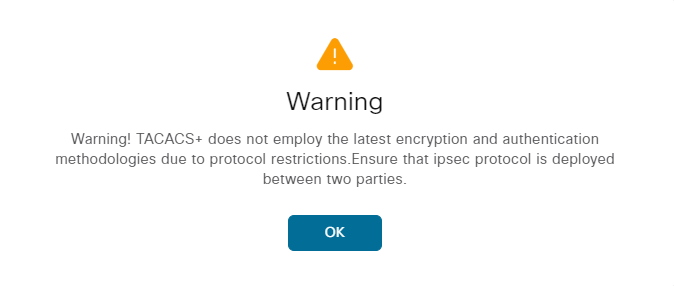
Select Enable Device Admin Service. You may get a warning like the following. Click OK:
Then click Save.
Creating Device Group
Next, we’re going to create a Network Device Group. Commonly, devices are grouped based on device type or location. The group can be used in a policy set to give differential treatment based on the group. Go to Administration -> Network Device Groups under Network Resources:

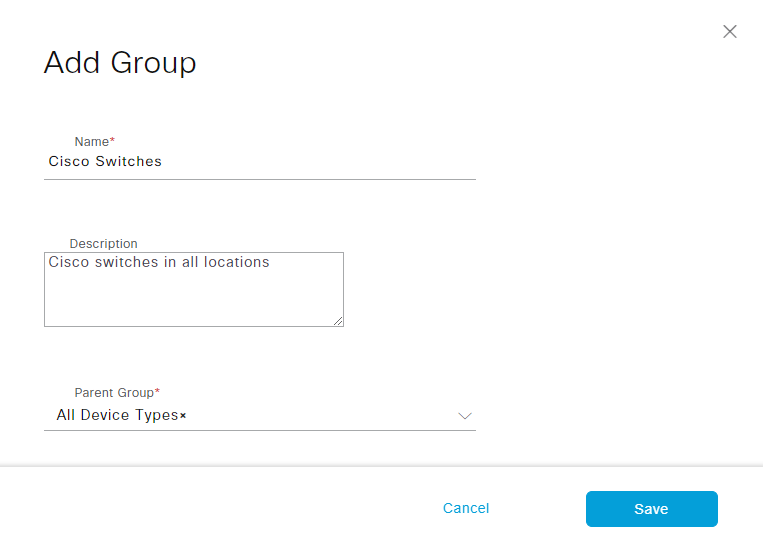
You’ll notice that there are some network device groups already there. They are the default groups. We will add a new group named Cisco Switch under All Device Types group. To do that, first select it and then click Add:

Give the group its name and description and click Save:
Expand All Device Types to see the newly created group:

Adding a NAD
Now we’re going to add a Network Access Device (NAD). Before the NAD has been added, ISE isn’t going to accept the TACACS+ packets coming from the NAD. The NAD is going to be added to the device group we created. Go to Administration -> Network Devices under Network Resources:

No devices have been added yet. Click + Add:
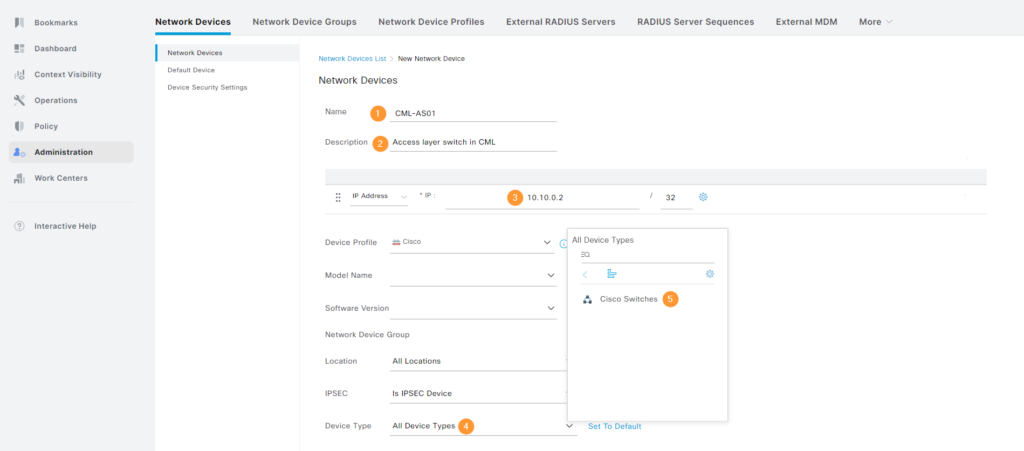
- 1 – Give the device a name. This could be an individual switch or a group of switches.
- 2 – Give it a description.
- 3 – IP address of the NAD used to reach ISE. Normally a management interface, such as SVI, loopback, or dedicated management interface. Note that it’s possible to add a range.
- 4 – Click to select Device Type.
- 5 – Select Cisco Switches.
Note that Device Profile is automatically set to Cisco. What’s a Device Profile? It’s used to define the NAD’s capabilities. A Cisco device may have other capabilities than a 3rd party device, for example. You can view the device profile by going to Administration -> Network Device Profiles under Network Resources:
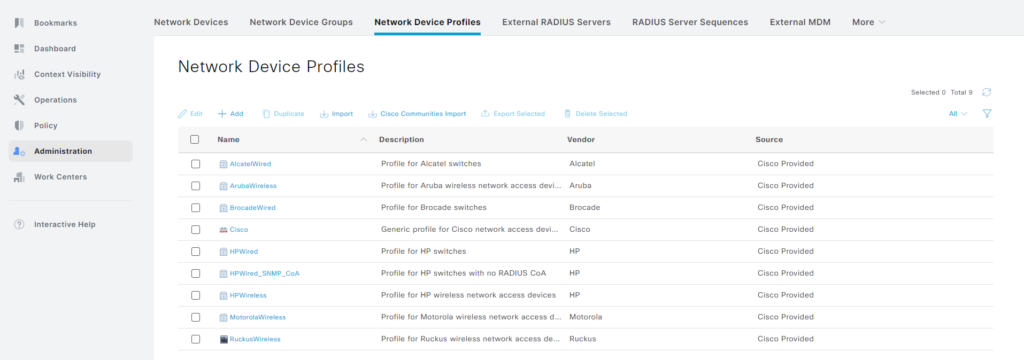
The Cisco profile enables services such as RADIUS, TACACS+, 802.1X, MAB, TrustSec, and Webauth.
Back to adding the device. Scroll down to where it says TACACS Authentication Settings and enable it, enter a shared secret, and click Submit:
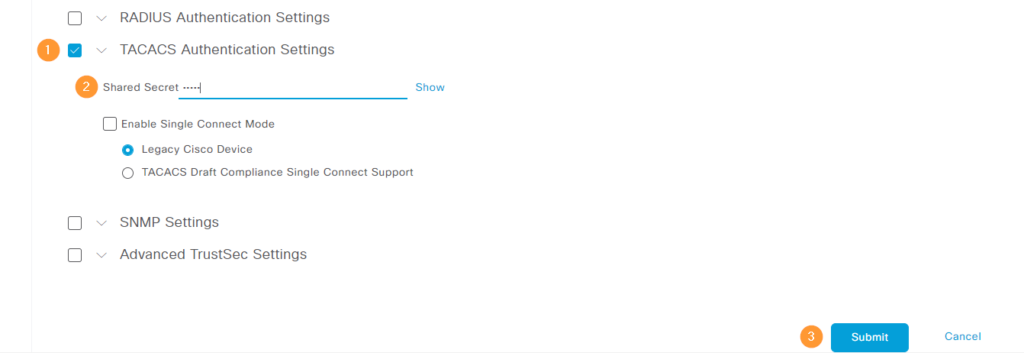
Our NAD has been added:

Creating a TACACS Profile
Next, we’re going to create a TACACS profile. The TACACS profile is used to authorize the exec shell and assign a privilege to it. Go to Workcenters -> Policy Elements under Device Administration:

Next, click Results and then TACACS Profiles:

Now click Add. Give the profile a name and description. We’re going to set the Default Privilege level to 15 as well as Maximum Privilege level. Both our NOC user and Network Admin user will get privilege 15, but the NOC user will be restricted by a command set. By setting the Default Privilege level to 15, the user won’t have to enable after logging in:
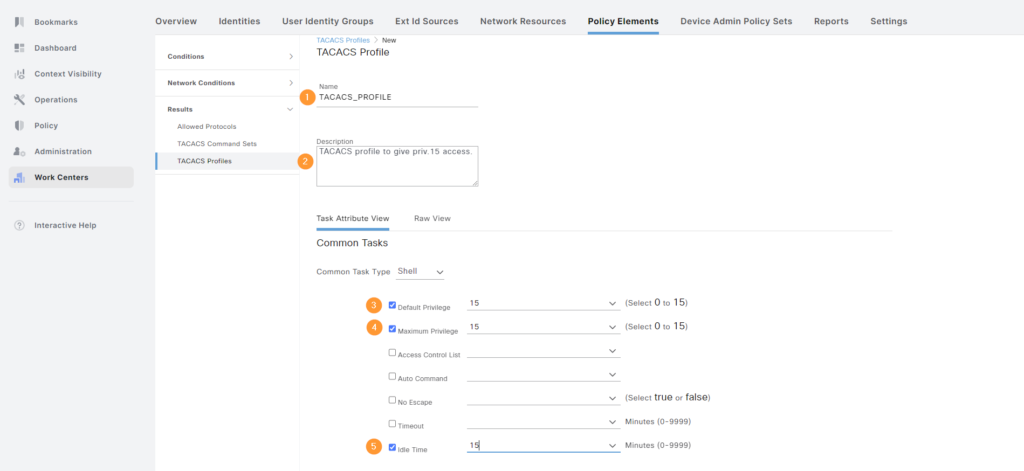
Click Save when done.
Creating Command Sets
Now that the profile has been created, we’re going to create the command sets. The command sets defines what commands are permitted or denied. We’ll go to TACACS Command Sets:

Notice the DenyAllCommands command set:

Now click Add. First, we’ll create the AllCommands command set. Give the command set a name, description, and select the Permit any command that is not listed below checkbox. Then click Save:
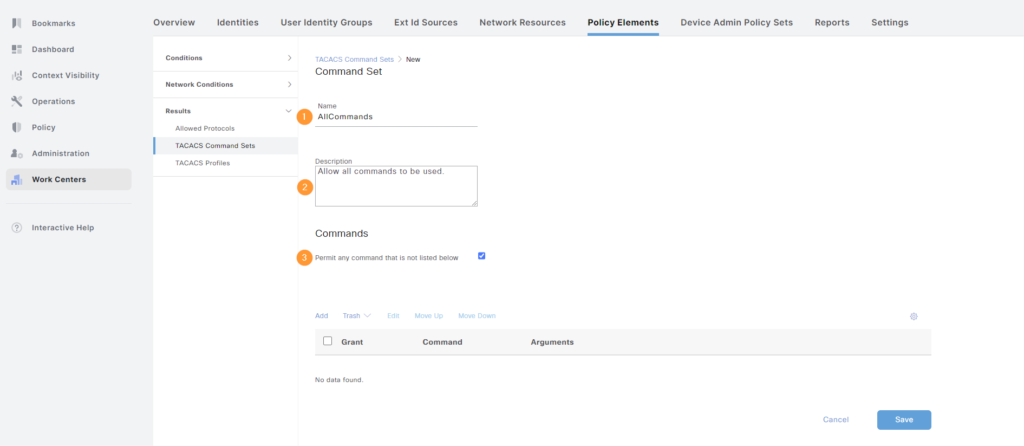
Next, we’ll create BasicCommands that only allows show commands, as well as ping and traceroute. Give the command set a name, description, and then click Add to add commands to be allowed:
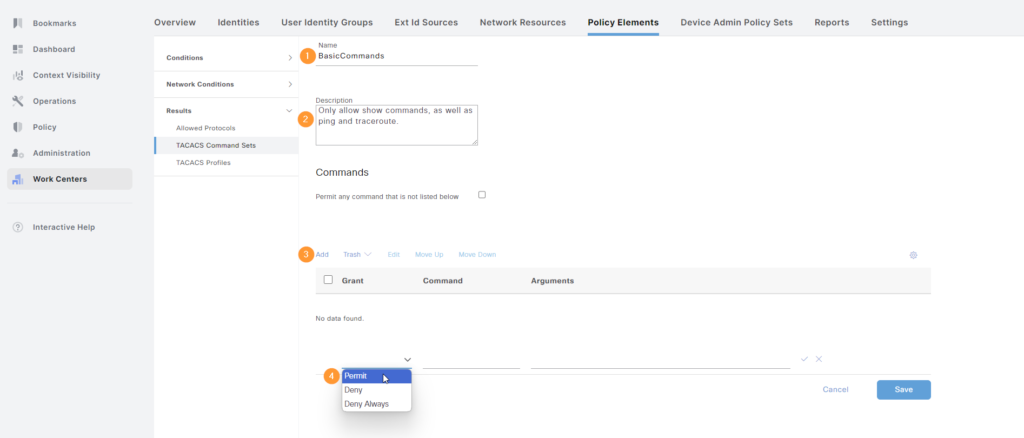
When complete, it should look like this. Don’t forget to click Save:
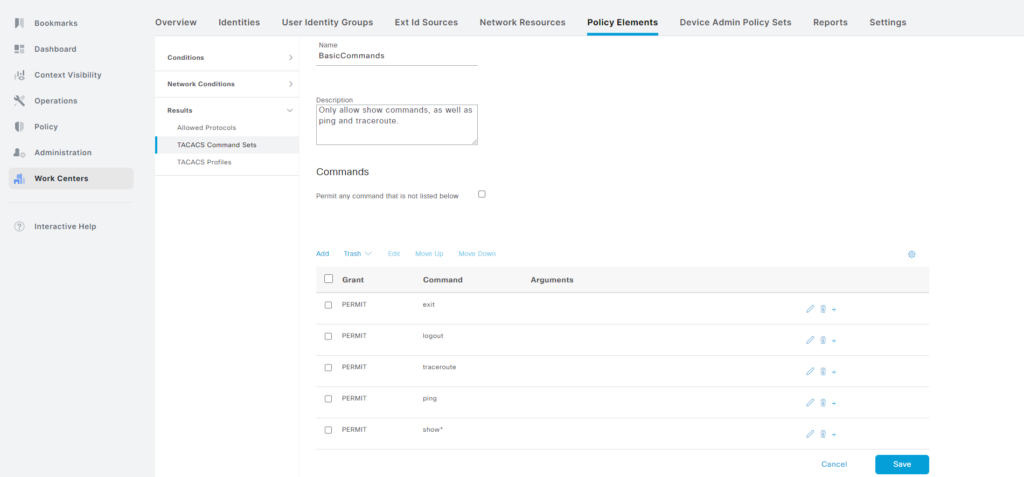
Note that you can use wildcards in the Command section while the Arguments section uses regex. The show* will match anything starting with show.
The command sets have been created:

Before moving on to creating our device admin policy set, I’m going to do two things:
- Configure local users in ISE to be used if AD is not reachable.
- Configure users Bob and Alice to be in the correct AD groups.
Creating Identity Groups
Before creating the user, let’s create two user identity groups. Go to Work Centers -> User Identity Groups under Device Administration:
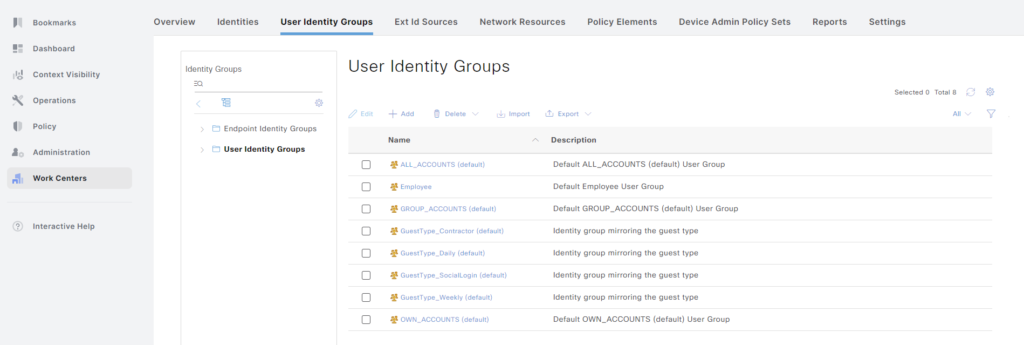
You’ll notice that there are some default groups here. Click + Add and add the name and description before clicking Submit:

I’ll repeat the process for a group named NOC. The groups have been added:
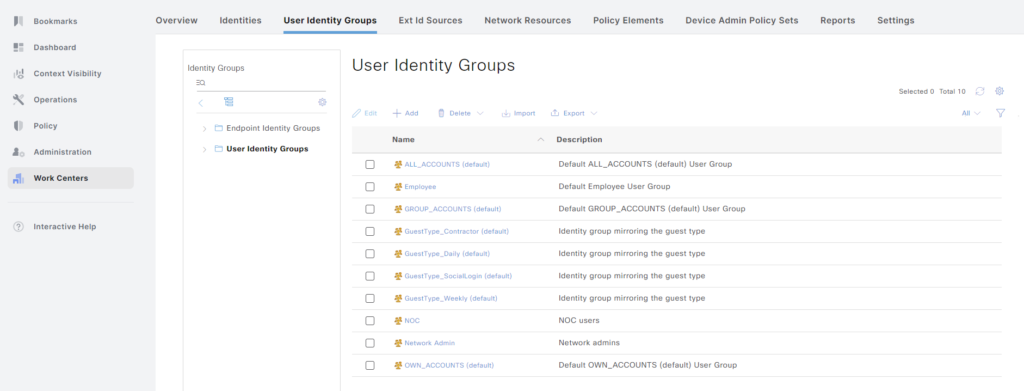
Creating Local Users
Now let’s create the users. Go to Work Centers -> Identities under Device Administration:

Click + Add. Give the user a name and password. Optionally select that the account doesn’t expire:
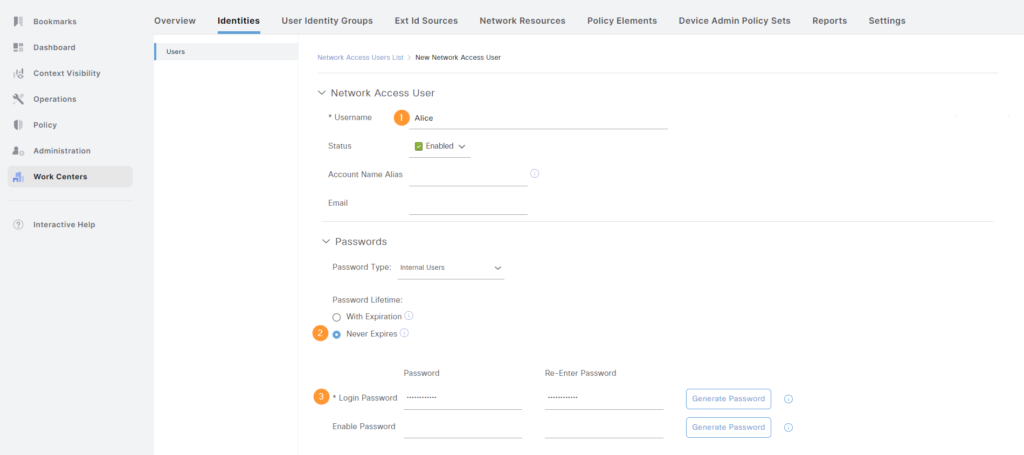
Note that an enable password can be supplied. However, we are assigning privilege level 15 to all users, but then restricting what commands they can use. The user won’t need to enable.
Then assign the user to the group and click Submit:
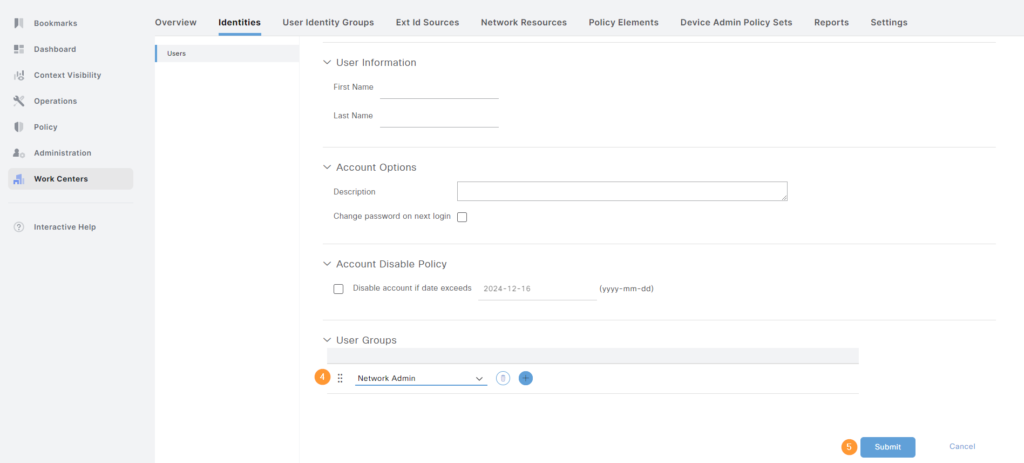
We’ll repeat the process for Bob, but put him in the NOC group. The users have been created:

Creating Groups in AD
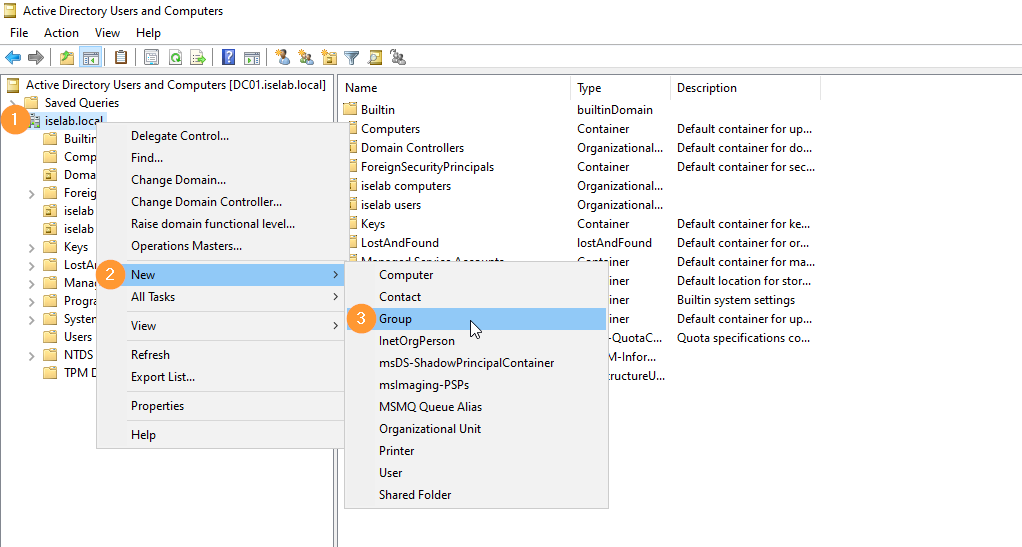
Next, we’re going to create some groups in AD, assign Bob to the correct group, and create the user Alice. First, we’ll create the group NOC. Right click the domain, then select New and then Group:
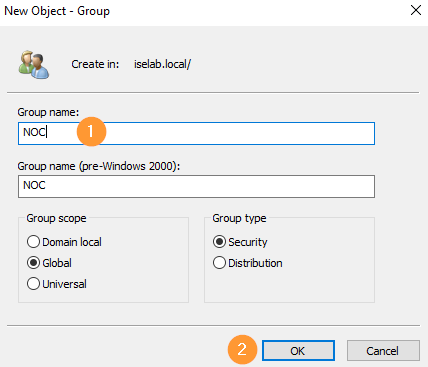
Give the group a name and click OK:
We’ll repeat the process for Network Admin and when done the groups have been added:
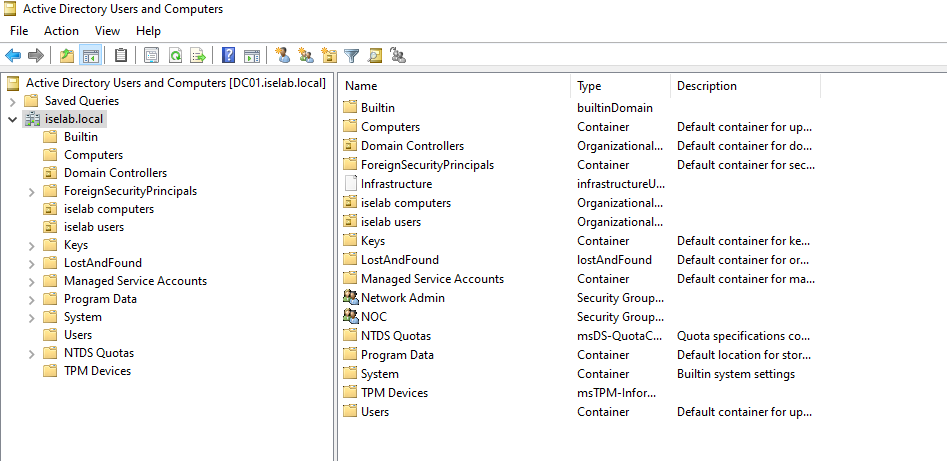
Adding Users to Groups
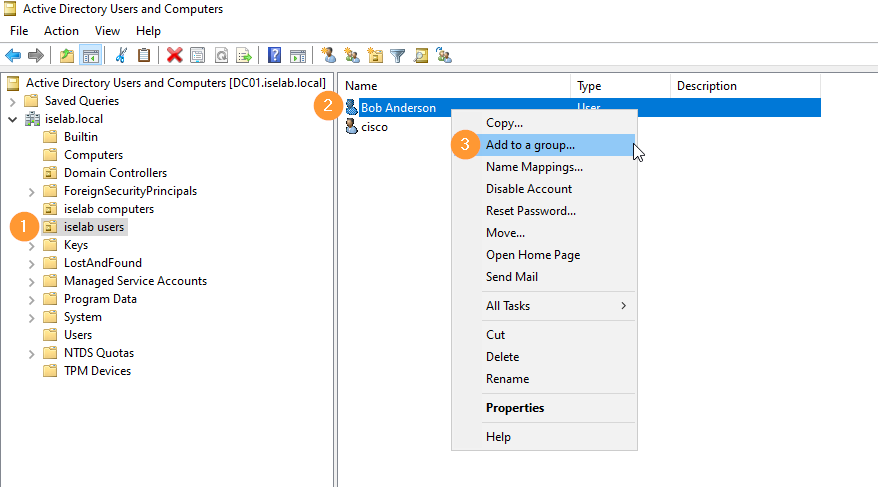
Next, we’ll add Bob to the group NOC. Go to the OU, right click the user and select Add to a group…:
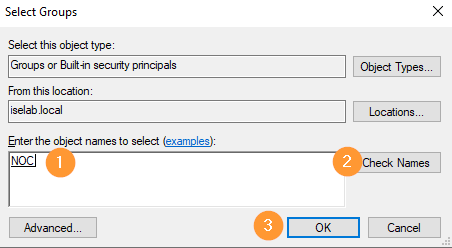
Then, type the group name, select Check Names and then click OK:
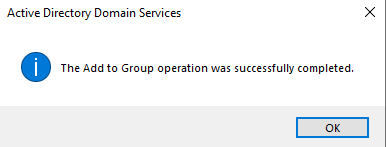
Bob was added successfully:
Creating User in AD
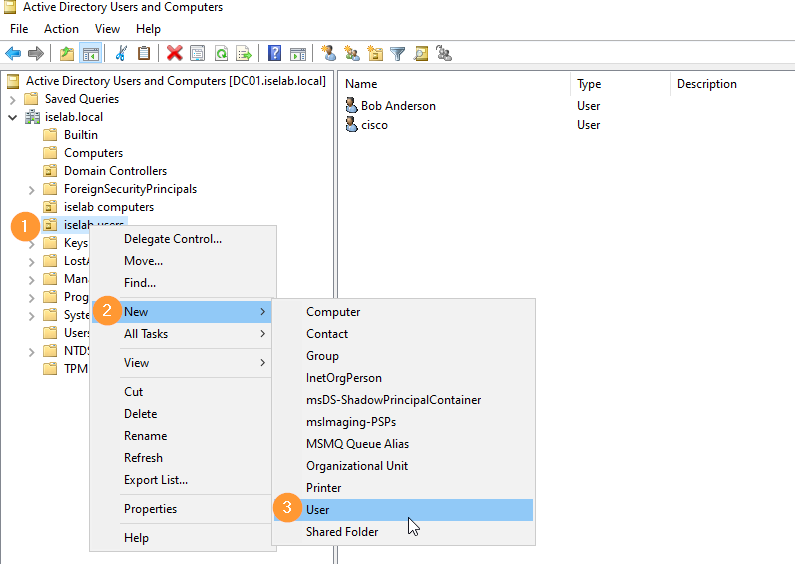
Now, we’re going to create Alice. Right click the user OU, select New and then User:
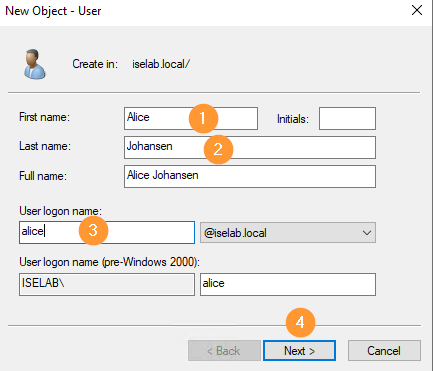
Now, fill out name, logon name and then click Next:
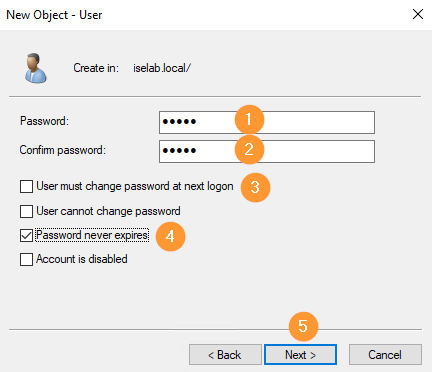
Then, give the user a password. I’ve selected that the user doesn’t have to change password at next logon and that the password doesn’t expire. Click Next:
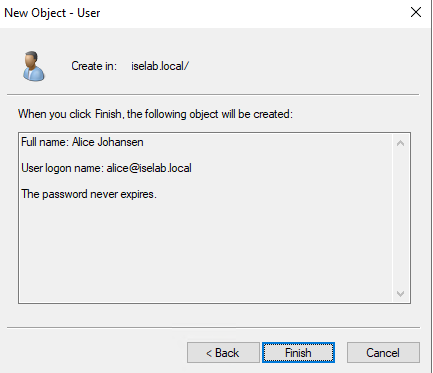
A summary is shown. Click Finish to create the user:
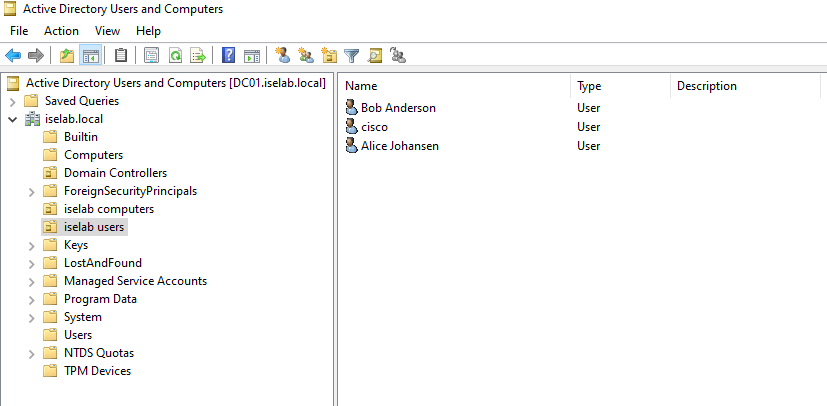
Alice has been created:
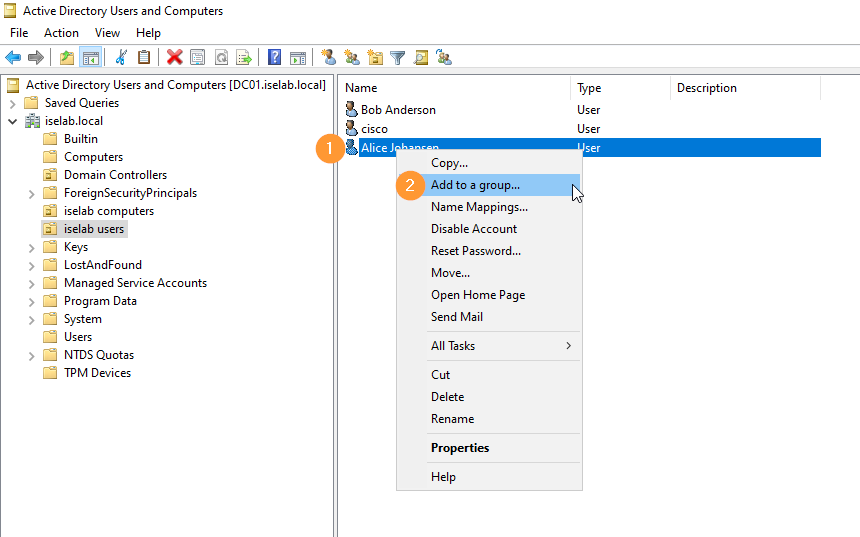
Now, let’s add Alice to the Network Admin group. Go to the user OU, right click Alice and select Add to a group…:
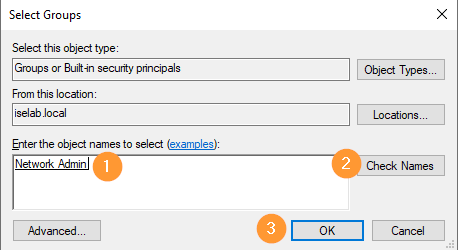
Then, enter the group name, select Check Names and then OK:
Our users have now been added to the proper groups.
Creating Identity Source Sequence
Before we create the device admin policy set, we will create an identity source sequence. Go to Administration -> Identity Source Sequences under Identity Management:

There are existing identity source sequences we could use, such as All_User_ID_Stores:
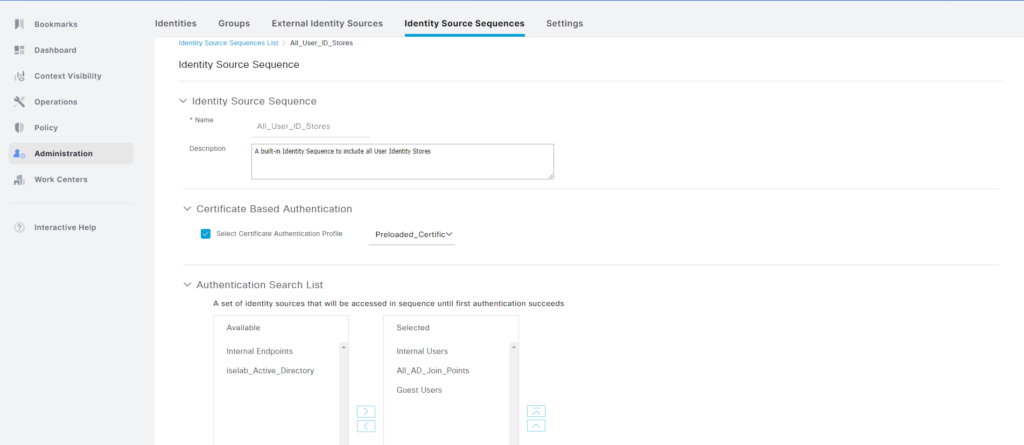
However, it covers more than we need, such as certificate based authentication and the Guest Users identity store. Let’s create a new sequence. Click + Add. Give the sequence a name, description, and add ID stores by selecting them and clicking the right arrow:
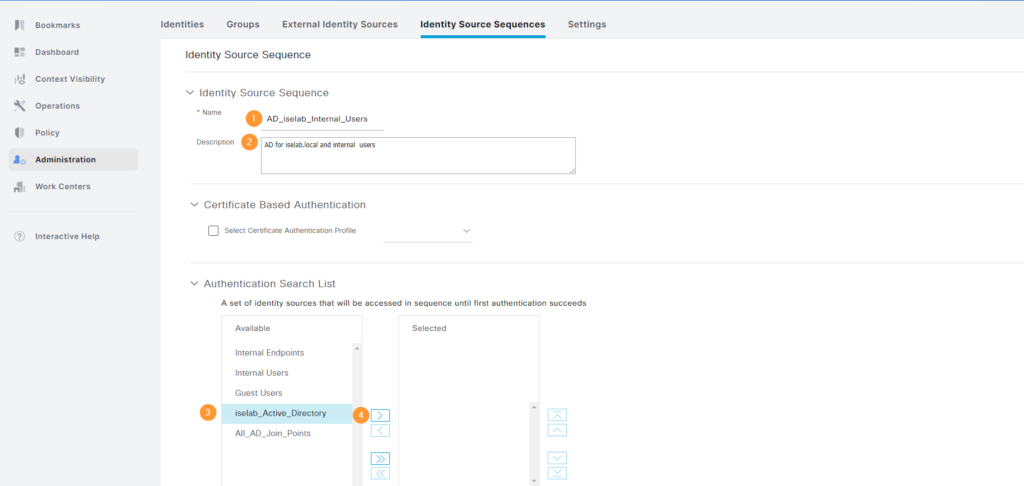
If the user is not found, continue searching in the next store. Don’t forget to click Submit:
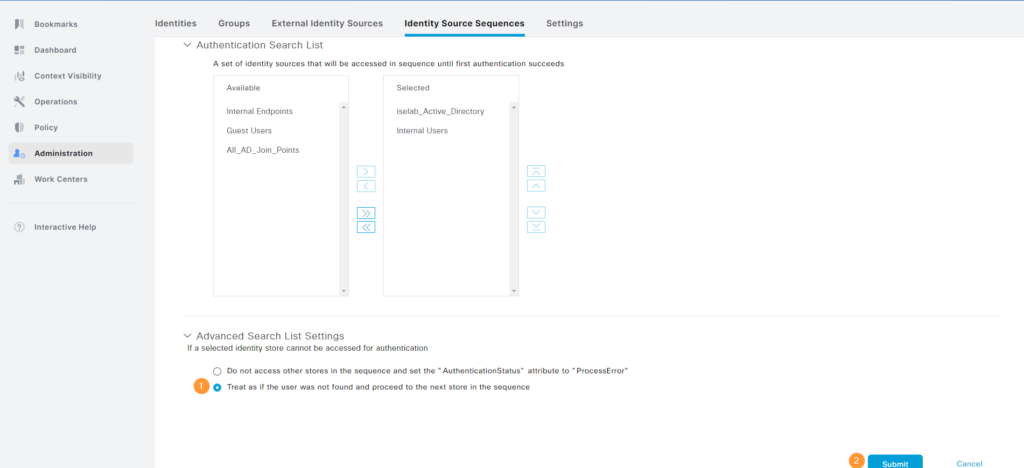
The sequence has been created:

Retrieving AD Groups
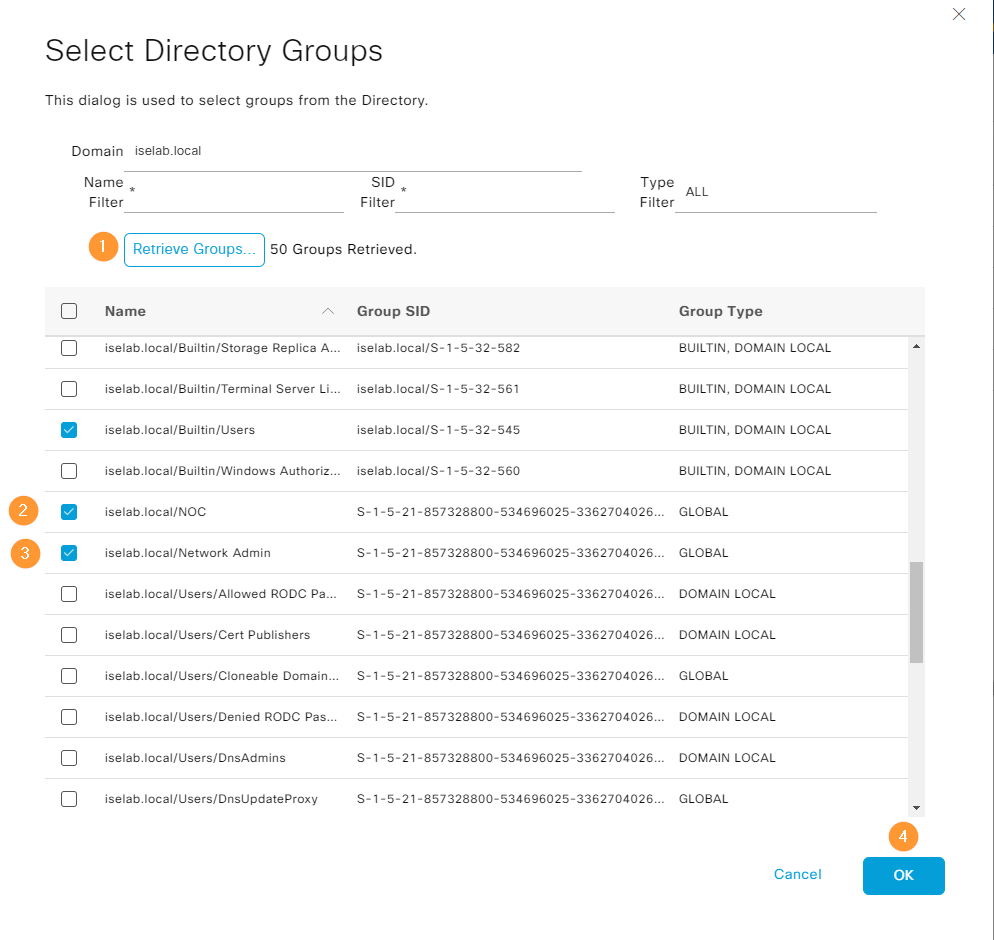
Next, we’re going to retrieve the AD groups we created earlier. Go to Administration -> External Identity Sources under Identity Management. Click the AD join point. Then click Groups. These are the groups that have been imported so far:

Now click + Add and then Select Groups From Directory:

Click Retrieve Groups… Select the groups and then click OK:
The groups have been imported:
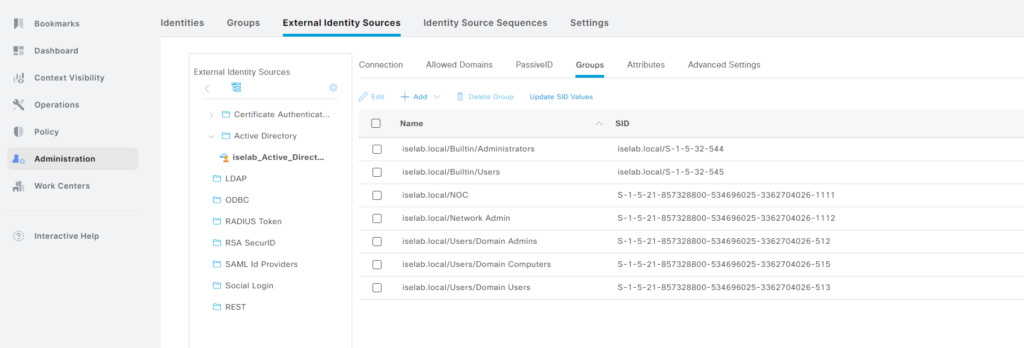
Don’t forget to click Save.
Creating Device Admin Policy Set
With all the prerequisites complete, it’s time to create the device admin policy set. This is where we will define what is required to authenticate and authorize. Go to Work Centers -> Device Admin Policy Sets under Device Administration:

There is a Default policy set, but we’re going to create a new one. Often policy sets are created based on device types. Click the cogwheel and then Insert new row above:

Give the policy set a name, description, select the Allowed Protocols to be Default Device Admin and then click the + to add a condition:

Now, click to add an attribute and then select Device Type:
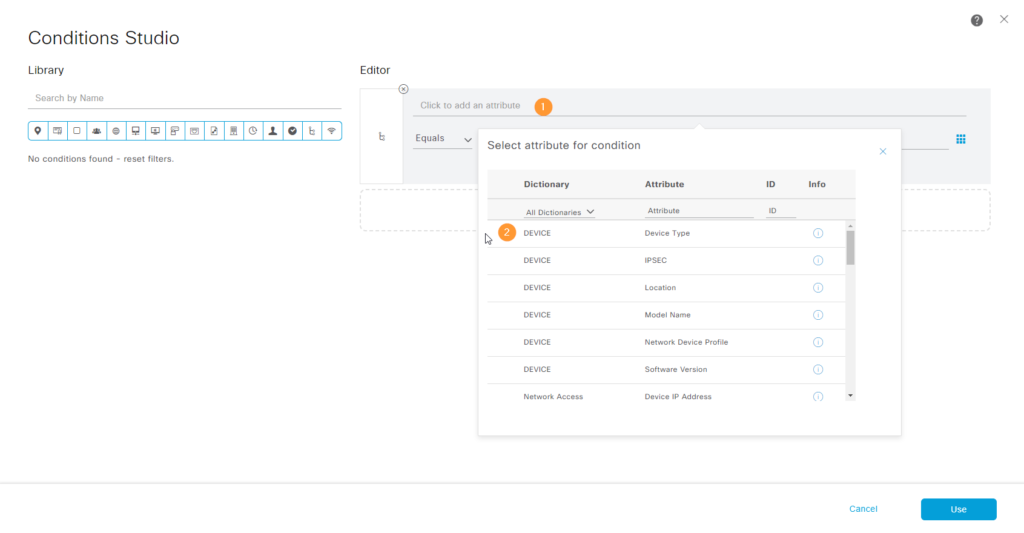
Then set it to equal the device type such as Cisco Switches and click Use (not Save)::
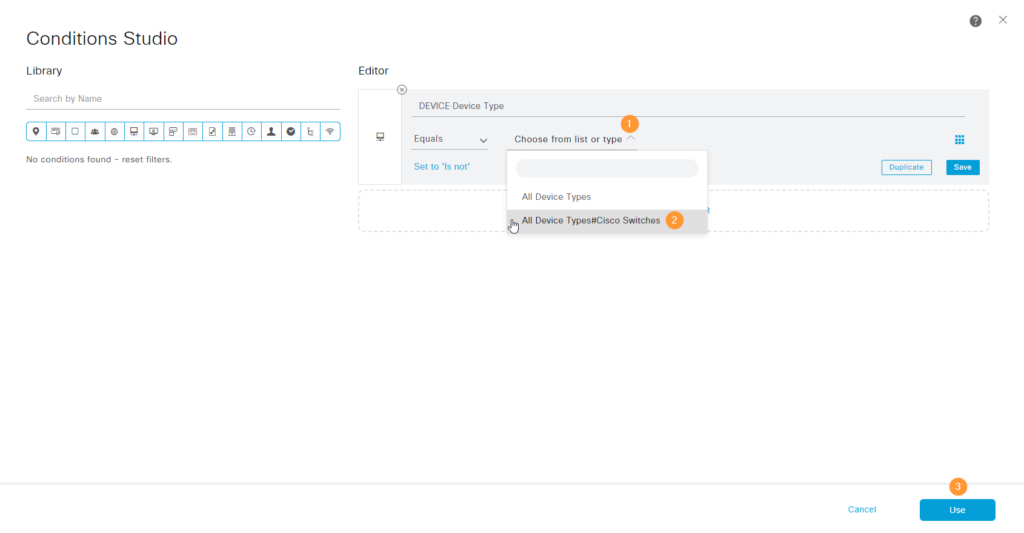
The policy set has been created:

Now click Save, then the right facing arrow on our new policy set:

This will open the policy set:
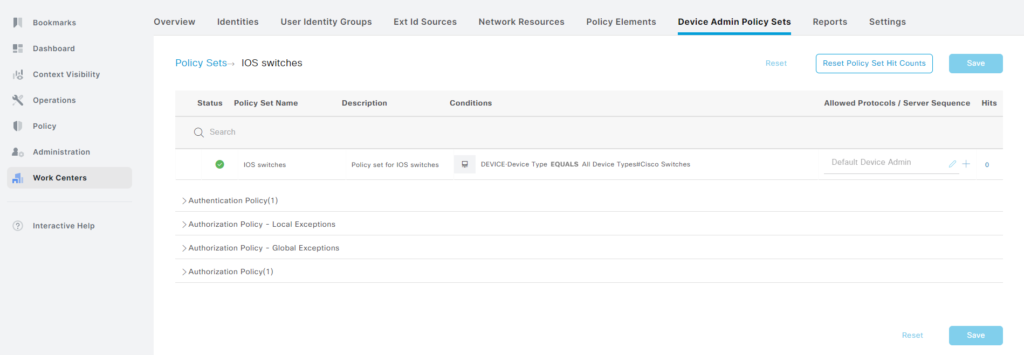
Click the right facing arrow next to Authentication Policy(1), then the cogwheel and Insert new row above:

Give the rule a name, select the identity source sequence we created earlier (AD_iselab_Internal_Users) and then we’ll add a condition matching our switches:
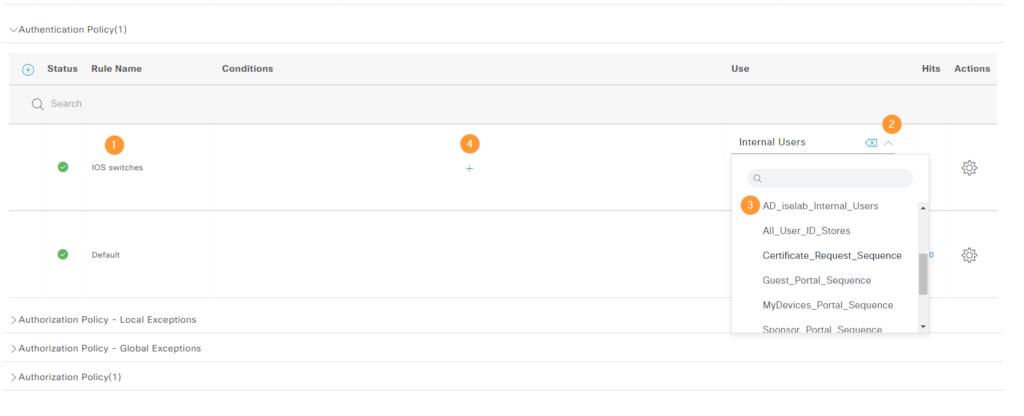
When complete, the rule looks like this:

Now, we’re going to add the authz rules, expand the section where it says Authorization Policy(1) by clicking the right facing arrow. There’s a default rule denying access:

We need a minimum of two authz rules, one to give access to network admins and one for NOC. However, I’ll add four rules to separate what happens when AD lookup is performed vs internal lookup. As always, click the cogwheel to insert rules above. Let’s start with with the AD rule for NOC. Give the rule a name, select the command set BasicCommands and the profile TACACS_PROFILE:

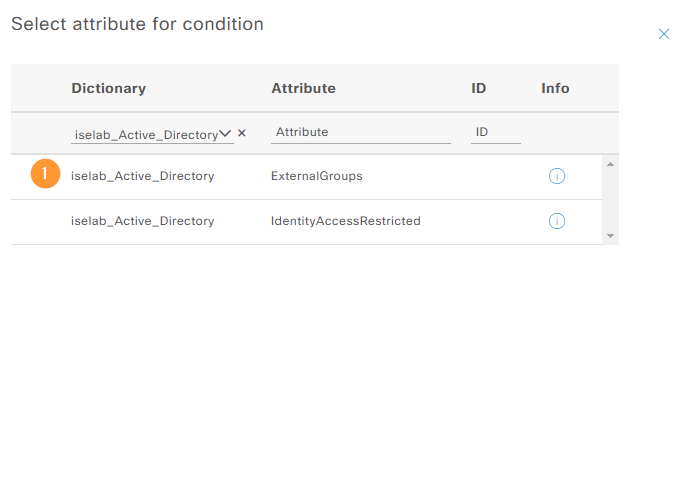
Add a condition by clicking the + sign. Add an attribute and select from iselab_Active_Directory which is our AD join point:
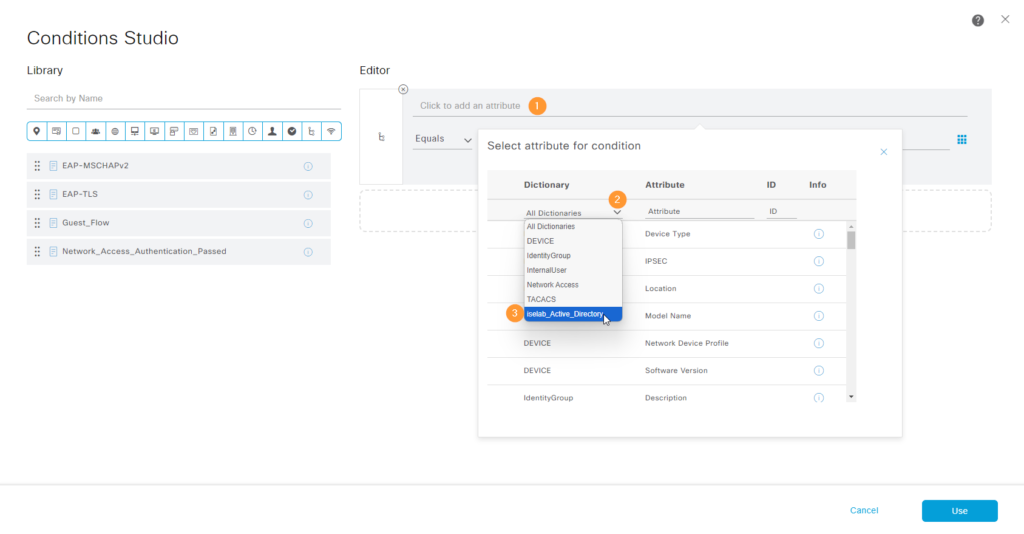
Select ExternalGroups:
Select the NOC group and click Use:
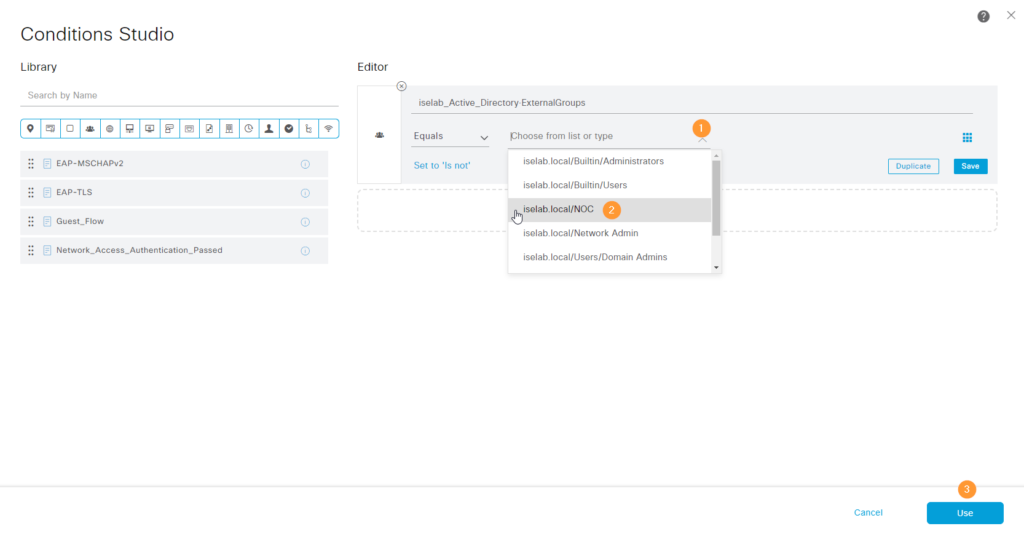
The authz rule has been added:

We’ll repeat the process for Network Admin. We now have the following rules:

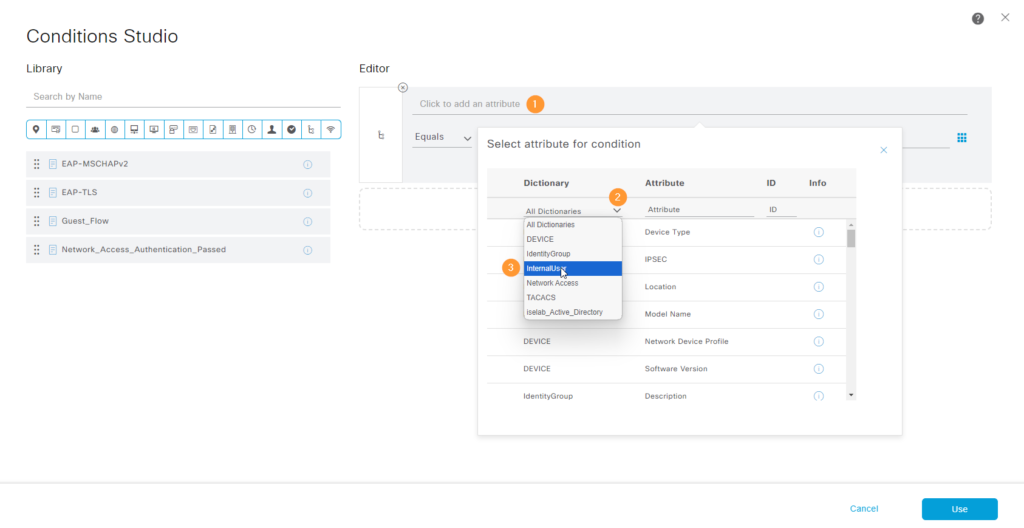
Now we’re going to add two rules based on internal identity group. Add the attribute from the InternalUser dictionary:
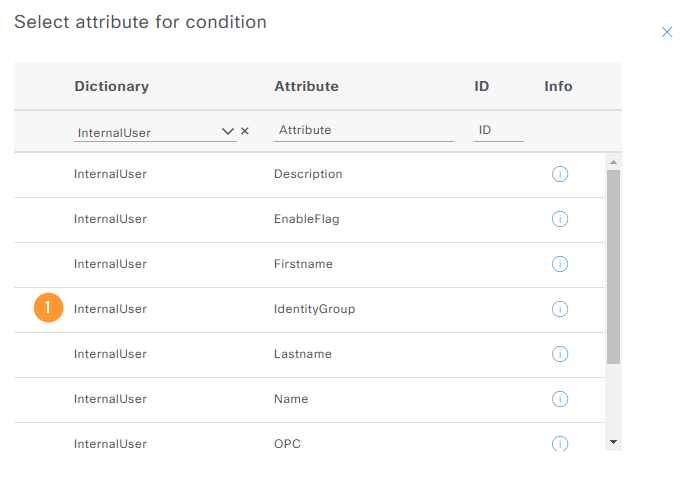
Select IdentityGroup:
The four rules have been created:
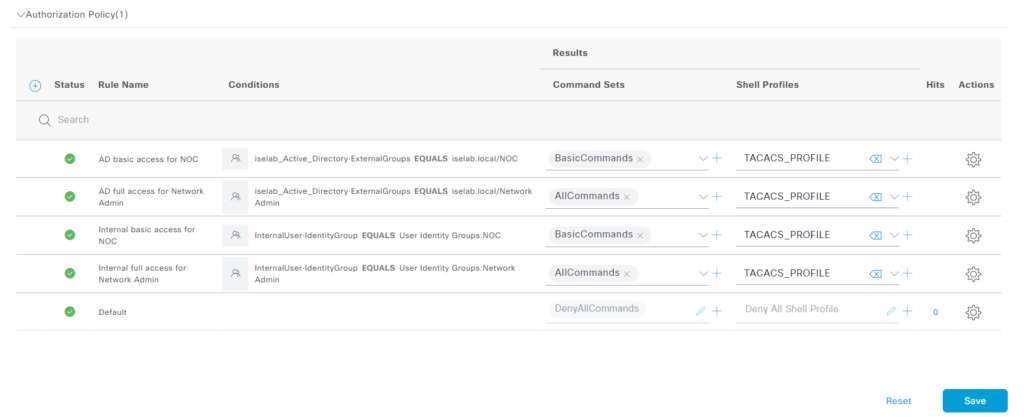
Don’t forget to click Save.
Verifying Access
All the work in ISE is done! Now we’re going to test different scenarios and run all kinds of debugs, packet captures, and live logs in ISE. I told you this was a deep dive!
Before we can do that, we need some AAA configuration on our switch. Let’s define our ISE server to be used for TACACS+:
tacacs server ise-1
 address ipv4 192.168.128.102
 key <redacted>
aaa group server tacacs+ ISE-TACACS-GROUP
 server name ise-1
 ip tacacs source-interface Vlan10
Enable AAA:
aaa new-model
Use TACACS+ for authentication, and fallback to local:
aaa authentication login default group ISE-TACACS-GROUP local
aaa authentication enable default group ISE-TACACS-GROUP enable
Use TACACS+ for authorization, authorize if already authenticated:
aaa authorization config-commands
aaa authorization exec default group ISE-TACACS-GROUP local if-authenticated
aaa authorization commands 0 default group ISE-TACACS-GROUP local if-authenticated
aaa authorization commands 1 default group ISE-TACACS-GROUP local if-authenticated
aaa authorization commands 15 default group ISE-TACACS-GROUP local if-authenticated
Enable accounting:
aaa accounting exec default start-stop group ISE-TACACS-GROUP
aaa accounting commands 0 default start-stop group ISE-TACACS-GROUP
aaa accounting commands 1 default start-stop group ISE-TACACS-GROUP
aaa accounting commands 15 default start-stop group ISE-TACACS-GROUP
I’ll enable debug logs to the buffer and increase the size of the logs:
logging buffered debugging
logging buffered 1024000
Let’s enable debugs on the switch:
AS01#debug aaa authentication
AAA Authentication debugging is on
AS01#debug aaa authorization
AAA Authorization debugging is on
AS01#debug tacacs authentication
TACACS+ authentication debugging is on
AS01#debug tacacs authorization
TACACS+ authorization debugging is on
AS01#debug tacacs events
TACACS+ events debugging is on
I’m using SSH from another switch and logging in as bob:
DS01#ssh -l bob 10.10.0.2
Password:

AS01#show priv
Current privilege level is 15
AS01#conf t
Command authorization failed.

AS01#ping 10.10.0.1
Type escape sequence to abort.
Sending 5, 100-byte ICMP Echos to 10.10.0.1, timeout is 2 seconds:
!!!!!
Success rate is 100 percent (5/5), round-trip min/avg/max = 155/181/268 ms
Notice that although Bob has privilege level 15, he is not able to configure anything. What do the debugs say? Bob logs in and passes authentication:
AAA/BIND(00000014): Bind i/f
AAA/AUTHEN/LOGIN (00000014): Pick method list 'default'
TPLUS: Queuing AAA Authentication request 20 for processing
TPLUS(00000014) login timer started 1020 sec timeout
TPLUS: processing authentication start request id 20
TPLUS: Authentication start packet created for 20(bob)
TPLUS: Using server 192.168.128.102
TPLUS: Source IP selected is: 10.10.0.2
TPLUS(00000014)/0/NB_WAIT/7FEFC8CA8698: Started 5 sec timeout
TPLUS(00000014)/0/NB_WAIT: socket event 2
TPLUS(00000014)/0/NB_WAIT: wrote entire 36 bytes request
TPLUS(00000014)/0/READ: socket event 1
TPLUS(00000014)/0/READ: Would block while reading
TPLUS(00000014)/0/READ: socket event 1
TPLUS(00000014)/0/READ: read entire 12 header bytes (expect 15 bytes data)
TPLUS(00000014)/0/READ: socket event 1
TPLUS(00000014)/0/READ: read entire 27 bytes response
TPLUS(00000014) login timer stopped
TPLUS(00000014)/0/7FEFC8CA8698: Processing the reply packet
TPLUS: Received authen response status GET_PASSWORD (8)
TPLUS(00000014)/0/None: Started 120 sec timeout
TPLUS: Queuing AAA Authentication request 20 for processing
TPLUS(00000014) login timer started 1020 sec timeout
TPLUS: processing authentication continue request id 20
TPLUS: Authentication continue packet generated for 20
TPLUS(00000014)/0/None: Timer Stoped
TPLUS(00000014)/0/WRITE/7FEFC8CA8698: Started 5 sec timeout
TPLUS(00000014)/0/WRITE: wrote entire 30 bytes request
TPLUS(00000014)/0/READ: socket event 1
TPLUS(00000014)/0/READ: read entire 12 header bytes (expect 6 bytes data)
TPLUS(00000014)/0/READ: socket event 1
TPLUS(00000014)/0/READ: read entire 18 bytes response
TPLUS(00000014) login timer stopped
TPLUS(00000014)/0/7FEFC8CA8698: Processing the reply packet
TPLUS: Received authen response status PASS (2)
Bob is authorized to use a shell with privilege level 15:
AAA/AUTHOR (0x14): Pick method list 'default'
TPLUS: Queuing AAA Authorization request 20 for processing
TPLUS(00000014) login timer started 1020 sec timeout
TPLUS: processing authorization request id 20
TPLUS: Protocol set to None .....Skipping
TPLUS: Sending AV service=shell
TPLUS: Sending AV cmd*
TPLUS: Authorization request created for 20(bob)
TPLUS: using previously set server 192.168.128.102 from group ISE-TACACS-GROUP
TPLUS: Source IP selected is: 10.10.0.2
TPLUS(00000014)/0/NB_WAIT/7FEFC8CA8CB0: Started 5 sec timeout
TPLUS(00000014)/0/NB_WAIT: socket event 2
TPLUS(00000014)/0/NB_WAIT: wrote entire 55 bytes request
TPLUS(00000014)/0/READ: socket event 1
TPLUS(00000014)/0/READ: Would block while reading
TPLUS(00000014)/0/READ: socket event 1
TPLUS(00000014)/0/READ: read entire 12 header bytes (expect 30 bytes data)
TPLUS(00000014)/0/READ: socket event 1
TPLUS(00000014)/0/READ: read entire 42 bytes response
TPLUS(00000014) login timer stopped
TPLUS(00000014)/0/7FEFC8CA8CB0: Processing the reply packet
TPLUS: Processed AV idletime=15
TPLUS: Processed AV priv-lvl=15
TPLUS: received authorization response for 20: PASS
AAA/AUTHOR/EXEC(00000014): processing AV cmd=
AAA/AUTHOR/EXEC(00000014): processing AV idletime=900
AAA/AUTHOR/EXEC(00000014): processing AV priv-lvl=15
AAA/AUTHOR/EXEC(00000014): Authorization successful
Bob issues command show privilege which is authorized:
AAA/AUTHOR: auth_need : user= 'bob' ruser= 'AS01'rem_addr= '10.10.0.1' priv= 1 list= '' AUTHOR-TYPE= 'commands'
AAA: parse name=tty1 idb type=-1 tty=-1
AAA: name=tty1 flags=0x11 type=5 shelf=0 slot=0 adapter=0 port=1 channel=0
AAA/MEMORY: create_user (0x7FEFC8CA8AF0) user='bob' ruser='AS01' ds0=0 port='tty1' rem_addr='10.10.0.1' authen_type=ASCII service=NONE priv=1 initial_task_id='0', vrf= (id=0)
tty1 AAA/AUTHOR/CMD (3893996130): Port='tty1' list='' service=CMD
AAA/AUTHOR/CMD: tty1 (3893996130) user='bob'
tty1 AAA/AUTHOR/CMD (3893996130): send AV service=shell
tty1 AAA/AUTHOR/CMD (3893996130): send AV cmd=show
tty1 AAA/AUTHOR/CMD (3893996130): send AV cmd-arg=privilege
tty1 AAA/AUTHOR/CMD (3893996130): send AV cmd-arg=<cr>
tty1 AAA/AUTHOR/CMD(3893996130): found list "default"
tty1 AAA/AUTHOR/CMD (3893996130): Method=ISE-TACACS-GROUP (tacacs+)
TAC+/AUTHOR: (3893996130): user=bob
TAC+/AUTHOR: (3893996130): send AV service=shell
TAC+/AUTHOR: (3893996130): send AV cmd=show
TAC+/AUTHOR: (3893996130): send AV cmd-arg=privilege
TAC+/AUTHOR: (3893996130): send AV cmd-arg=<cr>
TAC+: using previously set server 192.168.128.102 from group ISE-TACACS-GROUP
TAC+: Opening TCP/IP to 192.168.128.102/49 timeout=5
TAC+: Opened TCP/IP handle 0x7FEFC87DD358 to 192.168.128.102/49 using source 10.10.0.2
 TAC+: Shared secret is cisco
TAC+: 192.168.128.102 req=7FEFC8887610 Qd id=18446744073308580450 ver=192 handle=0x7FEFC87DD358 expire=5 AUTHOR/START queued
TAC+: 192.168.128.102 id=18446744073308580450 wrote 90 of 90 bytes
TAC+: 192.168.128.102 req=7FEFC8887610 Qd id=18446744073308580450 ver=192 handle=0x7FEFC87DD358 expire=4 AUTHOR/START sent
TAC+: 192.168.128.102 read=12 wanted=12 alloc=12 got=12
TAC+: 192.168.128.102 read=18 wanted=18 alloc=18 got=6
TAC+: 192.168.128.102 received 18 byte reply for 7FEFC8887610
TAC+: req=7FEFC8887610 Tx id=18446744073308580450 ver=192 handle=0x7FEFC87DD358 expire=4 AUTHOR/START processed
TAC+: periodic timer stopped (queue empty)
 TAC+: Shared secret is cisco
TAC+: (-400971166): received author response status = PASS_ADD
TAC+: Closing TCP/IP 0x7FEFC87DD358 connection to 192.168.128.102/49
AAA/AUTHOR (3893996130): Post authorization status = PASS_ADD
He then tries his luck with configure terminal, but is not allowed:
tty1 AAA/AUTHOR/CMD (1597945666): Port='tty1' list='' service=CMD
AAA/AUTHOR/CMD: tty1 (1597945666) user='bob'
tty1 AAA/AUTHOR/CMD (1597945666): send AV service=shell
tty1 AAA/AUTHOR/CMD (1597945666): send AV cmd=configure
tty1 AAA/AUTHOR/CMD (1597945666): send AV cmd-arg=terminal
tty1 AAA/AUTHOR/CMD (1597945666): send AV cmd-arg=<cr>
tty1 AAA/AUTHOR/CMD(1597945666): found list "default"
tty1 AAA/AUTHOR/CMD (1597945666): Method=ISE-TACACS-GROUP (tacacs+)
TAC+/AUTHOR: (1597945666): user=bob
TAC+/AUTHOR: (1597945666): send AV service=shell
TAC+/AUTHOR: (1597945666): send AV cmd=configure
TAC+/AUTHOR: (1597945666): send AV cmd-arg=terminal
TAC+/AUTHOR: (1597945666): send AV cmd-arg=<cr>
TAC+: using previously set server 192.168.128.102 from group ISE-TACACS-GROUP
TAC+: Opening TCP/IP to 192.168.128.102/49 timeout=5
TAC+: Opened TCP/IP handle 0x7FEFC87DD358 to 192.168.128.102/49 using source 10.10.0.2
TAC+: periodic timer started
TAC+: 192.168.128.102 req=7FEFC8887610 Qd id=1597945666 ver=192 handle=0x7FEFC87DD358 expire=5 AUTHOR/START queued
TAC+: 192.168.128.102 id=1597945666 wrote 94 of 94 bytes
TAC+: 192.168.128.102 req=7FEFC8887610 Qd id=1597945666 ver=192 handle=0x7FEFC87DD358 expire=4 AUTHOR/START sent
TAC+: 192.168.128.102 read=12 wanted=12 alloc=12 got=12
TAC+: 192.168.128.102 read=18 wanted=18 alloc=18 got=6
TAC+: 192.168.128.102 received 18 byte reply for 7FEFC8887610
TAC+: req=7FEFC8887610 Tx id=1597945666 ver=192 handle=0x7FEFC87DD358 expire=4 AUTHOR/START processed
TAC+: periodic timer stopped (queue empty)
TAC+: (1597945666): received author response status = FAIL
TAC+: Closing TCP/IP 0x7FEFC87DD358 connection to 192.168.128.102/49
AAA/AUTHOR (1597945666): Post authorization status = FAIL
Now let’s take a look at the same interaction from ISE perspective. We can see that our policy set has hits:

We’re using the expected authc rule:

Also the expected authz rule:
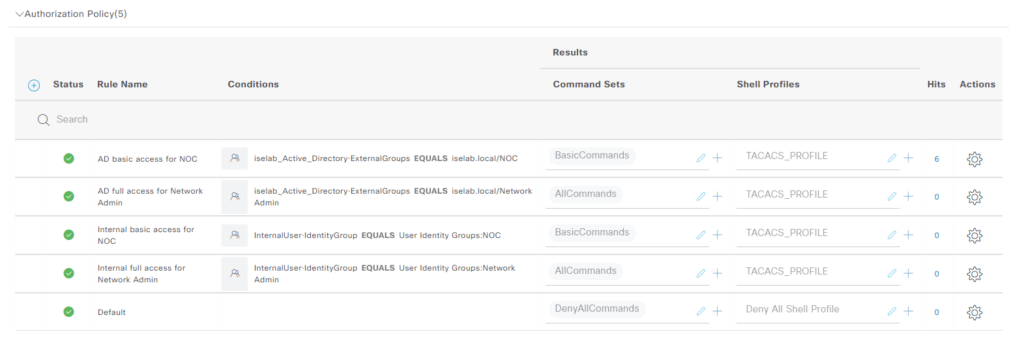
Now we’ll go to the TACACS live logs. Go to Operations -> Live Logs under TACACS:
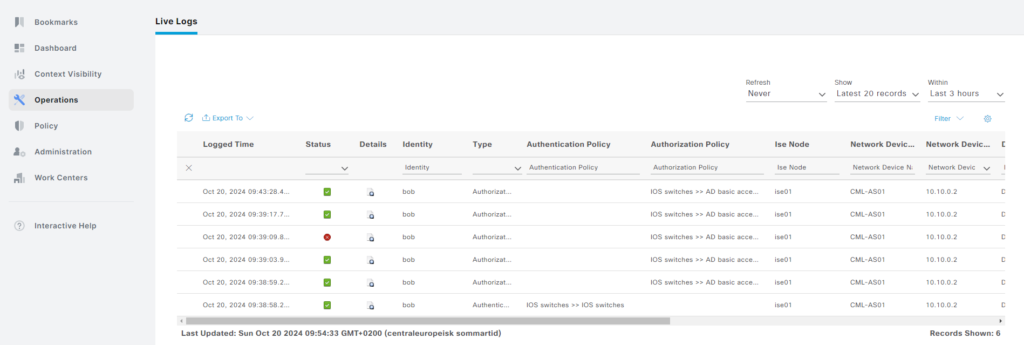
There’s a lot of information here. First let’s start with when Bob authenticated (the first entry):
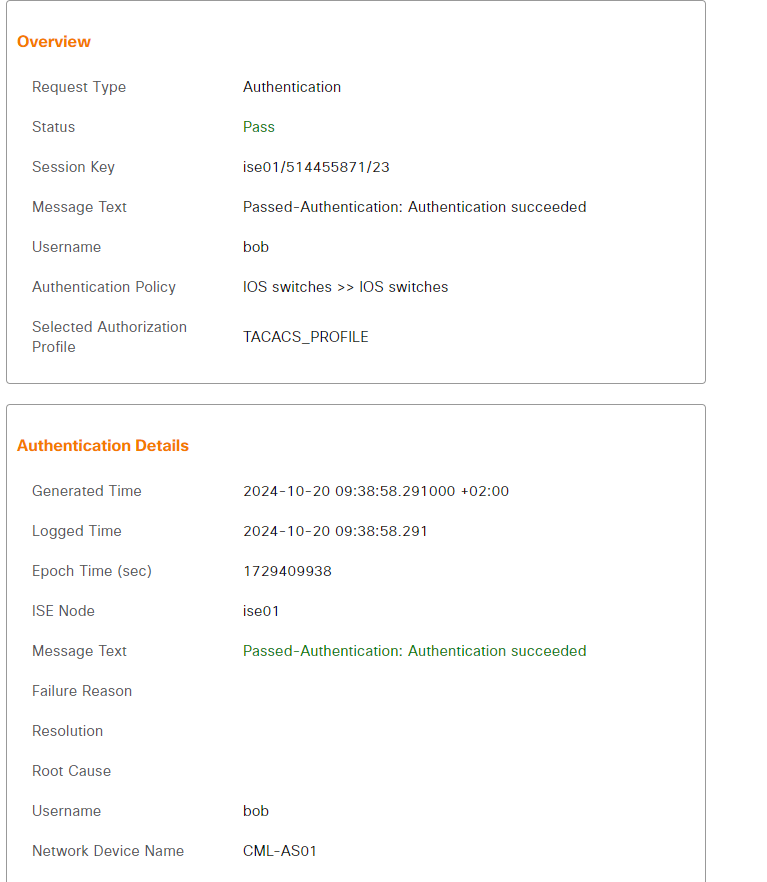
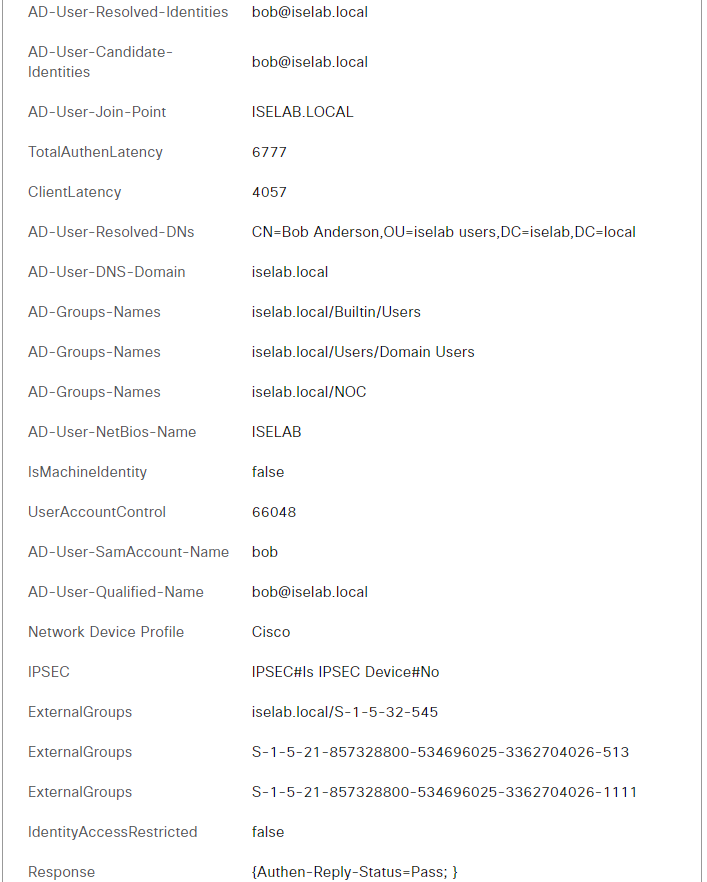
Bob passed authentication successfully. Further down we get a lot of details about Bob as he authenticated via AD:
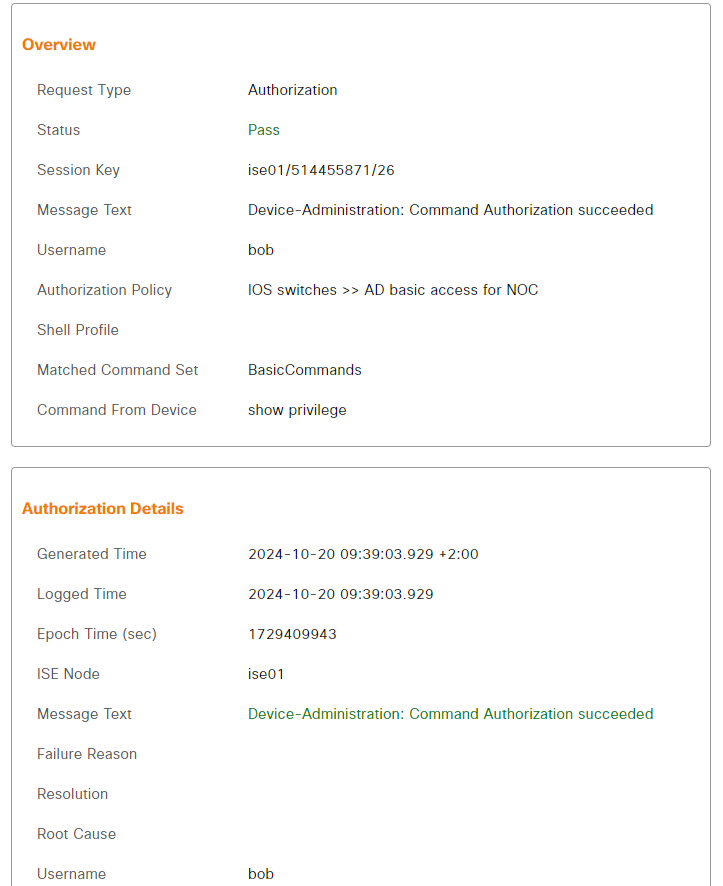
The logs show that the show privilege command was authorized:
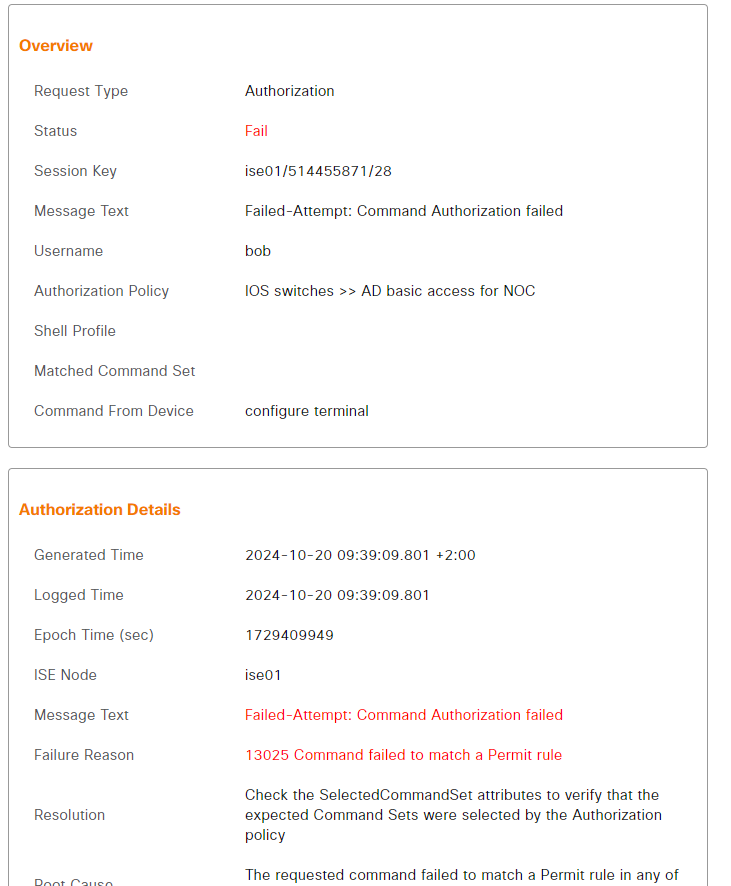
However, configure terminal was not authorized:
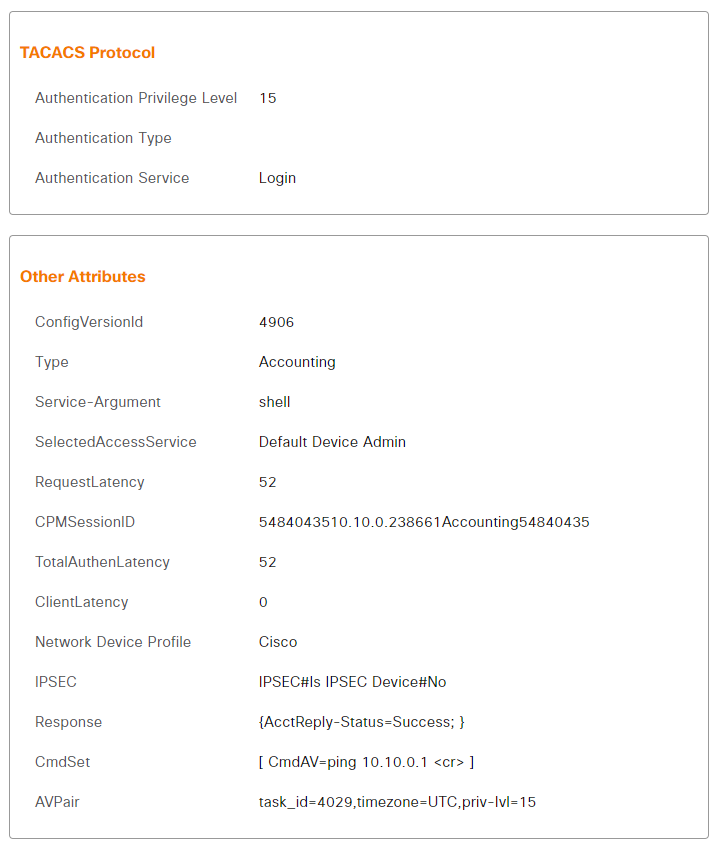
As we enabled accounting in our switch, we can see all the commands that have been used by going to Operations -> Reports -> Device Administration -> TACACS Accounting:
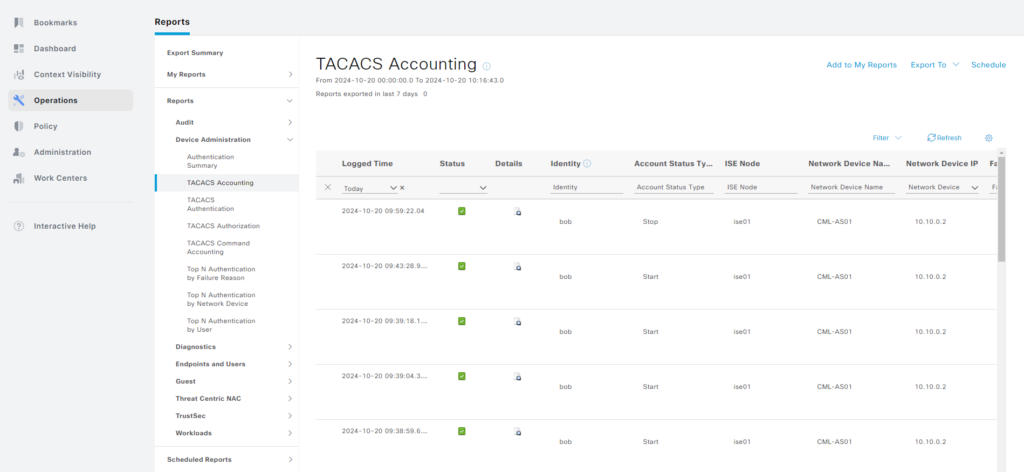
Here’s an example of when Bob used the ping command:
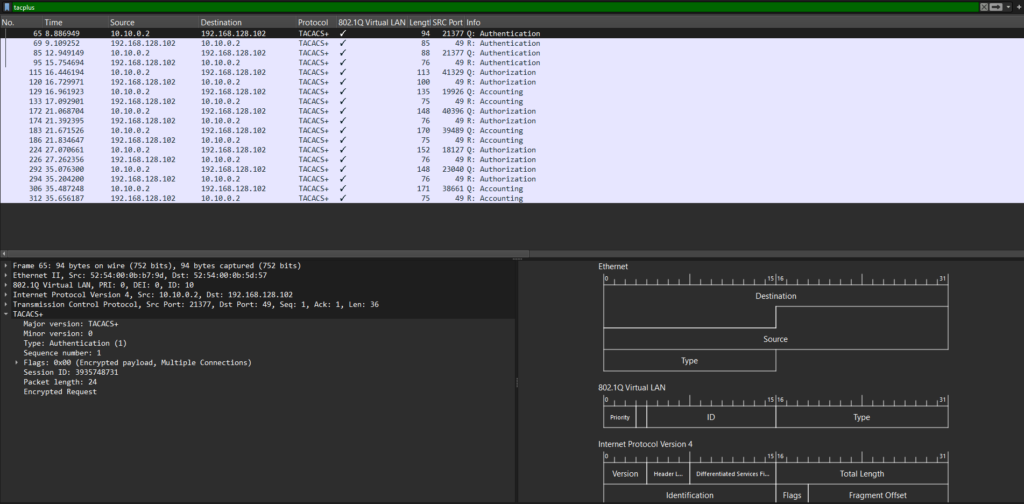
Now for packet captures. By default we won’t see much because TACACS+ is encrypted:
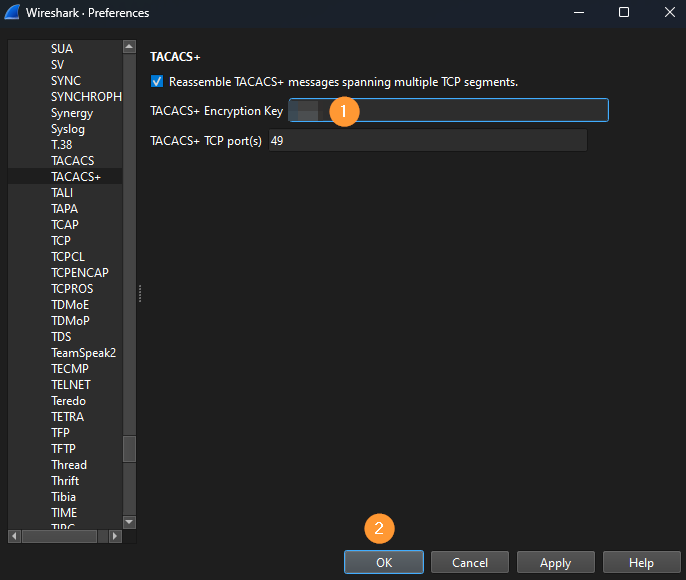
To decrypt the packets, go to Edit -> Preferences, then expand Protocols, go to TACACS+, enter the encryption key and click OK:
There is now a decrypted request. A Login is requested:
Frame 65: 94 bytes on wire (752 bits), 94 bytes captured (752 bits)
Ethernet II, Src: 52:54:00:0b:b7:9d, Dst: 52:54:00:0b:5d:57
802.1Q Virtual LAN, PRI: 0, DEI: 0, ID: 10
Internet Protocol Version 4, Src: 10.10.0.2, Dst: 192.168.128.102
Transmission Control Protocol, Src Port: 21377, Dst Port: 49, Seq: 1, Ack: 1, Len: 36
TACACS+
    Major version: TACACS+
    Minor version: 0
    Type: Authentication (1)
    Sequence number: 1
    Flags: 0x00 (Encrypted payload, Multiple Connections)
    Session ID: 3935748731
    Packet length: 24
    Encrypted Request
    Decrypted Request
        Action: Inbound Login (1)
        Privilege Level: 1
        Authentication type: ASCII (1)
        Service: Login (1)
        User len: 3
        User: bob
        Port len: 4
        Port: tty1
        Remaddr len: 9
        Remote Address: 10.10.0.1
        ASCII Data Length: 0
ISE asks for credentials:
Frame 69: 85 bytes on wire (680 bits), 85 bytes captured (680 bits)
Ethernet II, Src: 52:54:00:0b:5d:57, Dst: 52:54:00:0b:b7:9d
802.1Q Virtual LAN, PRI: 0, DEI: 0, ID: 10
Internet Protocol Version 4, Src: 192.168.128.102, Dst: 10.10.0.2
Transmission Control Protocol, Src Port: 49, Dst Port: 21377, Seq: 1, Ack: 37, Len: 27
TACACS+
    Major version: TACACS+
    Minor version: 0
    Type: Authentication (1)
    Sequence number: 2
    Flags: 0x00 (Encrypted payload, Multiple Connections)
    Session ID: 3935748731
    Packet length: 15
    Encrypted Reply
    Decrypted Reply
        Status: Send Password (0x05)
        Flags: 0x01(NoEcho)
        Server message length: 9
        Server message: Password:
        Data length: 0
Credentials are provided:
Frame 85: 88 bytes on wire (704 bits), 88 bytes captured (704 bits)
Ethernet II, Src: 52:54:00:0b:b7:9d, Dst: 52:54:00:0b:5d:57
802.1Q Virtual LAN, PRI: 0, DEI: 0, ID: 10
Internet Protocol Version 4, Src: 10.10.0.2, Dst: 192.168.128.102
Transmission Control Protocol, Src Port: 21377, Dst Port: 49, Seq: 37, Ack: 28, Len: 30
TACACS+
    Major version: TACACS+
    Minor version: 0
    Type: Authentication (1)
    Sequence number: 3
    Flags: 0x00 (Encrypted payload, Multiple Connections)
    Session ID: 3935748731
    Packet length: 18
    Encrypted Request
    Decrypted Request
        Flags: 0x00
        User length: 13
        User: <redacted>
        Data length: 0
Authentication passes:
Frame 95: 76 bytes on wire (608 bits), 76 bytes captured (608 bits)
Ethernet II, Src: 52:54:00:0b:5d:57, Dst: 52:54:00:0b:b7:9d
802.1Q Virtual LAN, PRI: 0, DEI: 0, ID: 10
Internet Protocol Version 4, Src: 192.168.128.102, Dst: 10.10.0.2
Transmission Control Protocol, Src Port: 49, Dst Port: 21377, Seq: 28, Ack: 67, Len: 18
TACACS+
    Major version: TACACS+
    Minor version: 0
    Type: Authentication (1)
    Sequence number: 4
    Flags: 0x00 (Encrypted payload, Multiple Connections)
    Session ID: 3935748731
    Packet length: 6
    Encrypted Reply
    Decrypted Reply
        Status: Authentication Passed (0x01)
        Flags: 0x00
        Server message length: 0
        Data length: 0
Now the user needs the exec shell:
Frame 115: 113 bytes on wire (904 bits), 113 bytes captured (904 bits)
Ethernet II, Src: 52:54:00:0b:b7:9d, Dst: 52:54:00:0b:5d:57
802.1Q Virtual LAN, PRI: 0, DEI: 0, ID: 10
Internet Protocol Version 4, Src: 10.10.0.2, Dst: 192.168.128.102
Transmission Control Protocol, Src Port: 41329, Dst Port: 49, Seq: 1, Ack: 1, Len: 55
TACACS+
    Major version: TACACS+
    Minor version: 0
    Type: Authorization (2)
    Sequence number: 1
    Flags: 0x00 (Encrypted payload, Multiple Connections)
    Session ID: 2481012989
    Packet length: 43
    Encrypted Request
    Decrypted Request
        Auth Method: TACACSPLUS (0x06)
        Privilege Level: 1
        Authentication type: ASCII (1)
        Service: Login (1)
        User len: 3
        User: bob
        Port len: 4
        Port: tty1
        Remaddr len: 9
        Remote Address: 10.10.0.1
        Arg count: 2
        Arg[0] length: 13
        Arg[0] value: service=shell
        Arg[1] length: 4
        Arg[1] value: cmd*
ISE approves:
Frame 120: 100 bytes on wire (800 bits), 100 bytes captured (800 bits)
Ethernet II, Src: 52:54:00:0b:5d:57, Dst: 52:54:00:0b:b7:9d
802.1Q Virtual LAN, PRI: 0, DEI: 0, ID: 10
Internet Protocol Version 4, Src: 192.168.128.102, Dst: 10.10.0.2
Transmission Control Protocol, Src Port: 49, Dst Port: 41329, Seq: 1, Ack: 56, Len: 42
TACACS+
    Major version: TACACS+
    Minor version: 0
    Type: Authorization (2)
    Sequence number: 2
    Flags: 0x00 (Encrypted payload, Multiple Connections)
    Session ID: 2481012989
    Packet length: 30
    Encrypted Reply
    Decrypted Reply
        Auth Status: PASS_ADD (0x01)
        Server Msg length: 0
        Data length: 0
        Arg count: 2
        Arg[0] length: 11
        Arg[0] value: idletime=15
        Arg[1] length: 11
        Arg[1] value: priv-lvl=15
The switch, as it’s configured with accounting, notifies ISE of the exec shell being activated:
Frame 129: 135 bytes on wire (1080 bits), 135 bytes captured (1080 bits)
Ethernet II, Src: 52:54:00:0b:b7:9d, Dst: 52:54:00:0b:5d:57
802.1Q Virtual LAN, PRI: 0, DEI: 0, ID: 10
Internet Protocol Version 4, Src: 10.10.0.2, Dst: 192.168.128.102
Transmission Control Protocol, Src Port: 19926, Dst Port: 49, Seq: 1, Ack: 1, Len: 77
TACACS+
    Major version: TACACS+
    Minor version: 0
    Type: Accounting (3)
    Sequence number: 1
    Flags: 0x00 (Encrypted payload, Multiple Connections)
    Session ID: 1416637663
    Packet length: 65
    Encrypted Request
    Decrypted Request
        Flags: 0x02
        Auth Method: TACACSPLUS (0x06)
        Privilege Level: 15
        Authentication type: ASCII (1)
        Service: Login (1)
        User len: 3
        User: bob
        Port len: 4
        Port: tty1
        Remaddr len: 9
        Remote Address: 10.10.0.1
        Arg count: 3
        Arg[0] length: 12
        Arg[0] value: task_id=4028
        Arg[1] length: 12
        Arg[1] value: timezone=UTC
        Arg[2] length: 13
        Arg[2] value: service=shell
ISE acknowledges:
Frame 133: 75 bytes on wire (600 bits), 75 bytes captured (600 bits)
Ethernet II, Src: 52:54:00:0b:5d:57, Dst: 52:54:00:0b:b7:9d
802.1Q Virtual LAN, PRI: 0, DEI: 0, ID: 10
Internet Protocol Version 4, Src: 192.168.128.102, Dst: 10.10.0.2
Transmission Control Protocol, Src Port: 49, Dst Port: 19926, Seq: 1, Ack: 78, Len: 17
TACACS+
    Major version: TACACS+
    Minor version: 0
    Type: Accounting (3)
    Sequence number: 2
    Flags: 0x00 (Encrypted payload, Multiple Connections)
    Session ID: 1416637663
    Packet length: 5
    Encrypted Reply
    Decrypted Reply
        Status: Success (0x01)
        Server Msg length: 0
        Data length: 0
Now Bob is using show privilege:
Frame 172: 148 bytes on wire (1184 bits), 148 bytes captured (1184 bits)
Ethernet II, Src: 52:54:00:0b:b7:9d, Dst: 52:54:00:0b:5d:57
802.1Q Virtual LAN, PRI: 0, DEI: 0, ID: 10
Internet Protocol Version 4, Src: 10.10.0.2, Dst: 192.168.128.102
Transmission Control Protocol, Src Port: 40396, Dst Port: 49, Seq: 1, Ack: 1, Len: 90
TACACS+
    Major version: TACACS+
    Minor version: 0
    Type: Authorization (2)
    Sequence number: 1
    Flags: 0x00 (Encrypted payload, Multiple Connections)
    Session ID: 3893996130
    Packet length: 78
    Encrypted Request
    Decrypted Request
        Auth Method: NONE (0x01)
        Privilege Level: 1
        Authentication type: ASCII (1)
        Service: TAC_PLUS_AUTHEN_SVC_NONE (0)
        User len: 3
        User: bob
        Port len: 4
        Port: tty1
        Remaddr len: 9
        Remote Address: 10.10.0.1
        Arg count: 4
        Arg[0] length: 13
        Arg[0] value: service=shell
        Arg[1] length: 8
        Arg[1] value: cmd=show
        Arg[2] length: 17
        Arg[2] value: cmd-arg=privilege
        Arg[3] length: 12
        Arg[3] value: cmd-arg=<cr>
The command is authorized:
Frame 174: 76 bytes on wire (608 bits), 76 bytes captured (608 bits)
Ethernet II, Src: 52:54:00:0b:5d:57, Dst: 52:54:00:0b:b7:9d
802.1Q Virtual LAN, PRI: 0, DEI: 0, ID: 10
Internet Protocol Version 4, Src: 192.168.128.102, Dst: 10.10.0.2
Transmission Control Protocol, Src Port: 49, Dst Port: 40396, Seq: 1, Ack: 91, Len: 18
TACACS+
    Major version: TACACS+
    Minor version: 0
    Type: Authorization (2)
    Sequence number: 2
    Flags: 0x00 (Encrypted payload, Multiple Connections)
    Session ID: 3893996130
    Packet length: 6
    Encrypted Reply
    Decrypted Reply
        Auth Status: PASS_ADD (0x01)
        Server Msg length: 0
        Data length: 0
        Arg count: 0
Great, we’ve verified Bob. Now let’s do the same for Alice. I won’t repeat everything again, but rather just look at the differences.
DS01#ssh -l alice 10.10.0.2
Password:

AS01#show priv
Current privilege level is 15
AS01#conf t
Enter configuration commands, one per line.  End with CNTL/Z.
AS01(config)#
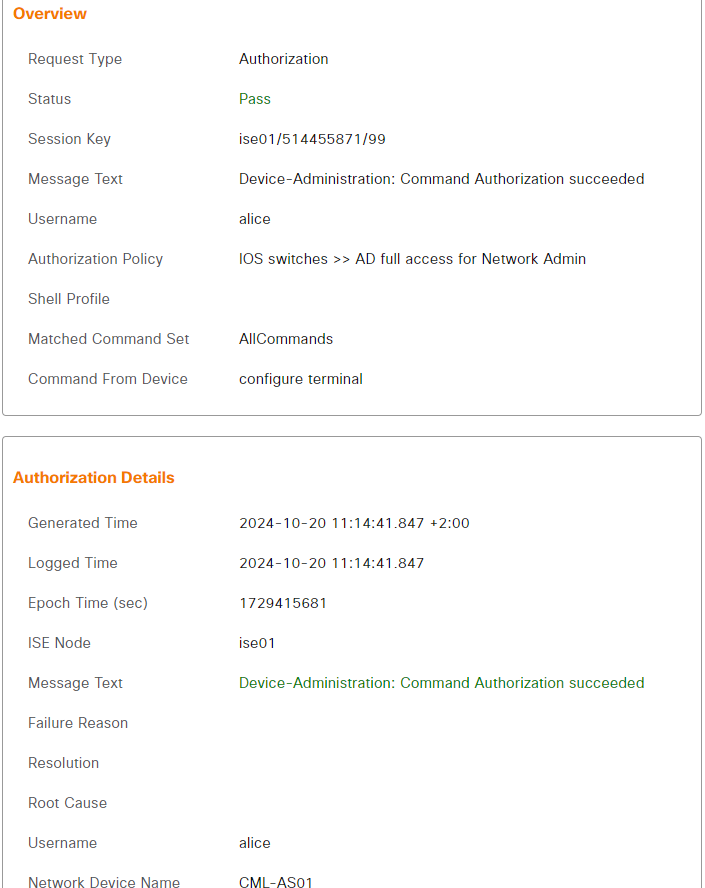
Alice was allowed to go into configuration mode. The live logs shows that the command was authorized and that the command set was AllCommands:
Now we’re going to try to authenticate using the internal users. At this point I realized having the exact same name in the internal ISE identity store and AD is not going to work well. ISE is going to try to look up the account in AD and it exists there, so it wouldn’t move on to the internal store. I’m renaming the users to have internal added to them:

Let’s try to login with Bob_internal:
DS01#ssh -l bob_internal 10.10.0.2
Password:
AS01#conf t
Command authorization failed.
This works. Note that if you don’t want to allow the internal identity store to be used while AD is online, you need to create a more complex policy set or keep this password locked away in some PAM, for example. When checking the live logs, we can see that the user was not found in AD:
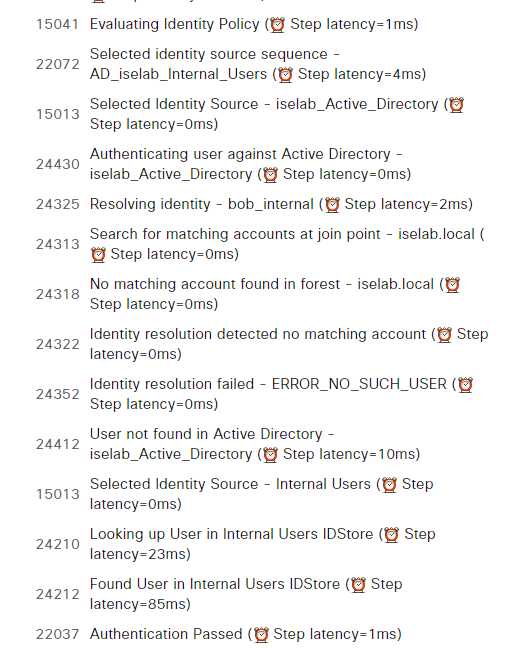
We’ve verified that the internal user works. Note that it won’t be possible to login with a fallback account that is locally configured on the switched while ISE is reachable:
DS01#ssh -l fallback 10.10.0.2
Password:

Password:
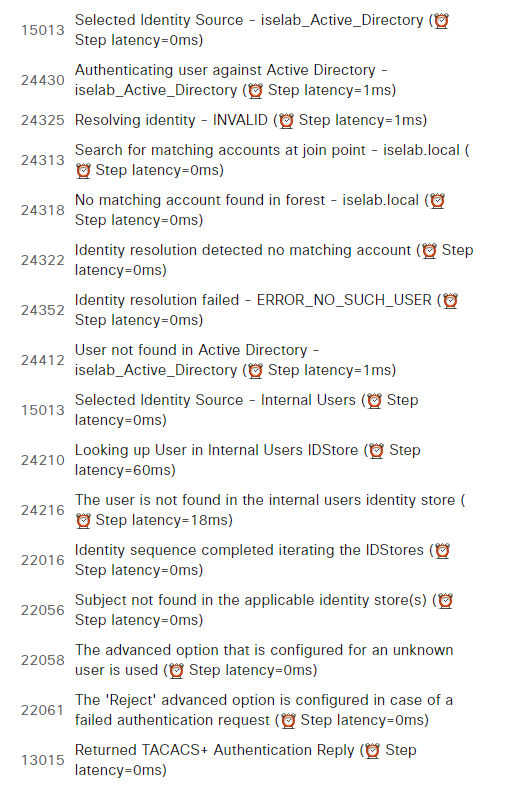
This is not working because this user is not in AD and also not in the internal store:
Testing Fallback Access
We’ll have to simulate a failure of ISE by blocking access to it. I’ll do this by implementing an ACL on the upstream switch, DS01:
ip access-list extended BLOCK_ISE_IN
 10 deny ip any host 192.168.128.102
 20 permit ip any any
ip access-list extended BLOCK_ISE_OUT
 10 deny ip host 192.168.128.102 any
 20 permit ip any any
!
interface Vlan10
 ip address 10.10.0.1 255.255.255.0
 ip access-group BLOCK_ISE_IN in
 ip access-group BLOCK_ISE_OUT out
Now when logging in with the fallback user, there’s going to be a five second delay before the user is authenticated:
05:47:44.751: AAA/BIND(00000028): Bind i/f
05:47:44.751: AAA/AUTHEN/LOGIN (00000028): Pick method list 'default'
05:47:44.751: TPLUS: Queuing AAA Authentication request 40 for processing
05:47:44.752: TPLUS(00000028) login timer started 1020 sec timeout
05:47:44.752: TPLUS: processing authentication start request id 40
05:47:44.752: TPLUS: Authentication start packet created for 40(fallback)
05:47:44.752: TPLUS: Using server 192.168.128.102
05:47:44.752: TPLUS: Source IP selected is: 10.10.0.2
05:47:44.752: TPLUS(00000028)/0/NB_WAIT/7FEFC87DD518: Started 5 sec timeout
05:47:49.752: TPLUS(00000028)/0/NB_WAIT/7FEFC87DD518: timed out
05:47:49.752: TPLUS(00000028)/0/NB_WAIT/7FEFC87DD518: timed out, clean up
05:47:49.752: TPLUS(00000028) login timer stopped
05:47:49.752: TPLUS(00000028)/0/7FEFC87DD518: Processing the reply packet
05:47:49.752: TPLUS: Invalid Client information received as input
05:47:54.156: %SEC_LOGIN-5-LOGIN_SUCCESS: Login Success [user: fallback] [Source: 10.10.0.1] [localport: 22] at 05:47:54 UTC
05:47:54.156: %SSH-5-SSH2_USERAUTH: User 'fallback' authentication for SSH2 Session from 10.10.0.1 (tty = 0) using crypto cipher '[email protected]', hmac '[email protected]' Succeeded
The five second delay is because of waiting for a reply from the TACACS+ server before it times out and authenticates locally instead.
Summary
This has been a massive post that covers most of what there is to know about device admin in ISE. We covered the benefits of TACACS+, such as command authorization, the flow of the protocol, how to configure everything in ISE, and also how to verify that it’s working.
Awesome job, we’re currently doing a ISE upgrade at work and this was great timing!
Thanks!
Thank you so much for this post it is very informative and I learned a lot here as so much detail.
I just recently completed an ISE cluster upgrade and used an ACL similar to the one you mentioned during my upgrade to work around a specific issue we had experienced in the first psn upgrade. The second stage of the upgrade worked seamlessly thanks to the ACL.
Thanks again for sharing this post.
Thanks, Daniel!
Hopefully more to come on other ISE related topics.
Simple and detailed. Thank you very much for sharing these info!!!
Thanks!
This has been a tremendous help, thank you for putting this together!
Happy to help!