It’s been a while since I did an on-premises installation of the Catalyst SDWAN controllers and as I recently had to go through the process, I thought I would document it and post it here for people that want to build their own lab.
The first thing that happens after booting the Manager is that you need to login with admin/admin and then set a new password:
vmanage login: Admin
Password:
Welcome to Viptela CLI
admin connected from 127.0.0.1 using console on vmanage
You must set an initial admin password different from default password.
Password:
Re-enter password:
After that we must select the persona (what services the Manager should run). For a non-cluster install it’s going to be both COMPUTE and DATA:
1) COMPUTE_AND_DATA
2) DATA
3) COMPUTE
Select persona for vManage [1, 2 or 3]:
Select 1.
You will be asked to confirm:
You chose persona COMPUTE_AND_DATA (1)
Are you sure? [y/n]
Type y.
You will then be asked what storage device to be used (you need a secondary disk):
vManage has been deployed with persona : {"persona": "COMPUTE_AND_DATA"}
Available storage devices:
sdb      100GB
1) sdb
Select storage device to use:
Here I’ll select 1.
Then we are asked to format the disk:
Would you like to format sdb? (y/n):
Type y.
Youll now see output similar to:
umount: /dev/sdb: not mounted.
mke2fs 1.47.0 (5-feb-2023)
Discarding device blocks: done
Creating filesystem with 26214400 4k blocks and 6553600 inodes
Filesystem UUID: 73087407-c9bd-46d8-a31f-3f67bd874d5a
Superblock backups stored on blocks:

        32768, 98304, 163840, 229376, 294912, 819200, 884736, 1605632, 2654208,
        4096000, 7962624, 11239424, 20480000, 23887872

Allocatin groupe tables: done
Writing inode tables: 38/800
Writing inode tables: done
Creating journal (131072 blocks): done
Writing superblocks and filesystem accounting information: done

grep: /boot/uuid_data: No such file or directory
Extracting vManage extra-packages
vManage Extra-Package extracted to /tmp_install/extra-packages/20.18.3.1/
Eventually you’ll get the prompt again:
viptela 20.18.3 vmanage /dev/tty0

vmanage login:
Login via console or SSH (if it has an IP via DHCP) and check what interfaces are up:
vmanage# show interface | tab

                                          IF      IF      IF                                                              TCP
                AF                        ADMIN   OPER    TRACKER  ENCAP  PORT                             SPEED          MSS                 RX       TX
VPN  INTERFACE  TYPE  IP ADDRESS          STATUS  STATUS  STATUS   TYPE   TYPE     MTU  HWADDR             MBPS   DUPLEX  ADJUST  UPTIME      PACKETS  PACKETS
----------------------------------------------------------------------------------------------------------------------------------------------------------------
0    eth0       ipv4  192.168.128.130/24  Up      Up      -        null   service  -    00:50:56:ad:70:f7  1000   full    -       0:00:03:13  598      585
0    eth1       ipv4  -                   Down    Down    -        -      -        -    00:50:56:ad:3f:a9  1000   full    -       -           -        -
0    eth2       ipv4  -                   Down    Down    -        -      -        -    00:50:56:ad:fb:7e  1000   full    -       -           -        -
Next I’ll apply basic settings:
conf t
 system
  host-name manager
  system-ip 192.168.128.30
  site-id 1
  organization-name "lostintransit.se"
  vbond 172.16.0.31
 vpn 0
  interface eth0
   ip address 172.16.0.30/24
   tunnel-interface
   allow-service all
   no shut
 vpn 512
  dns 192.168.128.53 primary
  interface eth1
  ip address 192.168.128.30/24
  no shut
  ip route 0.0.0.0/0 192.168.128.1
 commit
I’m setting allow-service to all initially to not have any issues with building the control connections.
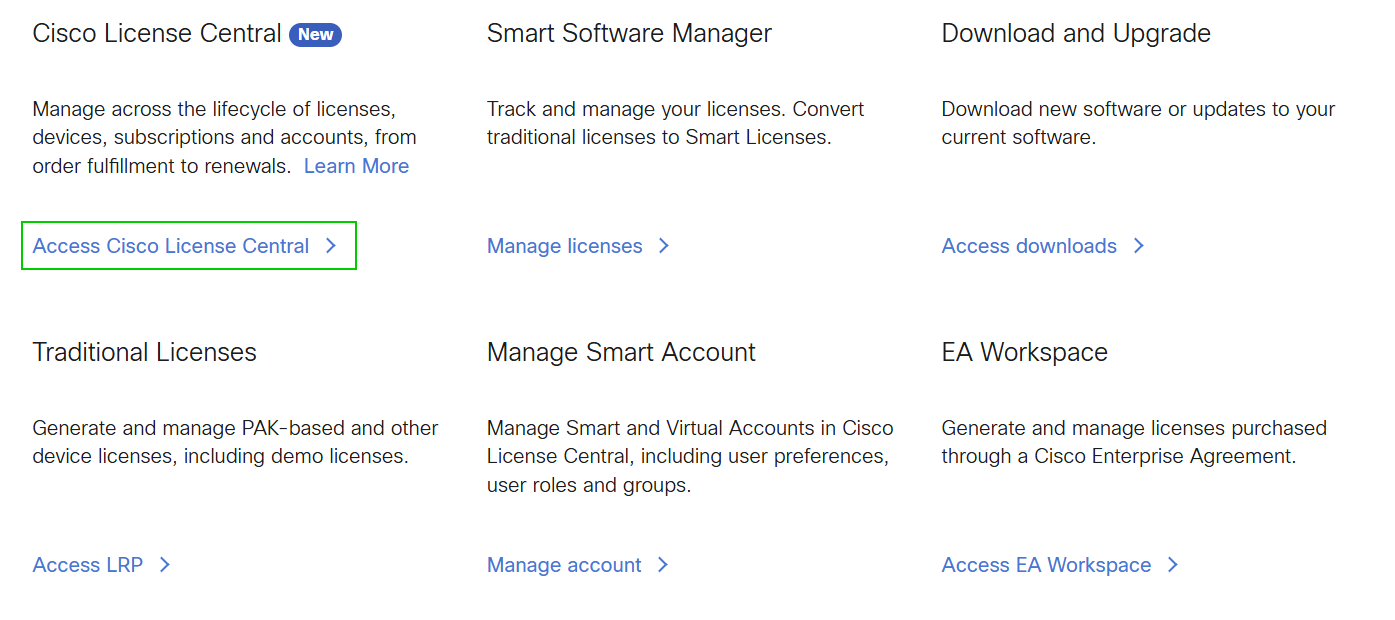
We need a Smart Account to be able to create a virtual account where we will then create our Validator profile and also generate serial numbers for our virtual routers. Got to Cisco Software Central and click Access Cisco License Central:
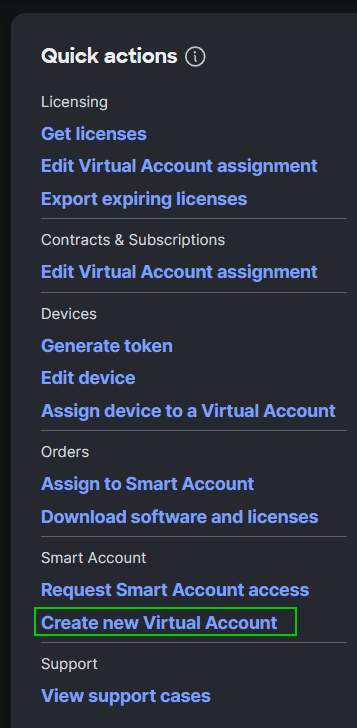
Then click Create new Virtual Account:
Give the VA a name and then click Create Virtual Account and View Details:
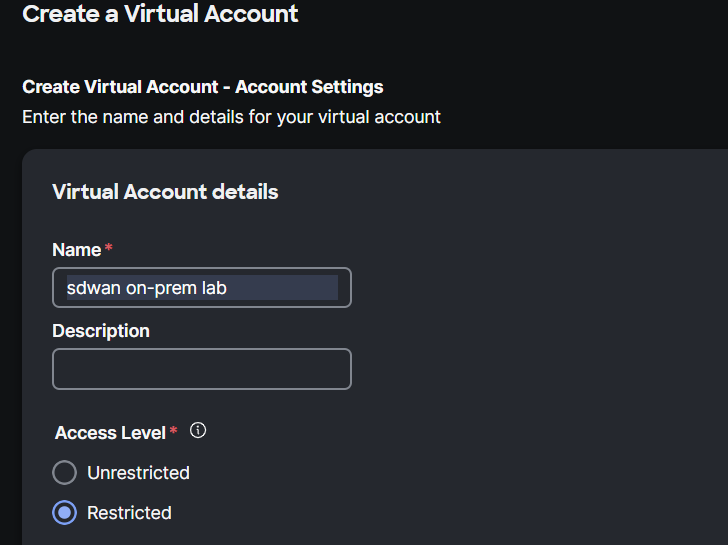
I’m setting the access level to **Restricted** as this VA should not be listed when for example working with CCW.
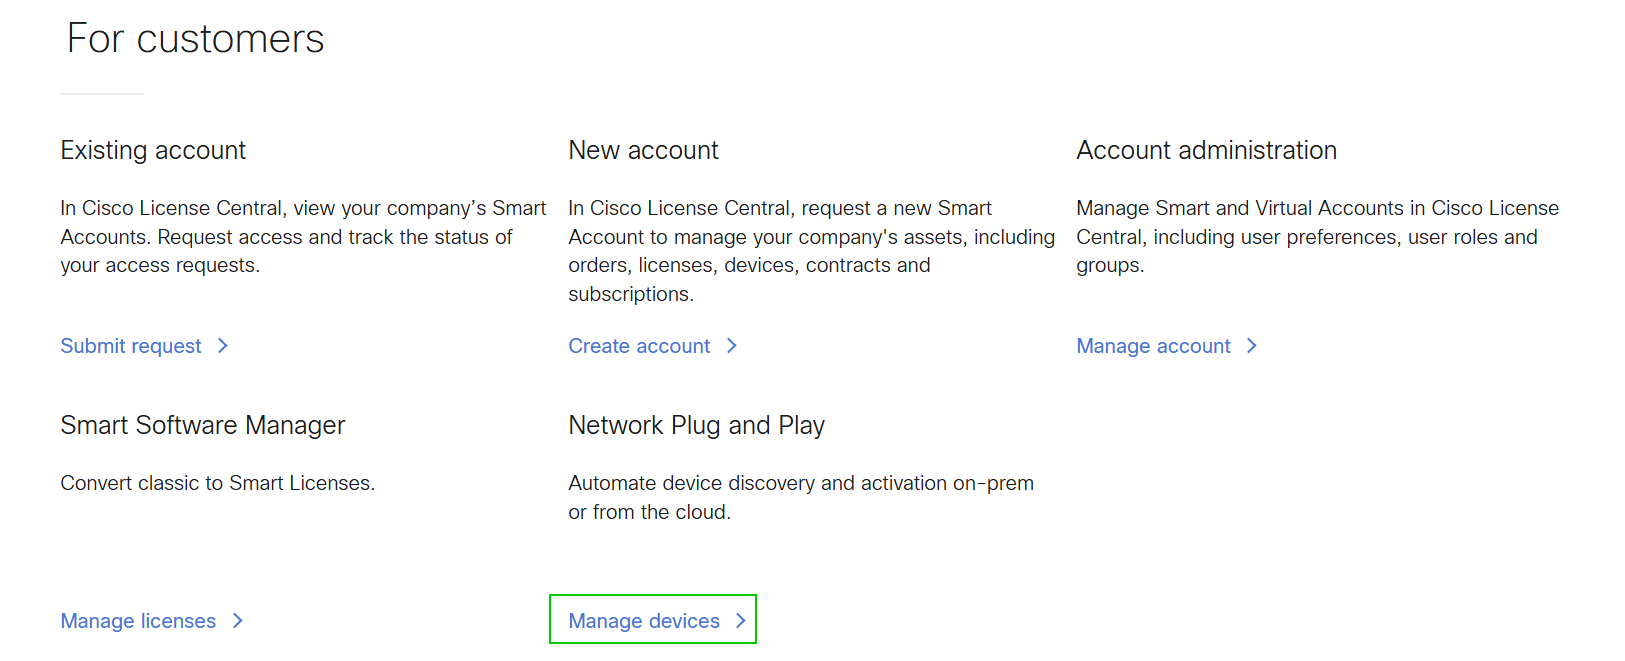
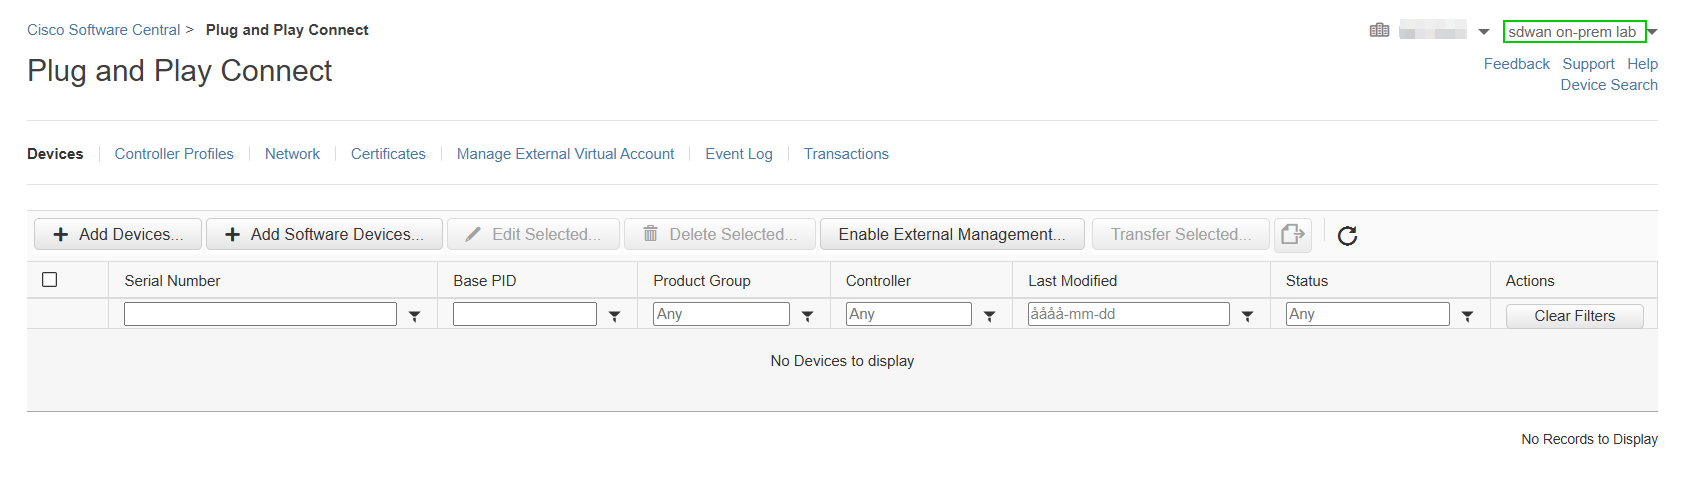
Now we need to create a PNP profile. Go to Network Plug and Play and click Manage devices:
Select the right VA:
Now click Controller Profiles and then + Add Profile…. Select VBOND as the Controller Type:

Then provide the details like the name/IP to the Validator and the organization name:
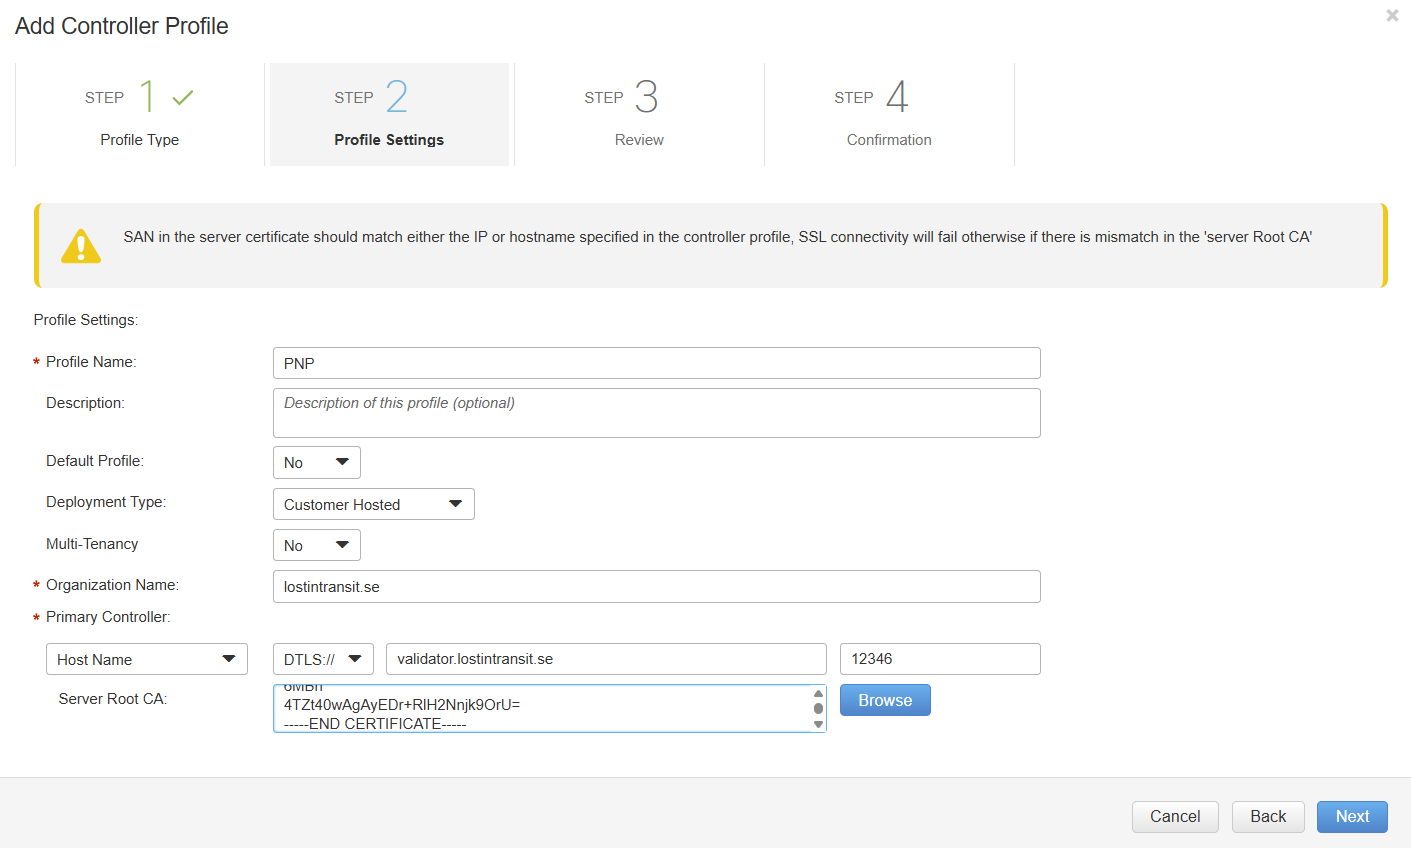
I’ve entered a FQDN for my Validator but you can also use an IP. It doesn’t matter so much if you don’t intend to have Cisco’s PNP server redirect to your Validator. I’ve also put my root CA cert chain which doesn’t really do anything for this setup since I’m not going to use it with connectivity to the internet.
Note that the organization name must match between all the controllers and the edge devices.
Click through until you get to the Review and then click Submit:

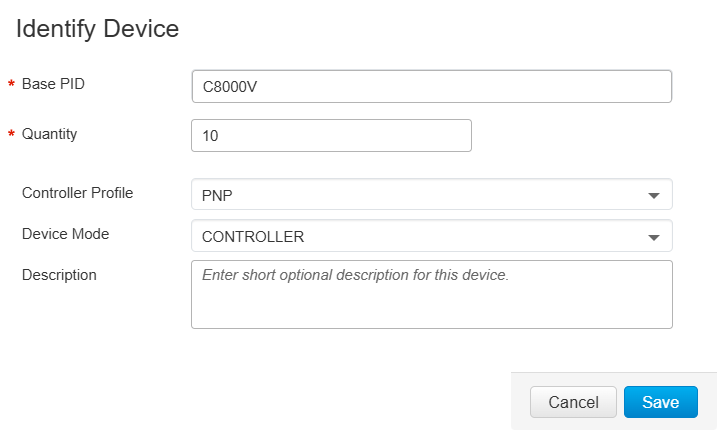
Then we need to add devices. Go to Devices and click + Add Software Devices…. Select C8000V as the PID, a quantity, and the correct controller profile and then click Save:
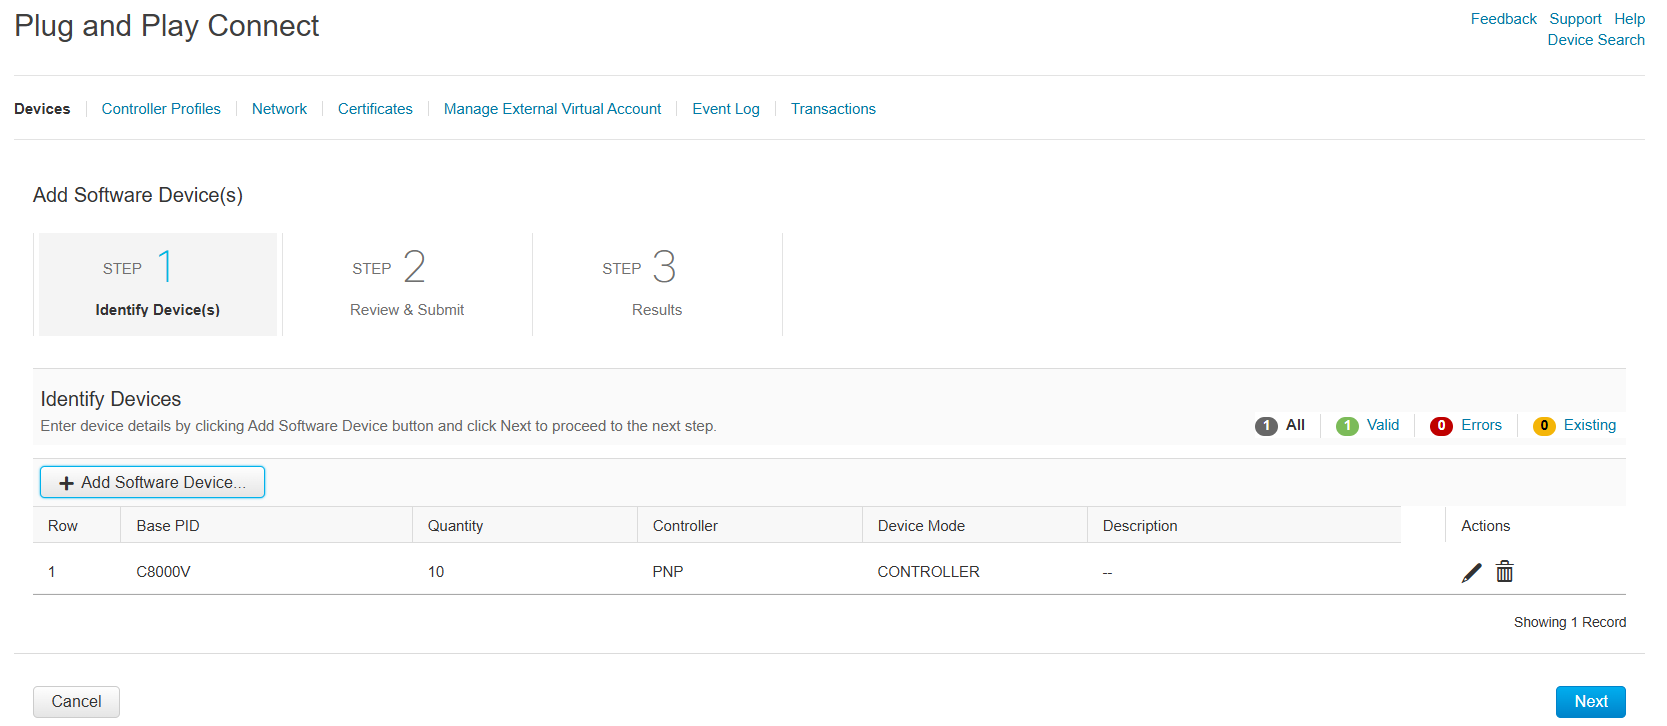
You will see something similar to the image below:
Move forward in the wizard and finally click Submit.
The devices have been added:

Now we will be doing the initial install. You will see this screen (if using same version as me):
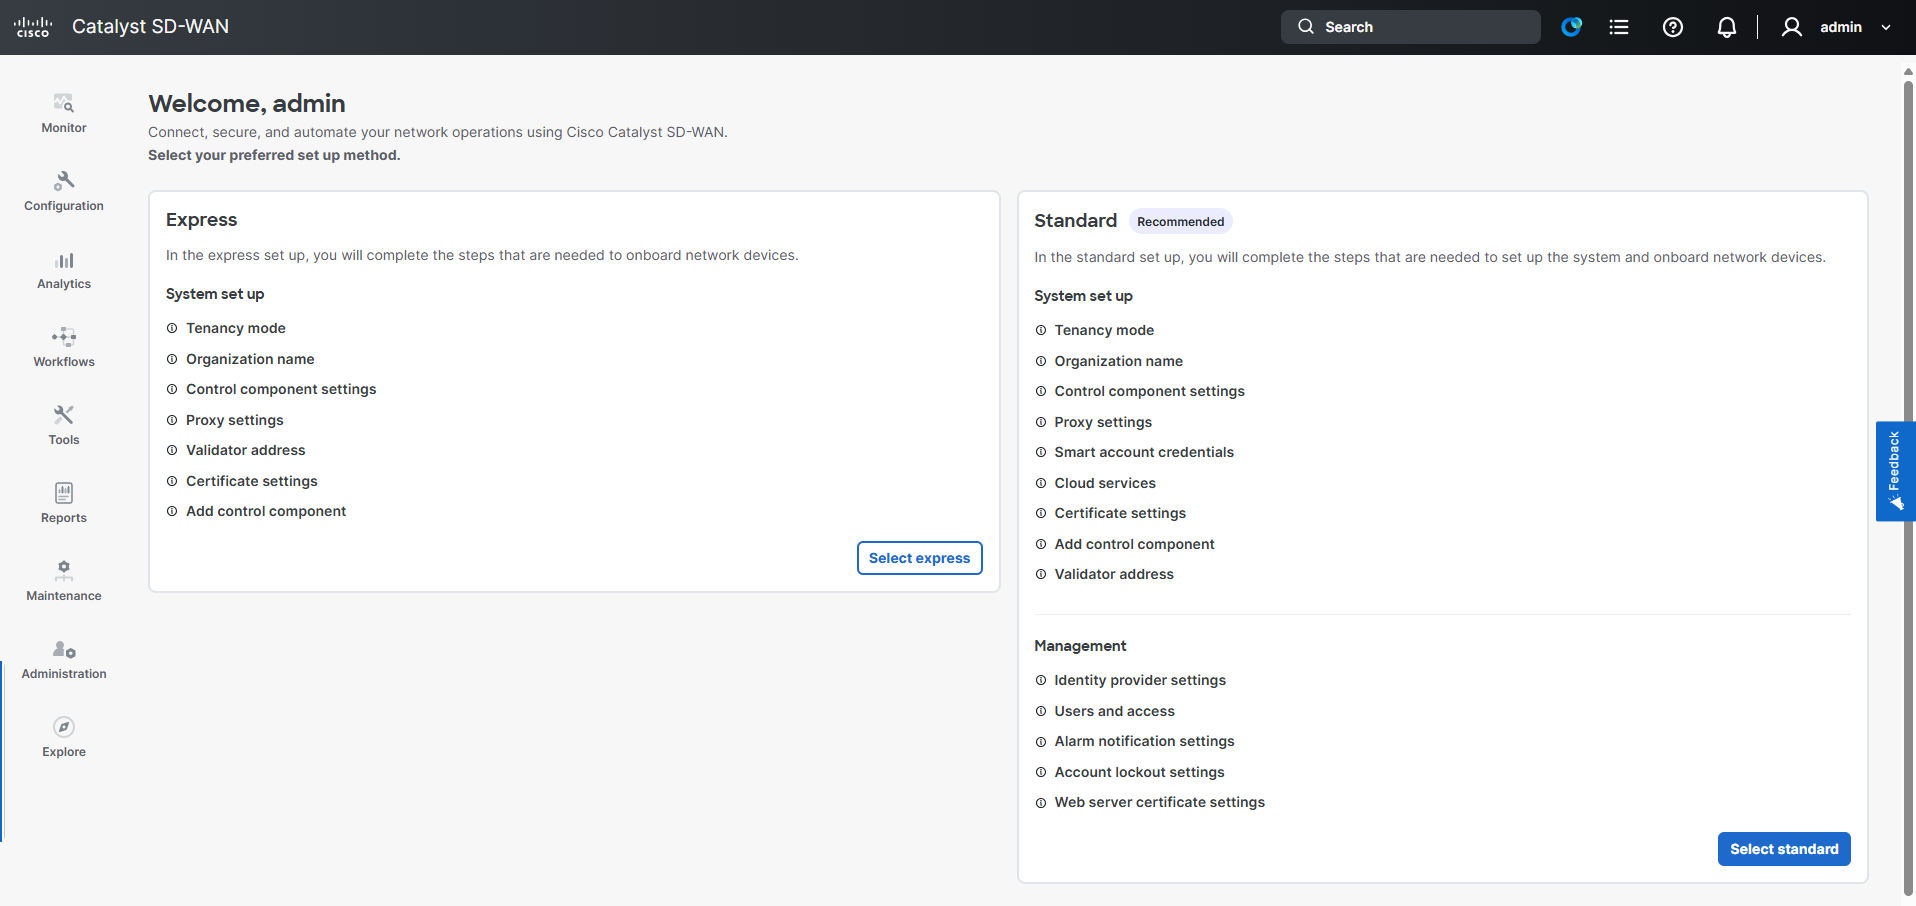
The first step is to select tenancy, select Single Tenant and then Save. Click Mark as complete to move on. This is true for all steps:
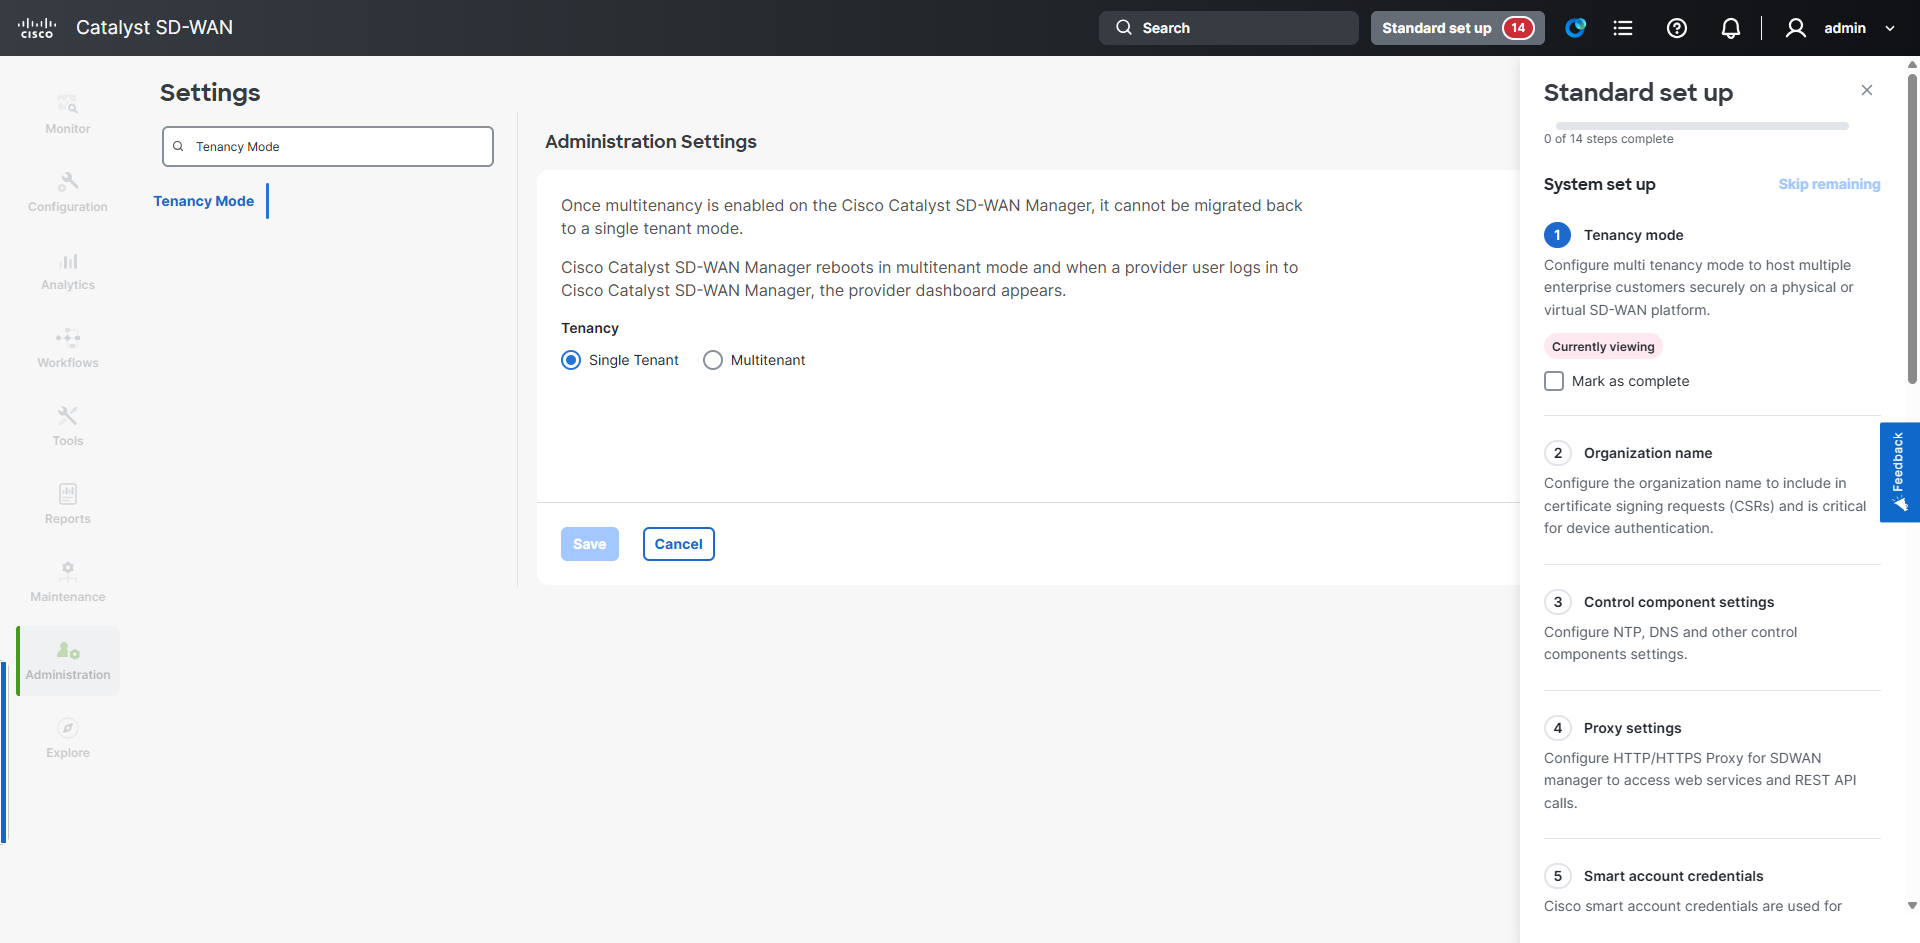
Now configure the organization name, I’m using lostintransit.se.
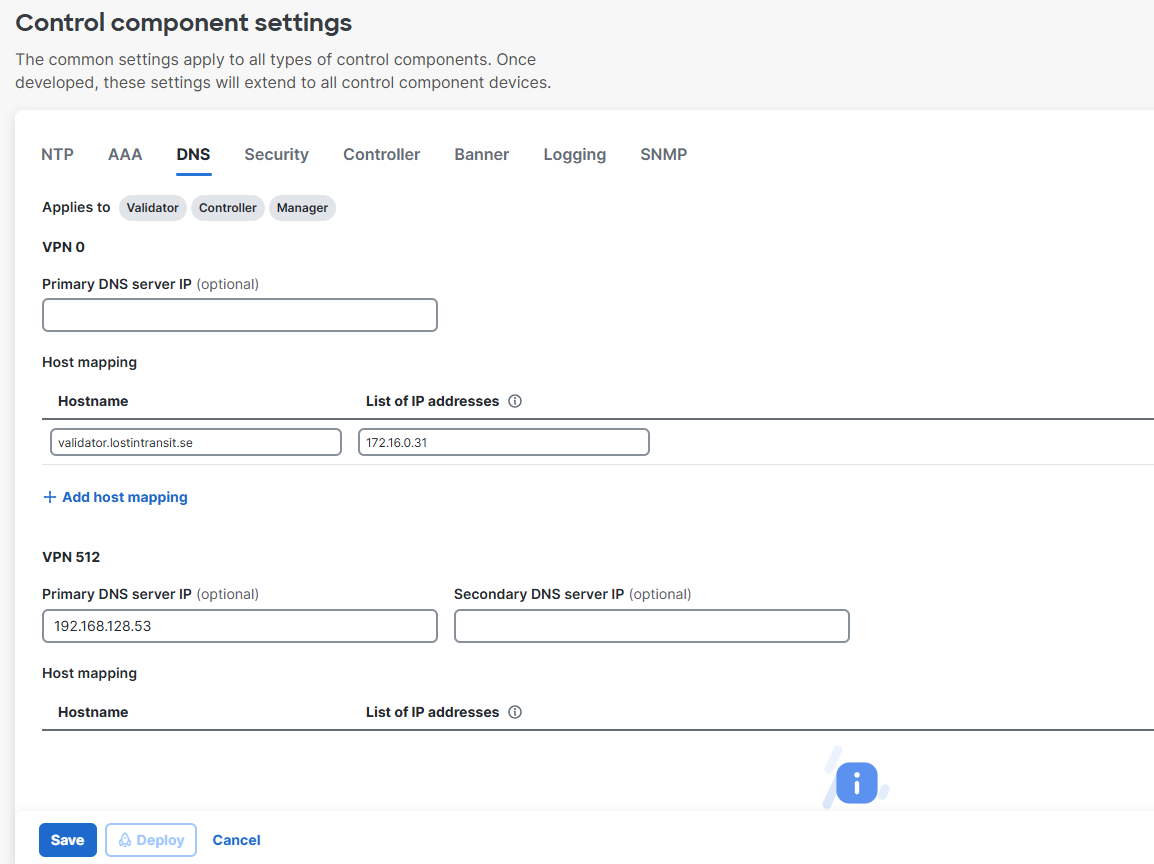
Next let’s configure control component settings. I’m adding a DNS server in VPN 512 and a static host mapping for the validator in VPN 0:
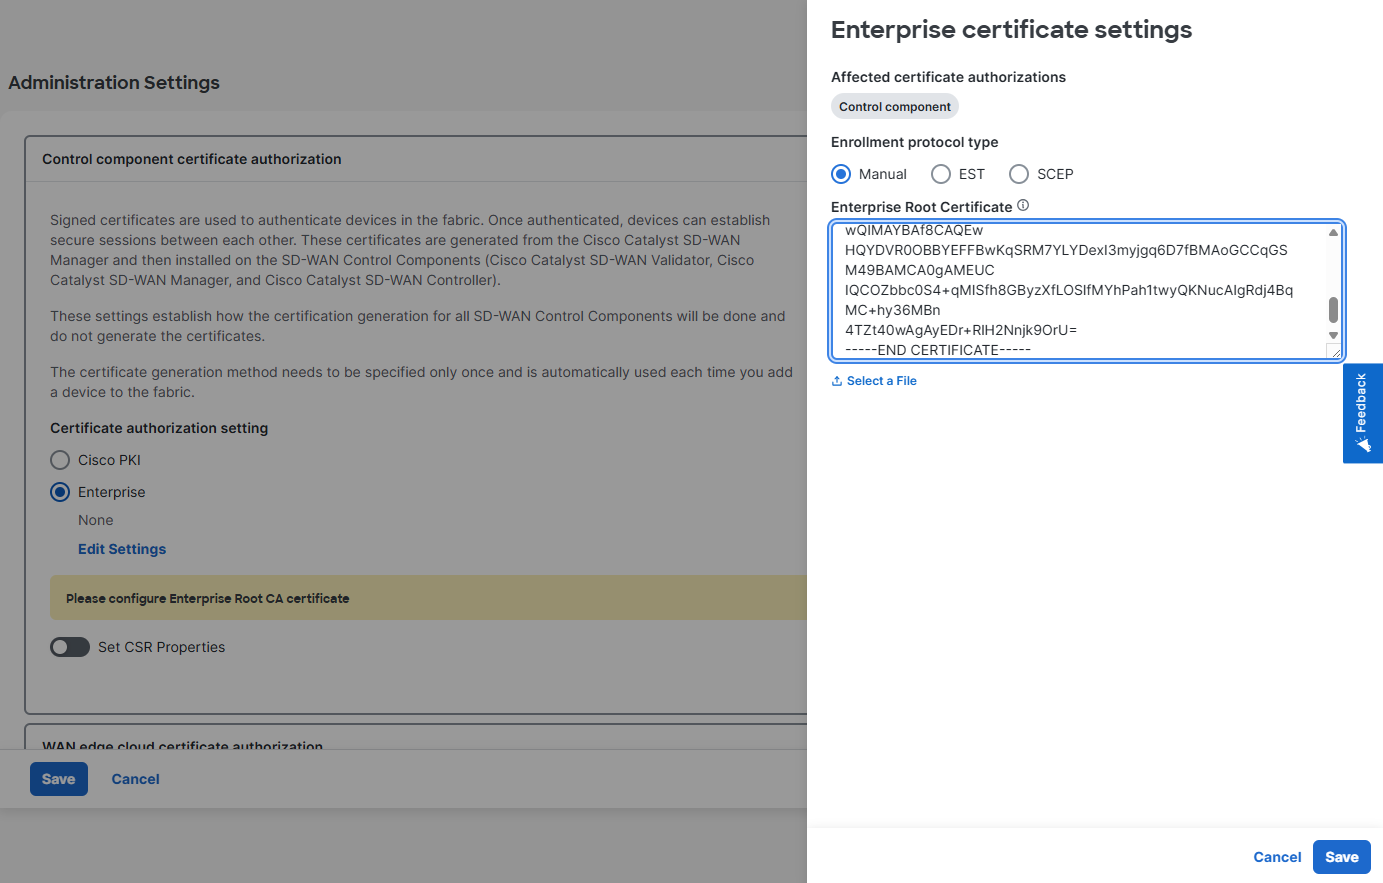
For the Certificate authorization setting I’m using Enterprise and I’m also inserting the root CA cert:
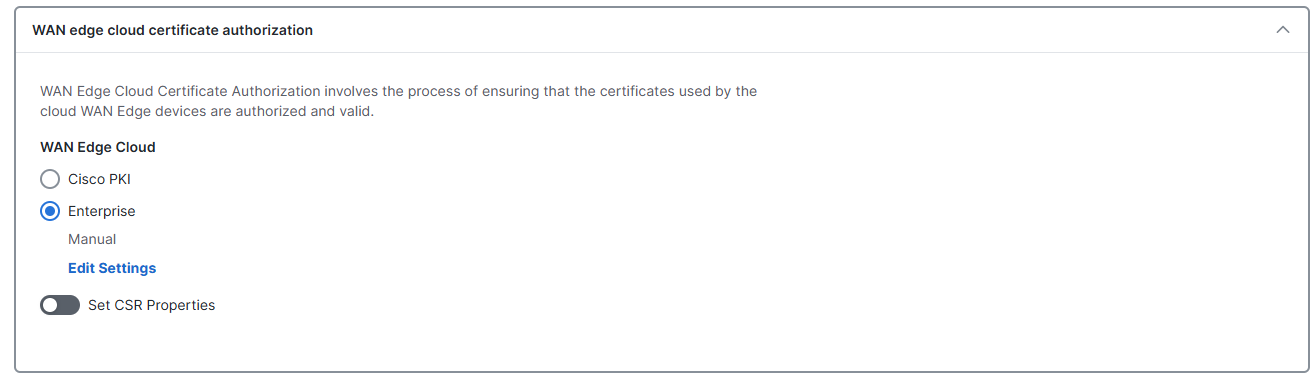
Also configure WAN edge cloud to use Enterprise CA:
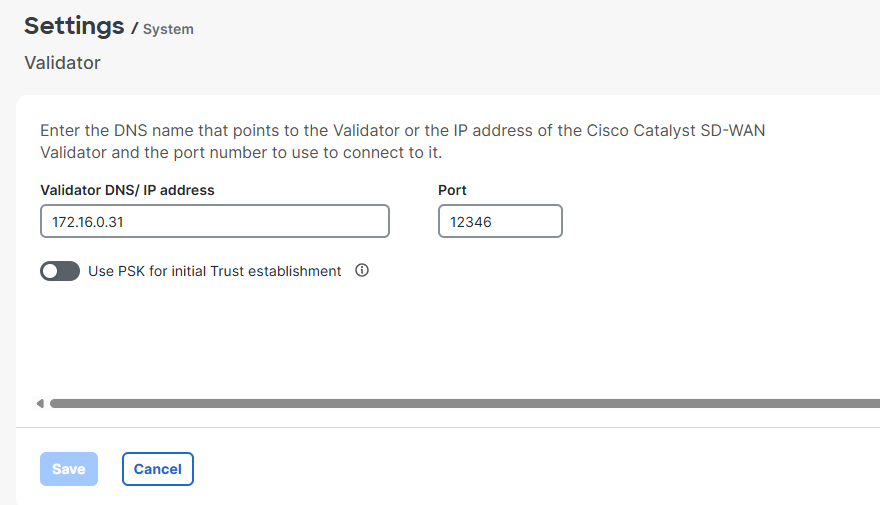
Now configure the validator to use:
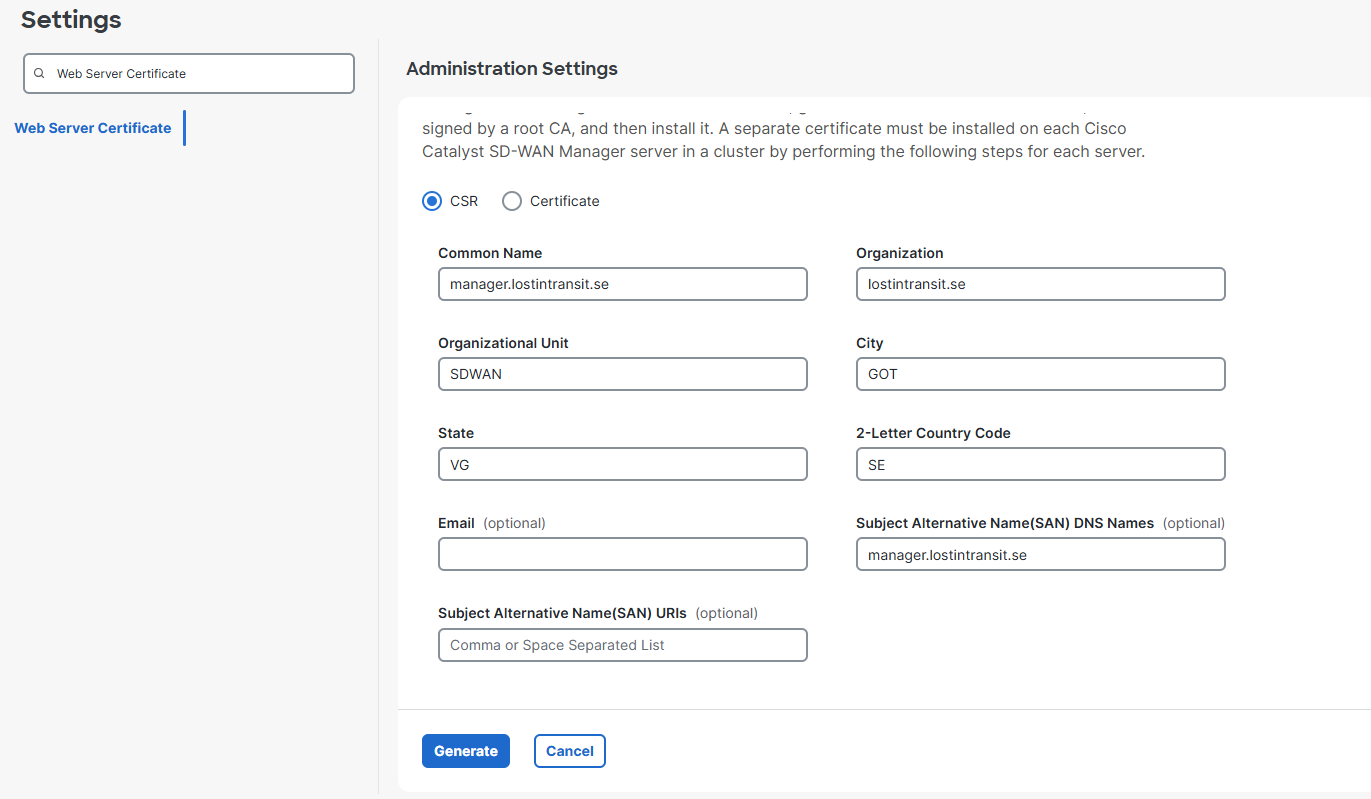
Next I’m generating a CSR for the web server certificate with the following settings:
Now I’m going to generate a web server certificate using certbot with the CSR we generated previously. I have saved the cert in my home folder in the directory cert:
sudo certbot certonly \
  --csr /home/ddib/cert/manager.csr \
  --dns-cloudflare \
  --dns-cloudflare-credentials /etc/letsencrypt/cloudflare.ini \
  --dns-cloudflare-propagation-seconds 60 \
  -d manager.lostintransit.se
Saving debug log to /var/log/letsencrypt/letsencrypt.log
Requesting a certificate for manager.lostintransit.se
Waiting 60 seconds for DNS changes to propagate

Successfully received certificate.
Certificate is saved at:            /home/ddib/cert/0000_cert.pem
Intermediate CA chain is saved at:  /home/ddib/cert/0000_chain.pem
Full certificate chain is saved at: /home/ddib/cert/0001_chain.pem
This certificate expires on 2026-09-10.

NEXT STEPS:
- Certificates created using --csr will not be renewed automatically by Certbot. You will need to renew the certificate before it expires, by running the same Certbot command again.
Then we need to combine the certificate for the manager with the intermediate:
cat 0000_cert.pem 0000_chain.pem > fullchain.pem
Import the certificate by going to Administration -> Settings -> Web Server Certificate and then clicking Import.
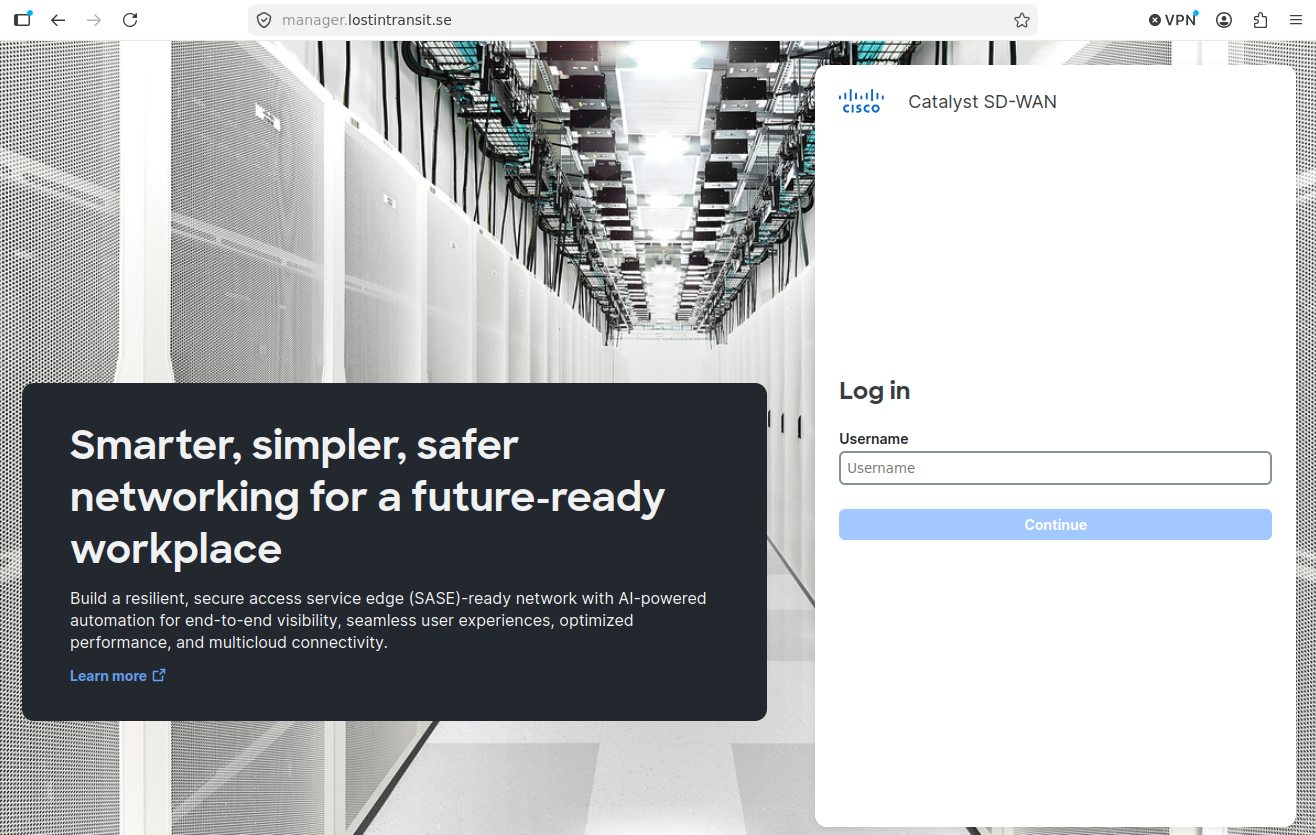
I can now access the manager using a valid certificate:
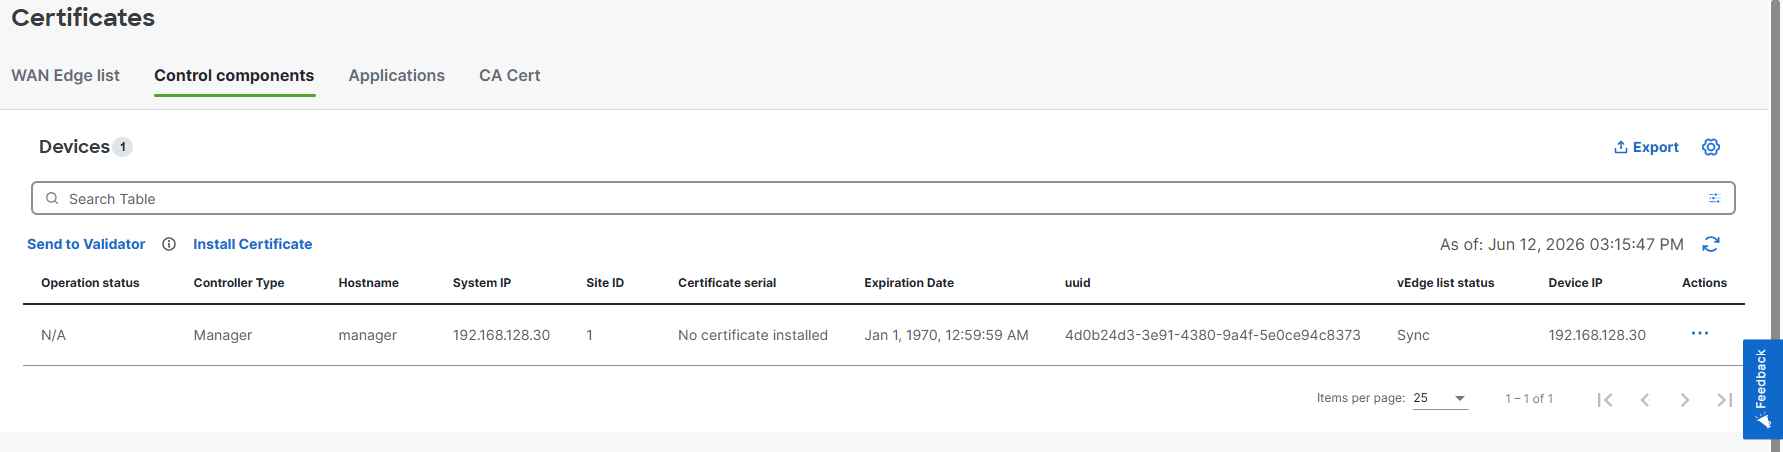
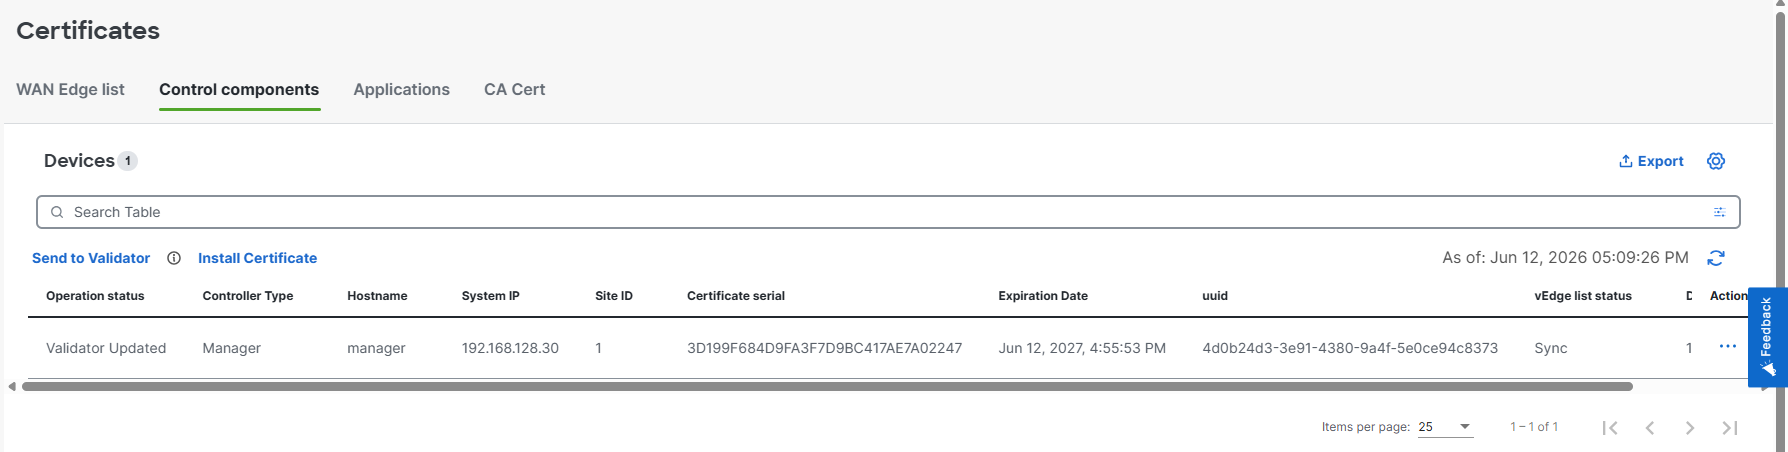
We also need to generate a controller certificate for the Manager. Go to Configuration -> Certificates -> Control Components. It looks like this currently:
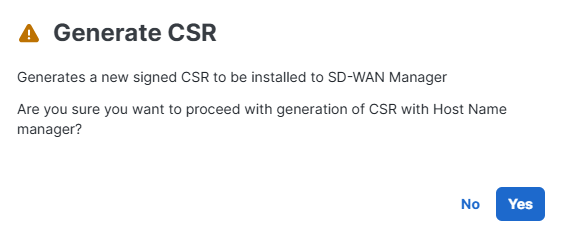
Click the three dots and then select Generate CSR and then click Yes:
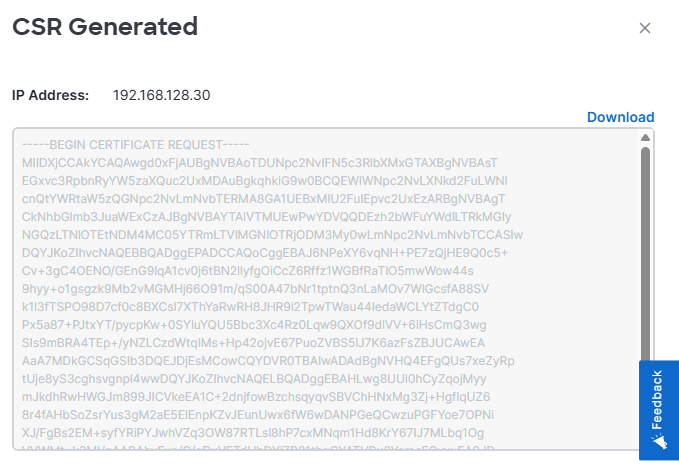
We can see and download the CSR:
Now I’m going to sign the CSR using Step CA:
sudo step ca sign \
  --ca-url https://stepca.lostintransit.se \
  --root /etc/step-ca/certs/root_ca.crt \
  --not-after 8760h \
  manager_control.txt manager_control.crt
✔ Provisioner: [email protected] (JWK) [kid: 2SLZVubh2qvHTfbyAi4dvLL0HrLm3znTdVK_1Ke94_E]
Please enter the password to decrypt the provisioner key:
✔ CA: https://stepca.lostintransit.se
✔ Certificate: manager_control.crt
We can inspect the certificate:
openssl x509 -in ~/cert/manager_control.crt -noout -text
Certificate:
    Data:
        Version: 3 (0x2)
        Serial Number:
            3d:19:9f:68:4d:9f:a3:f7:d9:bc:41:7a:e7:a0:22:47
        Signature Algorithm: ecdsa-with-SHA256
        Issuer: O = lostintransit.se, CN = lostintransit.se Intermediate CA
        Validity
            Not Before: Jun 12 14:54:53 2026 GMT
            Not After : Jun 12 14:55:53 2027 GMT
        Subject: CN = vmanage-4d0b24d3-3e91-4380-9a4f-5e0ce94c8373-0.cisco.com
        Subject Public Key Info:
            Public Key Algorithm: rsaEncryption
                Public-Key: (2048 bit)
                Modulus:
                    00:9e:8d:3d:e5:d8:ea:fa:8d:1f:e3:c4:ef:34:23:
                    1c:4f:50:d1:ce:7e:0a:ff:b7:80:2e:0e:10:d3:bf:
                    18:49:c6:f6:5a:80:d5:cb:f4:8f:ab:41:37:69:65:
                    c9:f8:0e:88:27:19:e9:17:df:cf:55:86:05:f4:5a:
                    4e:53:b9:9b:05:a8:c3:8e:2c:f6:1c:b2:fa:8d:60:
                    b2:0c:e4:f4:c6:f6:bc:c1:8c:1e:3e:ba:3b:dd:66:
                    fe:a4:b4:d0:0e:3b:6c:da:f5:b6:9b:67:43:79:cb:
                    68:c3:af:ed:69:46:72:c7:c0:f3:c4:95:93:59:77:
                    7d:34:8f:3b:df:03:ed:c7:f4:73:c0:57:0a:c9:7b:
                    5d:38:58:69:1c:11:1f:c2:47:47:d8:b6:4e:9c:13:
                    59:ab:b8:e0:87:9d:69:60:8b:62:d6:53:76:00:b4:
                    3f:1e:5a:f3:bf:8f:26:dc:58:4f:fa:72:72:92:b0:
                    fb:44:98:8a:e6:10:53:90:5b:73:75:dc:e1:1c:f4:
                    2e:ac:3d:41:73:9f:f5:d9:55:57:ee:a2:1e:c0:a6:
                    43:7c:20:48:8b:3d:98:14:40:e1:31:29:fb:fc:8d:
                    64:b0:b3:75:6b:6a:20:cb:3e:1e:9e:36:a2:3b:c4:
                    eb:b3:ee:a1:95:41:4b:99:49:ec:ae:9a:cc:5b:19:
                    04:95
                Exponent: 65537 (0x10001)
        X509v3 extensions:
            X509v3 Key Usage: critical
                Digital Signature, Key Encipherment
            X509v3 Extended Key Usage:
                TLS Web Server Authentication, TLS Web Client Authentication
            X509v3 Subject Key Identifier:
                B3:BC:5E:67:24:69:B5:48:DE:F3:24:B7:72:08:6C:BE:09:E9:97:8C
            X509v3 Authority Key Identifier:
                92:5D:76:F6:28:CE:19:62:13:3C:3A:F8:15:85:2B:10:63:1B:CC:E4
            X509v3 Subject Alternative Name:
                DNS:vmanage-4d0b24d3-3e91-4380-9a4f-5e0ce94c8373-0.cisco.com
            1.3.6.1.4.1.37476.9000.64.1:
                [email protected].+2SLZVubh2qvHTfbyAi4dvLL0HrLm3znTdVK_1Ke94_E
    Signature Algorithm: ecdsa-with-SHA256
    Signature Value:
        30:45:02:20:5d:a0:fc:8b:b3:c4:38:4e:71:51:da:3c:98:e7:
        90:49:0e:a9:72:ff:7d:eb:75:6d:fe:7b:b8:78:97:4f:74:5f:
        02:21:00:ca:47:3c:97:8a:a6:80:cf:94:f8:c0:e4:8b:a0:35:
        d4:61:d4:ad:9b:ca:9a:85:3c:9e:eb:b1:21:db:e4:21:b9
Now we will install it in the Manager. Go to Configuration -> Certificates -> Control Components** and then click **Install Certificate:
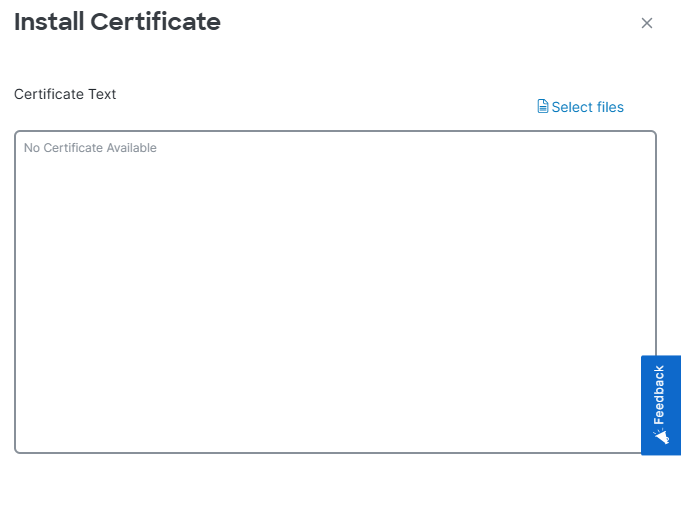
I will select my file and then click Install:

This failed to install. I then realized that Manager didn’t have the full chain of Intermediate and Root. I need to concatenate them:
sudo cat /etc/step-ca/certs/intermediate_ca.crt /etc/step-ca/certs/root_ca.crt > /tmp/chain.pem
Then upload to Manager:
scp /tmp/chain.pem [email protected]:/home/admin/
The authenticity of host '192.168.128.30 (192.168.128.30)' can't be established.
ED25519 key fingerprint is SHA256:r/8fvJziY9UpsNsFbW/UIJQA39t43bIAIiPpuIu9wCQ.
This key is not known by any other names.
Are you sure you want to continue connecting (yes/no/[fingerprint])? yes
Warning: Permanently added '192.168.128.30' (ED25519) to the list of known hosts.
([email protected]) Password:
chain.pem                                                                                                                                                                    100% 1389     2.3MB/s   00:00
Then install it:
manager# request root-cert-chain install /home/admin/chain.pem
Uploading root-ca-cert-chain via VPN 0
Copying /home/admin/chain.pem to /usr/share/viptela/root-ca.crt.tmp via VPN 0
Moving /usr/share/viptela/root-ca.crt.tmp to /usr/share/viptela/root-ca.crt via VPN 0
Updating the root certificate chain..
inotify_modify_file: setting file /etc/viptela/rootcert_reinstall to id 1781276883
send_root_ca_cert_chain_notification
Successfully installed the root certificate chain
Successfully installed the root certificate chain
Now the installation of the certificate succeeds:
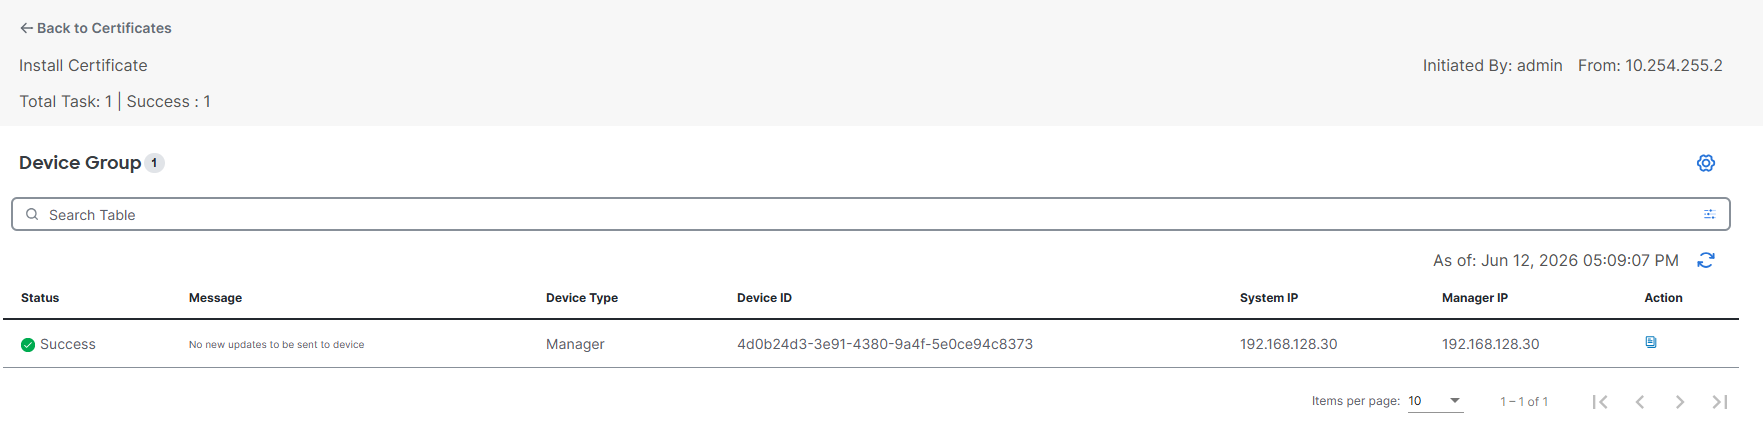
The certificate has been installed:
Now we’ll configure the Validator with this initial configuration:
conf t
 system
  host-name validator
  system-ip 192.168.128.31
  site-id 2
  organization-name "lostintransit.se"
  vbond 172.16.0.31 local
 vpn 0
  interface gi0/0
  ip address 172.16.0.31/24
  tunnel-interface
  allow-service all
  no shut
 vpn 512
  dns 192.168.128.53 primary
  interface eth0
  ip address 192.168.128.31/24
  no shut
  ip route 0.0.0.0/0 192.168.128.1
 commit
Then I upload the full chain to the Validator:
scp /tmp/chain.pem [email protected]:/home/admin/
The authenticity of host '192.168.128.31 (192.168.128.31)' can't be established.
ED25519 key fingerprint is SHA256:RVVlj3oczu7R+KIq4eFSy9rD1spxOoUAi6uOOfPiPwk.
This key is not known by any other names.
Are you sure you want to continue connecting (yes/no/[fingerprint])? yes
Warning: Permanently added '192.168.128.31' (ED25519) to the list of known hosts.
([email protected]) Password:
chain.pem
Then install it:
validator# request root-cert-chain install /home/admin/chain.pem
Uploading root-ca-cert-chain via VPN 0
Copying /home/admin/chain.pem to /usr/share/viptela/root-ca.crt.tmp via VPN 0
Moving /usr/share/viptela/root-ca.crt.tmp to /usr/share/viptela/root-ca.crt via VPN 0
Updating the root certificate chain..
inotify_modify_file: setting file /etc/viptela/rootcert_reinstall to id 1781278688
send_root_ca_cert_chain_notification
Successfully installed the root certificate chain
Successfully installed the root certificate chain
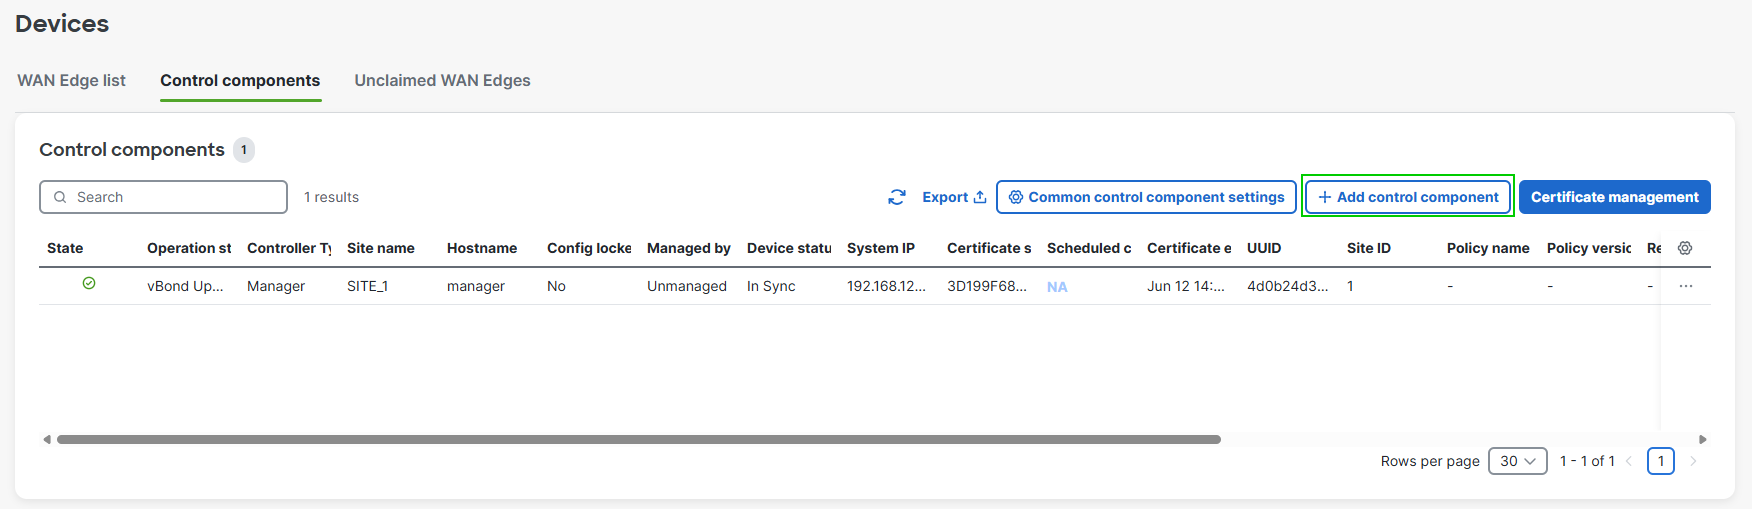
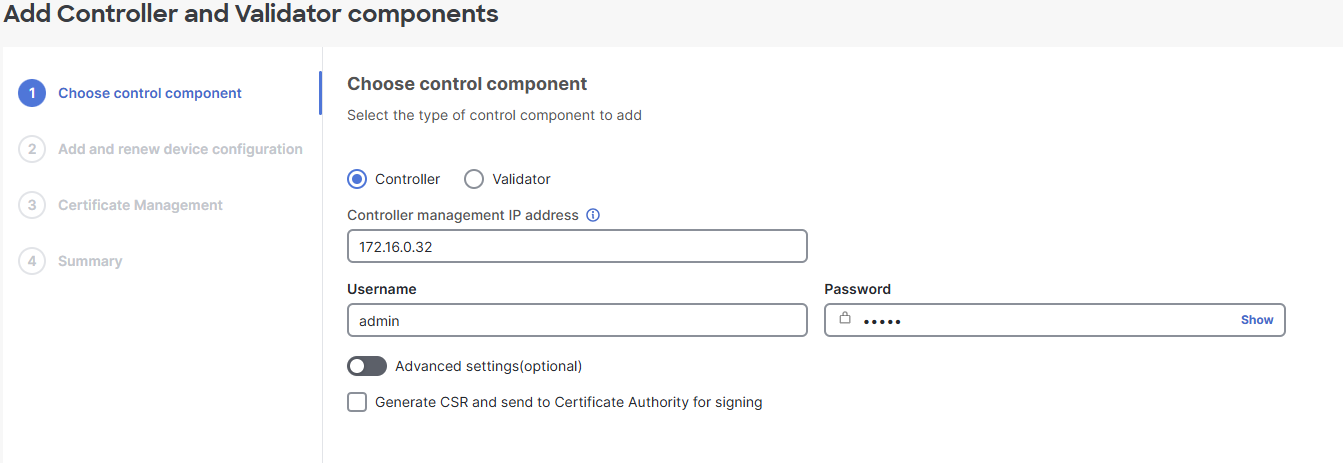
Now we are going to add the Validator in the Manager. Go to Configuration -> Devices -> Control Components and click + Add control component. Then click Let’s do it:
Enter the VPN 0 or VPN 512 IP as well as credentials. Select Validator. I won’t generate a CSR at this point:
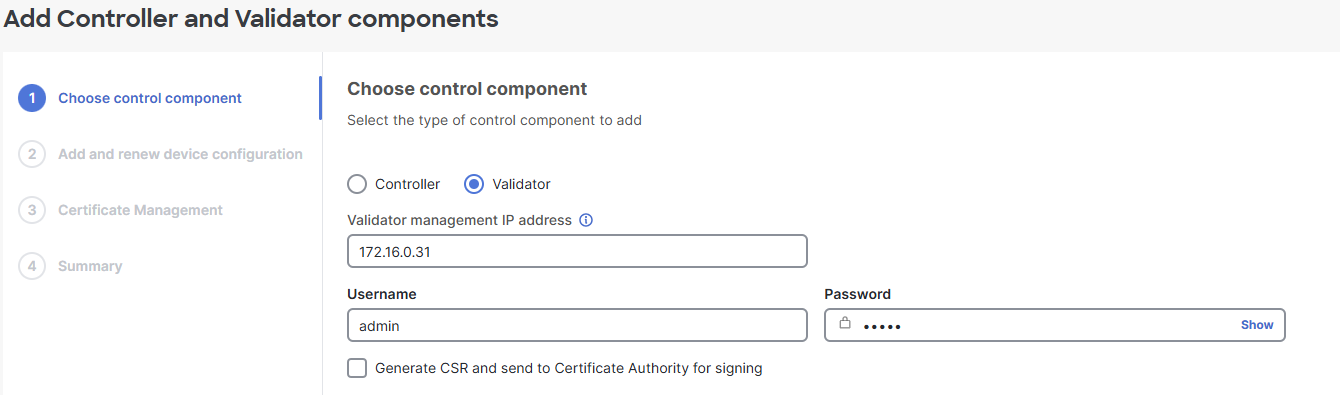
Click Next.
You can now add configuration if you want to or just review:

Click Next.
A summary is shown:
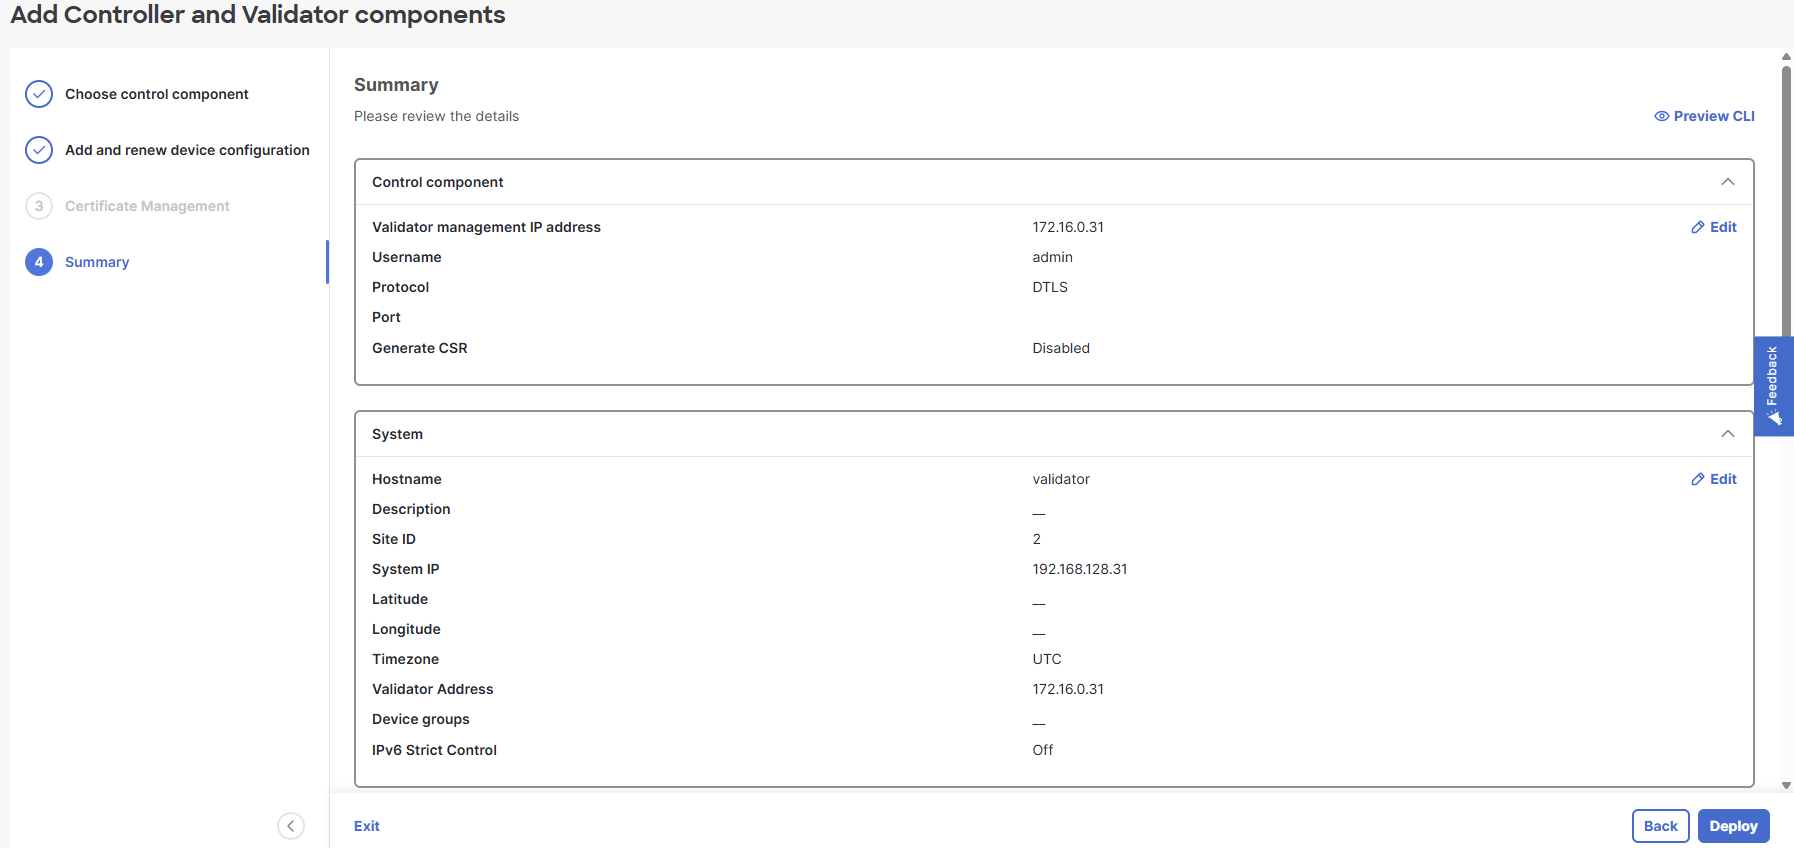
Click Deploy to add the Validator.
Next we’ll need a certificate for the Validator so we repeat the steps of generating a CSR and then signing it with Step CA (refer to Manager).
sudo step ca sign \
  --ca-url https://stepca.lostintransit.se \
  --root /etc/step-ca/certs/root_ca.crt \
  --not-after 8760h \
  validator_control.txt validator_control.crt
✔ Provisioner: [email protected] (JWK) [kid: 2SLZVubh2qvHTfbyAi4dvLL0HrLm3znTdVK_1Ke94_E]
Please enter the password to decrypt the provisioner key:
✔ CA: https://stepca.lostintransit.se
✔ Certificate: validator_control.crt
The certificate has been installed:

We can now see the control connections forming:
validator# show orchestrator connections
                                                                                     PEER                      PEER
         PEER     PEER     PEER             SITE        DOMAIN      PEER             PRIVATE  PEER             PUBLIC                                   ORGANIZATION
INSTANCE TYPE     PROTOCOL SYSTEM IP        ID          ID          PRIVATE IP       PORT     PUBLIC IP        PORT    REMOTE COLOR     STATE           NAME                    UPTIME
-----------------------------------------------------------------------------------------------------------------------------------------------------------------------------------------------
0        vmanage  dtls     192.168.128.30   1           0           172.16.0.30      12346    172.16.0.30      12346   default          up              lostintransit.se        0:00:00:44
0        vmanage  dtls     192.168.128.30   1           0           172.16.0.30      12446    172.16.0.30      12446   default          up              lostintransit.se        0:00:00:43
0        vmanage  dtls     192.168.128.30   1           0           172.16.0.30      12546    172.16.0.30      12546   default          up              lostintransit.se        0:00:00:44
0        vmanage  dtls     192.168.128.30   1           0           172.16.0.30      12646    172.16.0.30      12646   default          up              lostintransit.se        0:00:00:43
0        vmanage  dtls     192.168.128.30   1           0           172.16.0.30      12746    172.16.0.30      12746   default          up              lostintransit.se        0:00:00:44
0        vmanage  dtls     192.168.128.30   1           0           172.16.0.30      12846    172.16.0.30      12846   default          up              lostintransit.se        0:00:00:44
0        vmanage  dtls     192.168.128.30   1           0           172.16.0.30      12946    172.16.0.30      12946   default          up              lostintransit.se        0:00:00:44
1        vmanage  dtls     192.168.128.30   1           0           172.16.0.30      13046    172.16.0.30      13046   default          up              lostintransit.se        0:00:00:44
Next we’ll install the Controller. It will have the following initial configuration:
conf t
 system
  host-name controller
  system-ip 192.168.128.32
  site-id 3
  organization-name "lostintransit.se"
  vbond 172.16.0.31
 vpn 0
  interface eth0
  ip address 172.16.0.32/24
  tunnel-interface
  allow-service all
  no shut
 vpn 512
  dns 192.168.128.53 primary
  interface eth0
  ip address 192.168.128.32/24
  no shut
  ip route 0.0.0.0/0 192.168.128.1
 commit
I upload the full cert chain to the Controller:
scp /tmp/chain.pem [email protected]:/home/admin/
The authenticity of host '192.168.128.32 (192.168.128.32)' can't be established.
ED25519 key fingerprint is SHA256:p4auDWZZaLd3K8W7Tr1a5+lYe8xkNtKbUKSusp0JZqU.
This key is not known by any other names.
Are you sure you want to continue connecting (yes/no/[fingerprint])? yes
Warning: Permanently added '192.168.128.32' (ED25519) to the list of known hosts.
([email protected]) Password:
chain.pem                                                                                                                                                                    100% 1389     1.9MB/s   00:00
Then install it:
controller# request root-cert-chain install /home/admin/chain.pem
Uploading root-ca-cert-chain via VPN 0
Copying /home/admin/chain.pem to /usr/share/viptela/root-ca.crt.tmp via VPN 0
Moving /usr/share/viptela/root-ca.crt.tmp to /usr/share/viptela/root-ca.crt via VPN 0
Updating the root certificate chain..
inotify_modify_file: setting file /etc/viptela/rootcert_reinstall to id 1781323661
send_root_ca_cert_chain_notification
Successfully installed the root certificate chain
Successfully installed the root certificate chain
Then we add the Controller in the Manager, same process as before. Just select Controller instead of Validator:
We generate a CSR and then sign the certificate:
sudo step ca sign \
  --ca-url https://stepca.lostintransit.se \
  --root /etc/step-ca/certs/root_ca.crt \
  --not-after 8760h \
  controller_control.txt controller_control.crt
✔ Provisioner: [email protected] (JWK) [kid: 2SLZVubh2qvHTfbyAi4dvLL0HrLm3znTdVK_1Ke94_E]
Please enter the password to decrypt the provisioner key:
✔ CA: https://stepca.lostintransit.se
✔ Certificate: controller_control.crt
Then install the certificate.
The control connections have now been established:
controller# show control connections
                                                                                             PEER                                          PEER
      PEER    PEER PEER            SITE       DOMAIN PEER                                    PRIV  PEER                                    PUB
INDEX TYPE    PROT SYSTEM IP       ID         ID     PRIVATE IP                              PORT  PUBLIC IP                               PORT  ORGANIZATION            REMOTE COLOR     STATE UPTIME
---------------------------------------------------------------------------------------------------------------------------------------------------------------------------------------
0     vbond   dtls 192.168.128.31  0          0      172.16.0.31                             12346 172.16.0.31                             12346 lostintransit.se          default         up     0:00:01:15
0     vmanage dtls 192.168.128.30  1          0      172.16.0.30                             12346 172.16.0.30                             12346 lostintransit.se          default         up     0:00:01:14
1     vbond   dtls 192.168.128.31  0          0      172.16.0.31                             12346 172.16.0.31                             12346 lostintransit.se          default         up     0:00:01:15
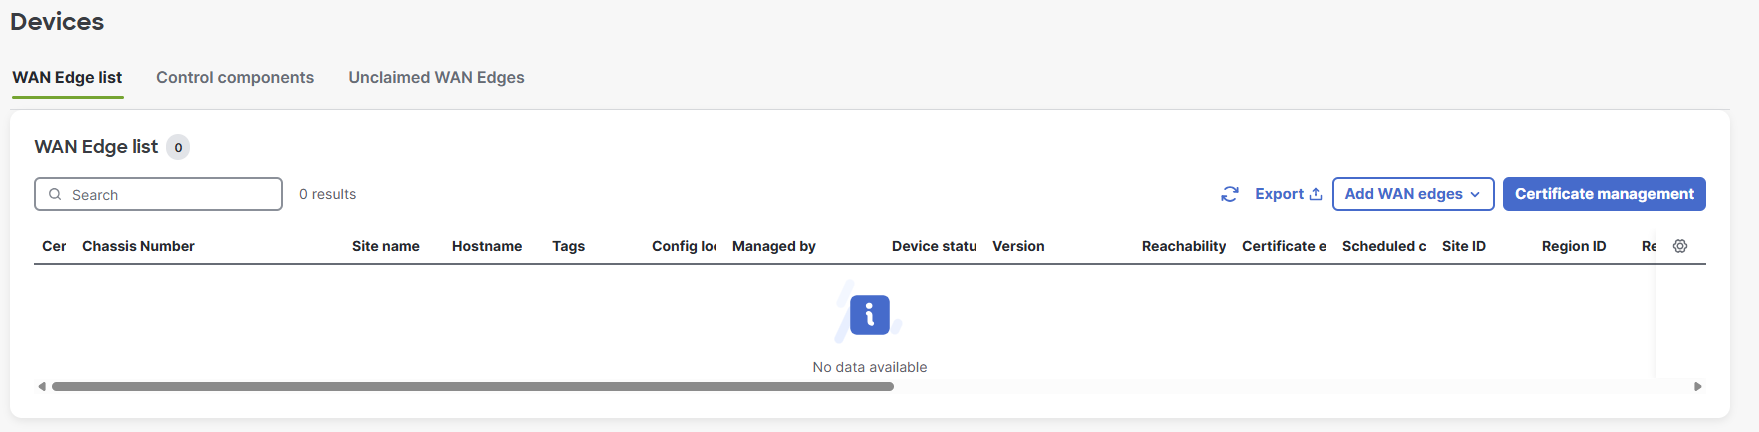
That’s all for the initial installation of the controllers. Next we’ll onboard a couple of routers just to have some data and devices to interact with. Before we can do that, we have to upload the serial file that has the serial numbers of our edge devices. Go to Configuration -> Devices -> WAN Edges. It’s currently empty:
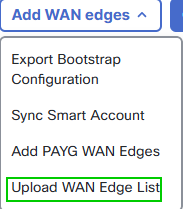
Click Add WAN edges and select Upload WAN Edge List:
I’ll select Upload file with serial numbers and select my file that I downloaded previously:
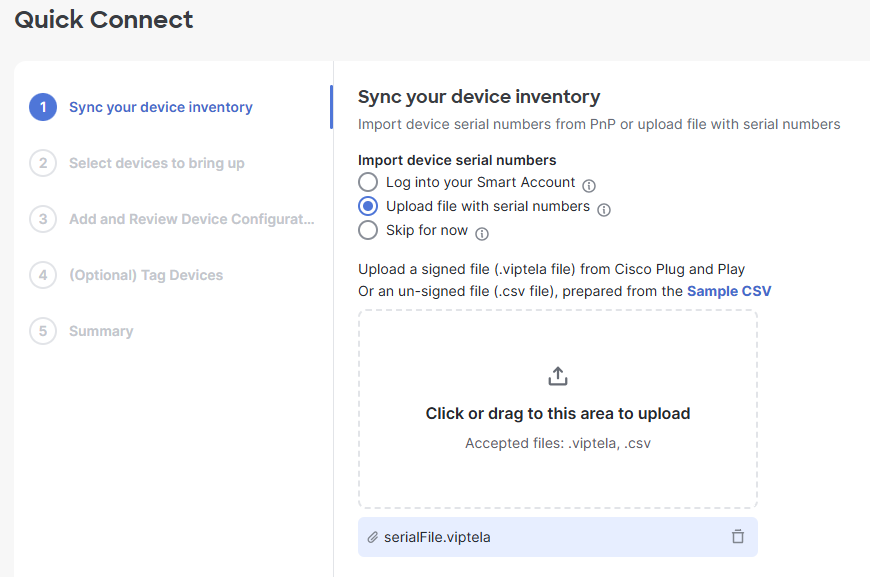
Then click **Next**.
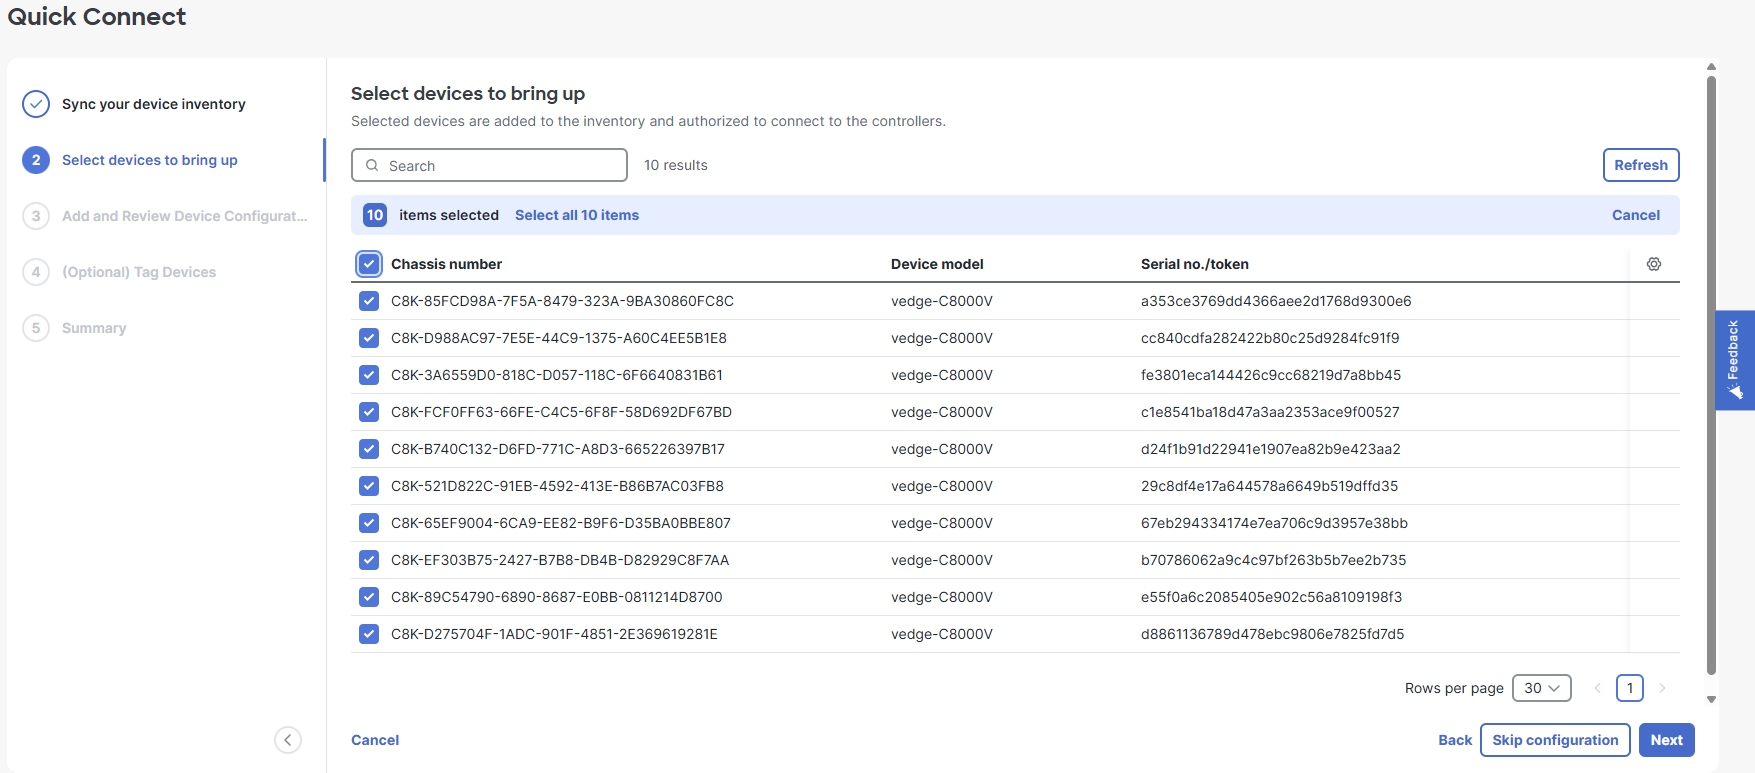
Then I’ll select all devices and click Skip configuration:
We can now see the devices at Configuration -> Devices -> WAN Edges:
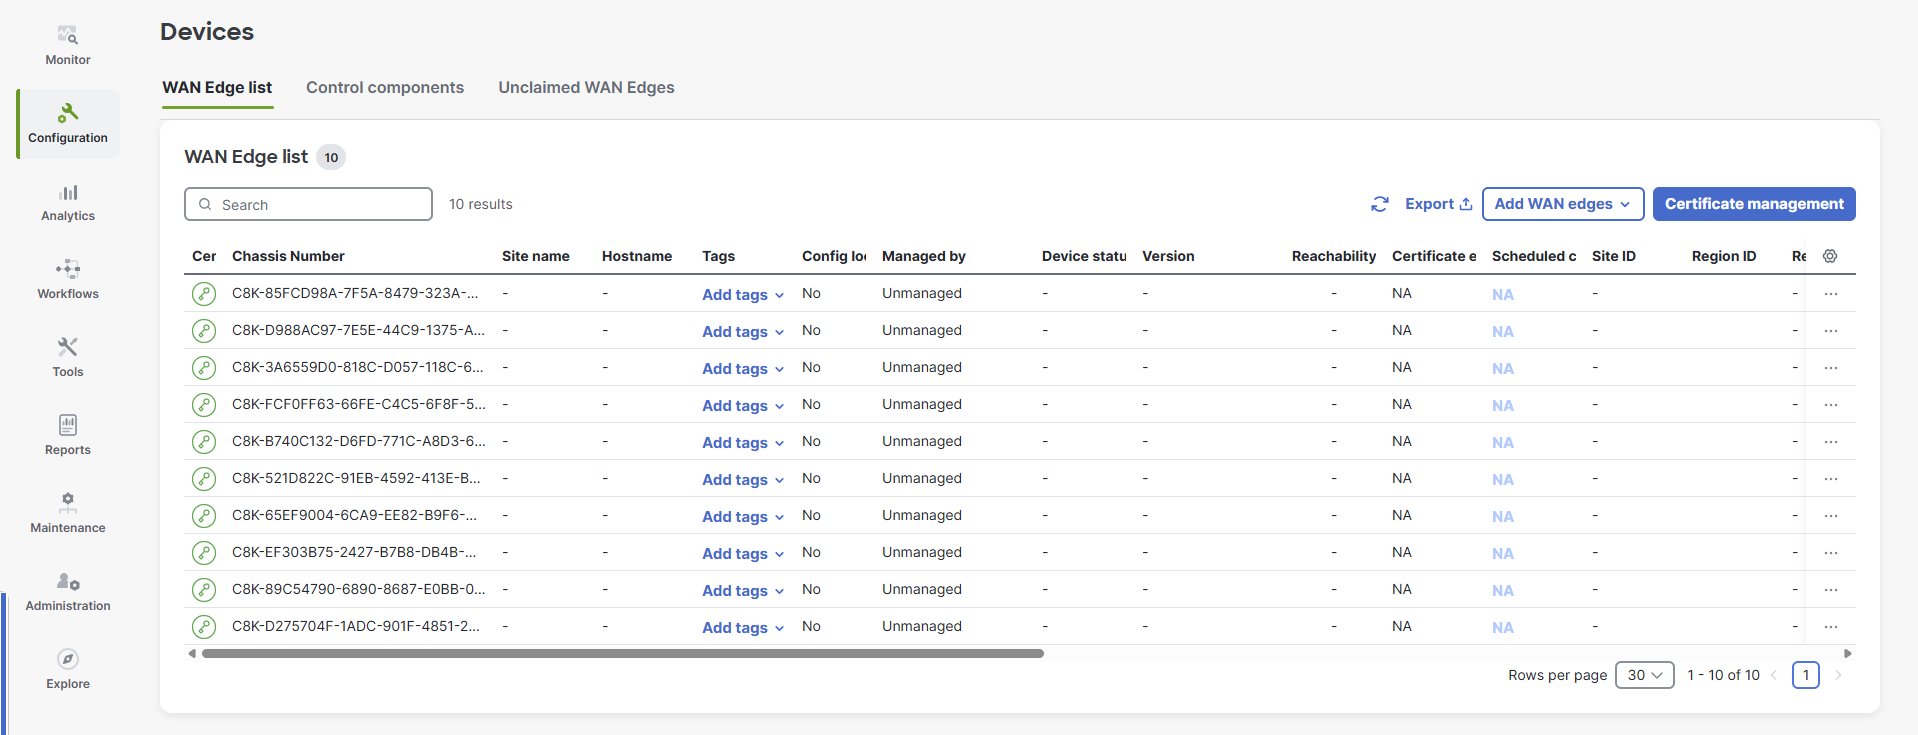
That’s it! While there are mechanisms to automate the installation of the controllers, I recommend you try it at least once manually to understand how the components work together.